Using leftover berries that are a bit too soft for snacking might seem like a kitchen defeat, but I see it as an opportunity. Those gentle, overripe fruits lend a tender moisture to muffins that often get lost with fresher berries. It’s a way to turn what seems like past-their-prime produce into something warm, inviting, and a little bit special.
This recipe is my go-to when I want a quick bake that feels like a small victory—rescuing berries and transforming them into soft, jammy bites inside a fluffy muffin. It’s honest baking, no fuss, just the kind of comfort that fills the house with a sweet berry aroma and leaves everyone asking for seconds.
Baking with imperfect berries reminds me that sometimes, the best moments come from embracing what’s a little less than perfect. These muffins are a testament to that—moist, bursting with flavor, and a little rustic. Perfect for a lazy weekend breakfast or a quick snack when you need a cozy pick-me-up.
Focusing on using leftover berries that are slightly too soft, turning what might seem like past-their-prime fruit into a tender, moist muffin that celebrates imperfect produce.
Turning Overripe Berries into Muffins
- Using slightly overripe berries feels like giving them a second chance, and I love how their jammy sweetness intensifies.
- Baking these muffins with imperfect fruit always brings back cozy memories of weekend mornings in my childhood kitchen.
- There’s a quiet pride in transforming leftovers into something warm and bursting with flavor, especially when the house fills with that fruity aroma.
- Sometimes I get a little chaotic trying to fold in the berries without overmixing—it’s all part of the charm, really.
- These muffins remind me that beauty and flavor often lie in the imperfect, and that’s what makes them feel special.
The story behind this recipe
- This recipe was born out of a lazy Sunday morning when I looked at a bowl of slightly soft berries sitting on the counter. Instead of tossing them, I thought, why not turn these into something warm and comforting? Mixing up these muffins became a little ritual—an honest attempt to rescue fruit that’s seen better days, but still holds that sweet, jammy promise inside.
- Baking with imperfect berries always sparks a nostalgic feeling—like I’m giving them a second life, one that fills the house with a warm, fruity aroma. It’s a reminder that sometimes, the best treats come from what we might overlook or forget.
- heading: ‘Turning Overripe Berries into Muffins’
Berry Muffins Trivia and Origins
- Berry muffins have roots in European baking traditions, where mixed fruit baked goods were common in rural kitchens.
- Using overripe berries in baked goods was historically a way to prevent waste before modern refrigeration and fresh markets.
- This recipe subtly echoes older practices of turning imperfect produce into comforting treats, a habit passed through generations.
Ingredient breakdown
- Fresh berries: I love the burst of tartness and sweetness they bring, especially when slightly soft. If yours are too mushy, gently fold them in to avoid turning the batter purple if you prefer a subtler hue.
- All-purpose flour: It’s my go-to for a light, tender crumb. Swap with whole wheat for more flavor and fiber, but expect a denser muffin with a nuttier bite.
- Sugar: I prefer a bit less than some recipes call for, to let the berries shine. Use brown sugar for extra moisture and caramel notes, especially if you like a richer muffin.
- Butter: I always use unsalted, melted and cooled. For a dairy-free version, coconut oil works, but it adds a subtle coconut aroma—less traditional, more tropical.
- Eggs: They give structure and moisture. To make these vegan, try flax eggs or applesauce, but note the texture will be slightly denser and softer.
- Baking powder: It’s what gives the muffins their lift. Make sure it’s fresh—old powder can lead to flat muffins that don’t rise properly.
- Lemon zest (optional): Adds a bright, zesty punch that complements the berries. Skip if you prefer a more subdued, classic berry muffin.
Spotlight on Key Ingredients
Berries:
- I love how their oozy, jammy interior becomes even more pronounced when slightly overripe. Their soft, sweet-tart burst adds a layer of depth to every bite.
- Soft, sometimes almost melting, they release juices that stain the batter a gentle purple, making each muffin look rustic and inviting. Handle gently to keep their shape.
Flour:
- It provides the muffin’s structure, absorbing moisture from the berries and egg. When fresh, it keeps the crumb tender and light, but whole wheat adds a nutty complexity if you prefer a denser bite.
- During baking, it forms the tender crumb that balances the fruit’s juiciness. A sifted, uniform flour mixture avoids dense patches and keeps things evenly textured.
Notes for ingredient swaps
- Fresh berries: I love the burst of tartness and sweetness they bring, especially when slightly soft. If yours are too mushy, gently fold them in to avoid turning the batter purple if you prefer a subtler hue.
- All-purpose flour: It’s my go-to for a light, tender crumb. Swap with whole wheat for more flavor and fiber, but expect a denser muffin with a nuttier bite.
- Sugar: I prefer a bit less than some recipes call for, to let the berries shine. Use brown sugar for extra moisture and caramel notes, especially if you like a richer muffin.
- Butter: I always use unsalted, melted and cooled. For a dairy-free version, coconut oil works, but it adds a subtle coconut aroma—less traditional, more tropical.
- Eggs: They give structure and moisture. To make these vegan, try flax eggs or applesauce, but note the texture will be slightly denser and softer.
- Baking powder: It’s what gives the muffins their lift. Make sure it’s fresh—old powder can lead to flat muffins that don’t rise properly.
- Lemon zest (optional): Adds a bright, zesty punch that complements the berries. Skip if you prefer a more subdued, classic berry muffin.
Equipment & Tools
- Mixing bowl: Combine dry and wet ingredients separately.
- Muffin tin: Holds the batter and shapes the muffins.
- Spatula: Gently fold ingredients together without deflating the batter.
- Cooling rack: Allow muffins to cool evenly and prevent sogginess.
- Oven: Bake the muffins at a steady temperature for even cooking.
Step-by-step guide to Berry Muffins
- Gather your equipment: a mixing bowl, muffin tin, spatula, and a cooling rack. Preheat your oven to 190°C (375°F).
- In the bowl, whisk together 1 ½ cups of all-purpose flour, ½ cup sugar, 1 teaspoon baking powder, and a pinch of salt. Set aside.
- Melt ½ cup unsalted butter, then let it cool slightly. In a separate small bowl, beat 2 eggs until frothy. Mix in the melted butter and 1 teaspoon vanilla extract.
- Pour the wet ingredients into the dry ingredients. Gently fold together until just combined—don’t overmix, lumps are fine.
- Carefully fold in 1 cup of leftover berries (soft, jammy ones work beautifully). If they’re very soft, fold gently to avoid purple streaks in the batter.
- Spoon the batter into a greased or lined muffin tin, filling each cup about ¾ full. Distribute remaining berries on top for a rustic look.
- Bake in the preheated oven for 20-25 minutes. The muffins are done when they turn golden and a toothpick inserted in the center comes out clean.
- Once baked, remove from oven and let the muffins cool in the tin for about 5 minutes. Transfer to a cooling rack to cool completely or serve warm.
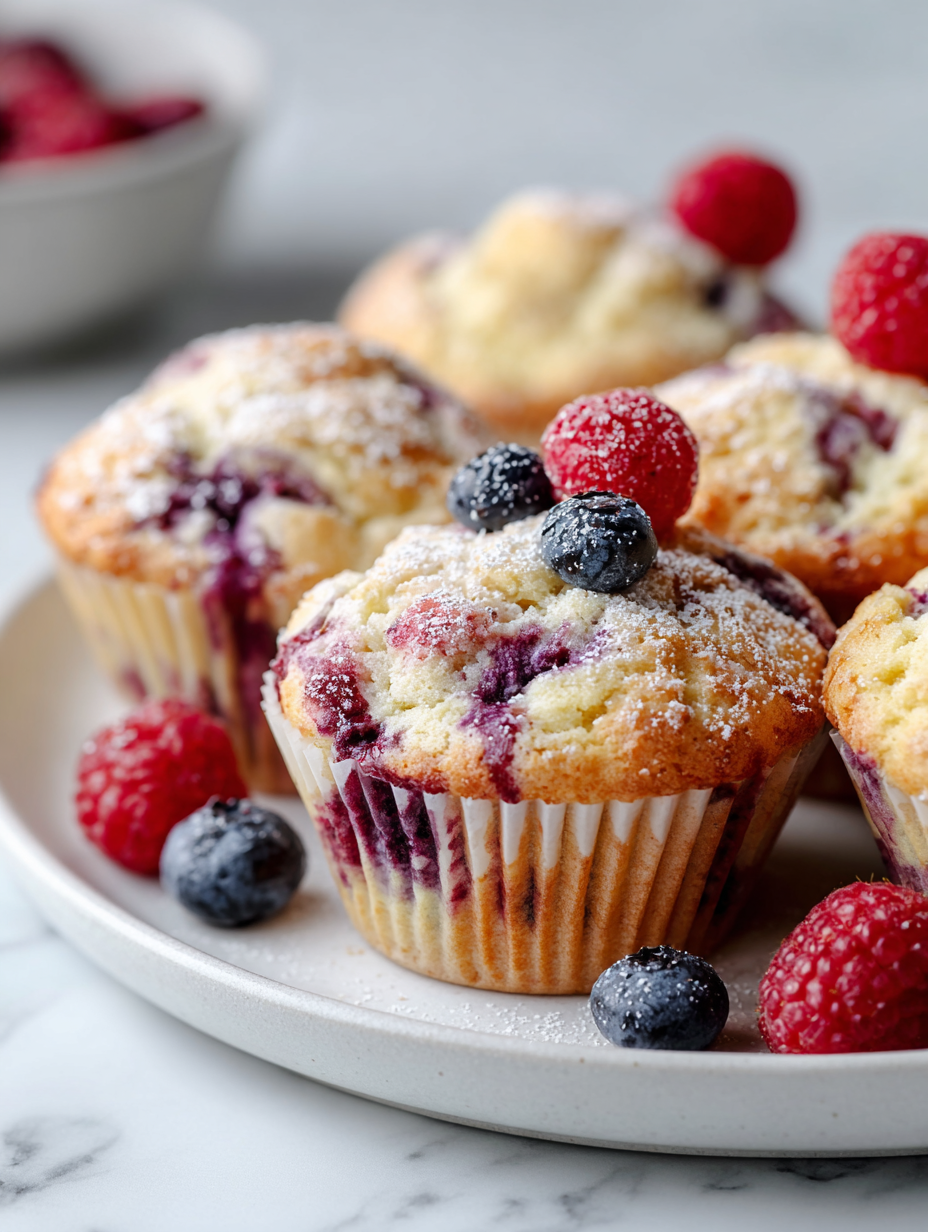
- Finish with a light dusting of powdered sugar or a dollop of yogurt if desired. Serve with a cup of tea or coffee for best enjoyment.
Let the muffins rest in the tin for 5 minutes, then transfer to a cooling rack. Serve warm or at room temperature, dusted with powdered sugar or with a smear of butter or yogurt.
How to Know It’s Done
- Golden-brown tops with a slight crackle indicate doneness.
- A toothpick inserted in the center comes out clean or with moist crumbs, not wet batter.
- Muffins feel firm but springy when gently pressed, not overly dense or overly soft.
Overripe Berry Muffins
Ingredients
Equipment
Method
- Preheat your oven to 190°C (375°F) and line a muffin tin with paper liners or lightly grease it.
- In a large bowl, whisk together the flour, sugar, baking powder, and salt until evenly combined. This creates a dry base for the batter.
- Melt the butter and let it cool slightly, then whisk it into the eggs along with the vanilla extract until the mixture is smooth and slightly frothy.
- Pour the wet mixture into the bowl of dry ingredients and gently fold together with a spatula just until no dry flour remains — be careful not to overmix, as this keeps the muffins tender.
- Gently fold in the leftover berries, taking care to preserve their jammy, soft texture and to avoid purple streaks in the batter.
- Spoon the batter into the prepared muffin tin, filling each cup about ¾ full. Add a few berries on top for a rustic look and extra flavor.
- Bake in the preheated oven for 20-25 minutes, or until the tops are golden and a toothpick inserted into the center comes out with moist crumbs.
- Remove the muffins from the oven, let them cool in the tin for 5 minutes, then transfer them to a cooling rack to cool completely or serve warm.
- Enjoy these moist, jammy berry muffins as a cozy breakfast or satisfying snack. Dust with powdered sugar or serve with yogurt if desired.
Pro tips for perfect berry muffins
- Gentle folding: Use a spatula to fold in berries softly—preserves their shape and prevents purple streaks.
- Room temp ingredients: Ensure butter and eggs are at room temperature for better mixing and a tender crumb.
- Berry distribution: Sprinkle berries with a little flour before folding—keeps them from sinking to the bottom.
- Oven preheat: Always preheat your oven to 190°C (375°F) so muffins bake evenly and rise well.
- Check for doneness: Muffins are done when the tops are golden and a toothpick comes out moist but clean.
- Avoid overmixing: Mix just until ingredients are combined—overmixing leads to dense, tough muffins.
- Cooling time: Let muffins sit in the tin for 5 minutes before transferring—this helps set the structure and prevents breakage.
Common mistakes and how to fix them
- FORGOT to check oven temperature → Use an oven thermometer for accuracy.
- DUMPED too much flour → Measure carefully to avoid dry muffins.
- OVER-TORCHED muffins → Reduce baking time or temperature slightly.
- MIXED batter too vigorously → Fold gently to keep muffins tender.
Quick Fixes and Pantry Swaps
- If berries are too soft, sprinkle with flour before folding to prevent sinking.
- Splash a little lemon juice on berries to brighten their flavor and prevent browning.
- Patch over cracks in muffin tops with a dab of batter for even baking.
- Shield muffins from over-browning by tenting with foil if they brown too quickly.
- When in doubt, rescue a burnt muffin by scraping the top and adding a fresh berry topping.
Prep, store, and reheat tips
- Prep the batter and fold in berries a day ahead; keep refrigerated for up to 24 hours—batter will develop a tangy aroma.
- Store baked muffins in an airtight container at room temperature for 1-2 days; for longer, freeze up to 3 months, wrapped tightly.
- Reheat muffins in a 180°C (350°F) oven for 5-7 minutes until warm, or microwave for 15-20 seconds—watch for that soft, steamy aroma.
- Berry flavors intensify slightly with overnight refrigeration, making the muffins even more fragrant and jammy when eaten the next day.
- For best texture, eat muffins the same day or reheat gently; avoid overexposure to heat to prevent drying out or becoming crumbly.
Top questions about Berry Muffins
1. Can I use frozen berries?
Use slightly overripe berries; they add natural sweetness and moisture. Look for soft, jammy fruits with a fragrant aroma.
2. How do I prevent berries from sinking?
Yes, just thaw and drain excess moisture first. Frozen berries release more juice, which can make the batter a little wetter.
3. What if my muffins turn purple?
Toss berries in a little flour before folding in. This helps them stay suspended in the batter during baking.
4. Can I make these gluten-free?
Use fresh berries or lightly dusted frozen berries. Mashing berries too much can stain the batter dark, but it’s okay if you like a jammy effect.
5. How do I know when the muffins are done?
Swap in a gluten-free flour blend. Expect a slightly denser muffin with a different crumb texture, but still tasty.
6. Can I add lemon zest or other flavorings?
They’re golden on top, a toothpick inserted in the center comes out moist but clean, and they feel springy to touch.
7. How long can I store these muffins?
Absolutely. Lemon zest brightens the flavor, while vanilla or a pinch of cinnamon can add cozy depth.
8. Can I freeze the batter?
Keep in an airtight container at room temp for 1-2 days, or freeze for up to 3 months. Reheat gently for best texture.
9. Why are my muffins dense and flat?
Yes, prepare the batter, then store in the fridge for up to 24 hours. Bake directly from cold, adding a few extra minutes.
10. What’s the best way to reheat muffins?
Overmixing the batter or using old baking powder can cause this. Mix just until ingredients are combined and check your leavening agents.
Baking these muffins feels like giving a little boost to overlooked berries, turning their gentle softness into something cozy and satisfying. The aroma that drifts through the house as they bake is a reminder that imperfect produce still holds a lot of charm.
There’s a quiet pleasure in pulling warm muffins from the oven, knowing they were made from leftovers and a bit of effort. They’re perfect for a lazy morning or a quick snack, and honestly, they never last long around here.

Hi, I’m Noah Bennett, the creator behind Breathing In Flavors. For me, cooking begins with a breath. Before the first bite, before the plating, before the garnish, there is that quiet moment when steam rises and you inhale. That is where flavor truly begins. Breathing In Flavors is my space to slow down, appreciate ingredients, and cook with awareness. I am so glad you’re here.
 The creator behind Breathing In Flavors.
For me, cooking begins with a breath. Before the first bite, before the plating, before the garnish, there is that quiet moment when steam rises and you inhale. That is where flavor truly begins.
Breathing In Flavors is my space to slow down, appreciate ingredients, and cook with awareness. I am so glad you’re here.
The creator behind Breathing In Flavors.
For me, cooking begins with a breath. Before the first bite, before the plating, before the garnish, there is that quiet moment when steam rises and you inhale. That is where flavor truly begins.
Breathing In Flavors is my space to slow down, appreciate ingredients, and cook with awareness. I am so glad you’re here.


