Lemon bars are one of those desserts that always feel like a little celebration—bright, tangy, and just a touch sweet. But what really makes them special for me is how the fresh lemon zest can cut through the richness of the buttery crust, almost like a burst of sunshine in every bite. I’ve always loved how a simple ingredient like lemon can elevate something so familiar into something surprisingly invigorating.
I remember making these on a rainy afternoon, the kitchen filled with that zesty, citrusy aroma that instantly lifts your mood. It’s not just about the flavor—it’s about how the lemon zest transforms the entire dessert, making it feel fresh and lively, even if the weather outside is gloomy. These bars are perfect when you need a little brightness, a little reminder that simple things can be truly delightful.
Focusing on how the brightness of fresh lemon zest can transform a simple dessert into a lively, almost invigorating treat that cuts through the richness of the buttery crust. It’s about capturing that moment when the lemon aroma hits your nose and awakens your senses, making each bite feel like a burst of sunshine, even on the gloomiest days.
The story behind this recipe
- This recipe actually came from a messy weekend baking with my grandma. She had a way of eyeballing lemon zest and just knowing when the batter was perfect. The smell of those lemons, sharp and sweet, always reminds me of lazy summer afternoons, even if it’s winter now. It’s a simple dessert, but it carries a lot of memories—those spontaneous, joyful kitchen moments that stick with you.
- One day, I was craving something bright and tangy but didn’t want to fuss with complicated pastries. I remembered her buttery crust, the zing of fresh lemon, and how those flavors felt like a little burst of sunshine. So I threw this together, improvising her secret crust recipe and adding a bit more zest for good measure. Now, it’s become my go-to when I need a bright pick-me-up, especially on days that feel a little too grey.
- heading: ‘The story behind this recipe’
Key ingredients and their quirks
- Lemon zest: I love how the bright, aromatic oils from fresh lemon zest really wake up the custard—use a microplane for the finest, most fragrant zest. Skip it, and the filling feels dull, so don’t forget that punch of citrus.
- Fresh lemon juice: Nothing beats the sharp, tangy brightness of freshly squeezed lemon juice. It’s like a lively splash that balances the sweetness—if you use bottled, it might lack that zing and aroma, so squeeze your own.
- Butter: I prefer real, unsalted butter—its rich, creamy flavor really anchors the crust. If you’re in a pinch, a good quality margarine can work, but the crust won’t have that full, buttery depth.
- Sugar: Granulated sugar is best here—its clean sweetness keeps the filling smooth and balanced. Using superfine sugar speeds up dissolving and keeps the filling silky, so don’t just grab the coarse stuff.
- Eggs: Fresh, room-temperature eggs create a smoother, more cohesive custard. If they’re cold, the mixture might seize up or cook unevenly, so warm them a little before mixing.
- Flour: A touch of all-purpose flour helps set the custard without making it dense. If you skip it, the filling might be too runny—if too much, it turns cakey, so measure carefully.
- Powdered sugar (for dusting): I love finishing with a light dusting of powdered sugar—adds a delicate sweetness and a pretty finish. Skip it if you want a more rustic look, but it really elevates the presentation.
Spotlight on key ingredients
Lemon:
- Lemon zest: I love how the bright, aromatic oils from fresh lemon zest really wake up the custard—use a microplane for the finest, most fragrant zest. Skip it, and the filling feels dull, so don’t forget that punch of citrus.
- Fresh lemon juice: Nothing beats the sharp, tangy brightness of freshly squeezed lemon juice. It’s like a lively splash that balances the sweetness—if you use bottled, it might lack that zing and aroma, so squeeze your own.
Butter & Sugar:
- Butter: I prefer real, unsalted butter—its rich, creamy flavor really anchors the crust. If you’re in a pinch, a good quality margarine can work, but the crust won’t have that full, buttery depth.
- Sugar: Granulated sugar is best here—its clean sweetness keeps the filling smooth and balanced. Using superfine sugar speeds up dissolving and keeps the filling silky, so don’t just grab the coarse stuff.
Notes for ingredient swaps
- Dairy-Free: Swap butter for coconut oil or margarine. The crust might be slightly flakier, but still tender and rich.
- Sugar Alternatives: Use honey or maple syrup in the filling. Expect a deeper, more caramelized lemon flavor with a touch of moisture.
- Gluten-Free: Replace all-purpose flour with almond flour or a gluten-free baking blend. The texture will be a bit denser but still delicious.
- Lemon Juice: If fresh lemons aren’t available, use high-quality bottled lemon juice. It’s less vibrant but still tangy enough for the filling.
- Eggs: For an egg-free version, try aquafaba or a flaxseed substitute. The filling sets differently, softer and a tad more fragile.
- Sweetener: Replace sugar with coconut sugar or stevia. The flavor will be less traditional, with a hint of caramel or a cleaner sweetness.
- Zest: Use bottled lemon zest or dried lemon peel. It won’t be as aromatic, but still imparts that citrus brightness.
Equipment & Tools
- Mixing bowls: Combine ingredients and whisk the filling.
- Pastry cutter or fingers: Work butter into dry ingredients for crust.
- 9-inch (23cm) square baking pan: Bake the crust and lemon filling.
- Parchment paper: Prevent sticking and make removal easier.
- Microplane or zester: Finely zest lemons for bright flavor.
- Juicer: Extract fresh lemon juice.
- Wire cooling rack: Cool the baked bars evenly.
Step-by-step guide to lemon bars
- Gather all ingredients and equipment. Preheat your oven to 175°C (350°F).
- For the crust, in a mixing bowl, combine 1 cup (125g) of all-purpose flour, 1/4 cup (50g) of granulated sugar, and a pinch of salt. Stir well.
- Add 1/2 cup (115g) of cold unsalted butter, cut into small pieces. Use a pastry cutter or your fingers to work it in until the mixture resembles coarse crumbs.
- Press this mixture evenly into a 9-inch (23cm) square baking pan lined with parchment paper. Bake for 15 minutes until just set and lightly golden.
- While the crust bakes, zest 2 large lemons finely, avoiding the bitter white pith. Juice the lemons to get about 1/3 cup (80ml) of fresh juice.
- In a bowl, whisk together 3 large eggs, 3/4 cup (150g) of granulated sugar, 1/4 cup (30g) of all-purpose flour, the lemon zest, and lemon juice until smooth.
- Once the crust has baked, pour the lemon filling over it, spreading evenly. Bake for another 20-25 minutes at 175°C (350°F), until the filling is set around the edges but slightly wobbly in the center.
- Check the edges for a light golden color and a gentle jiggle in the center. The filling should look glossy and slightly puffed.
- Remove from the oven and let cool in the pan on a wire rack for at least 2 hours, or until completely cooled. For best flavor, refrigerate for an additional hour.
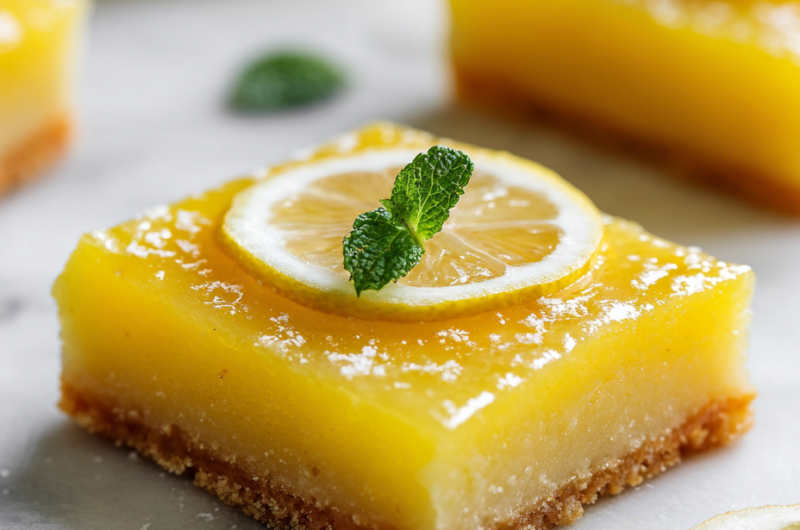
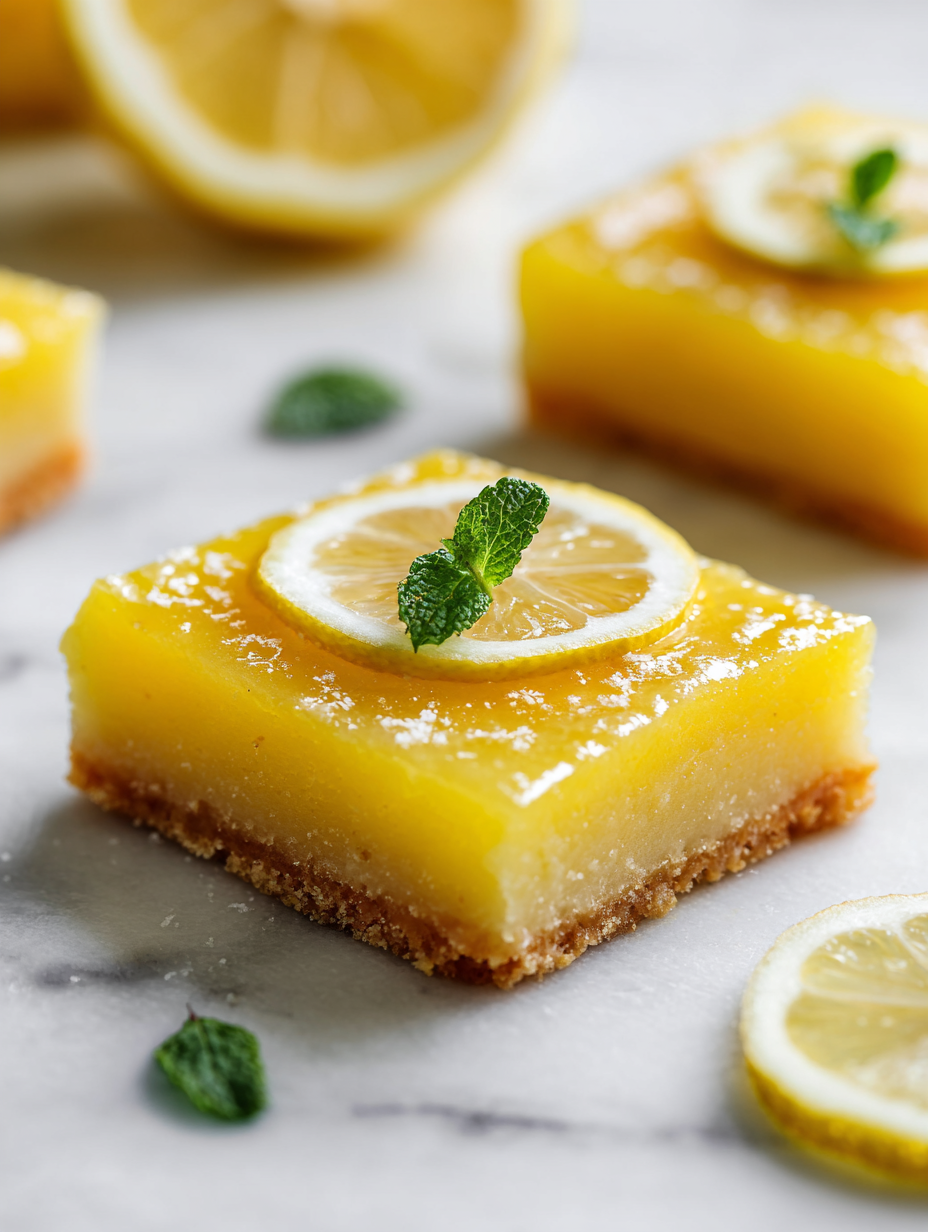
- Once cooled, dust with powdered sugar and slice into squares. Serve chilled or at room temperature, with a lemon wedge if desired.
Allow the bars to cool completely in the pan, then refrigerate for at least an hour to set fully. Dust with powdered sugar just before slicing into squares. Serve chilled or at room temperature for the best balance of tang and sweetness.
How to Know It’s Done
- Edges are golden and slightly crisp, filling is set but not cracked.
- Center jiggles gently when shaken, indicating perfect doneness.
- A faint lemon aroma wafts up, and the top looks glossy and slightly puffed.
Lemon Bars
Ingredients
Equipment
Method
- Preheat your oven to 175°C (350°F). Line a 9-inch square baking pan with parchment paper, leaving some overhang for easy removal.
- In a mixing bowl, combine 1 cup of flour, 1/4 cup of sugar, and a pinch of salt. Use a pastry cutter or your fingers to work in the cold butter until the mixture resembles coarse crumbs and looks like wet sand.
- Press this crumbly mixture evenly into the prepared pan, smoothing the top with the back of a spoon or your fingers. Bake for 15 minutes until lightly golden and just set.
- Meanwhile, finely zest both lemons using a microplane, avoiding the bitter white pith. Then, juice the lemons to gather about 1/3 cup of fresh lemon juice.
- In a separate bowl, whisk together the eggs, 3/4 cup of sugar, 1/4 cup of flour, lemon zest, and lemon juice until the mixture is smooth and slightly frothy.
- Pour the lemon custard over the pre-baked crust, spreading it out evenly with a spatula. Return to the oven and bake for an additional 20-25 minutes, until the filling is set around the edges but still slightly wobbly in the center.
- Remove from the oven and let the lemon bars cool completely in the pan on a wire rack. Once cooled, refrigerate for at least an hour to set fully.
- Dust the cooled bars generously with powdered sugar, then cut into squares. Serve chilled or at room temperature, enjoying the vibrant citrus aroma and smooth, glossy filling.
Pro tips for perfect lemon bars
- Use a microplane for lemon zest to release fragrant oils.
- Squeeze lemons just before mixing to preserve brightness.
- Work cold butter into the crust for tender, flaky texture.
- Use superfine sugar for a silky, smooth filling.
- Add lemon zest gradually to maximize citrus aroma.
- Bake until edges are golden and filling is just set—don’t overdo it.
- Chill the bars thoroughly before slicing for clean, neat pieces.
Common mistakes and how to fix them
- FORGOT to preheat the oven → Always preheat for even baking and better crusts.
- DUMPED lemon zest into filling → Add zest gradually for maximum brightness.
- OVER-TORCHED crust → Cover with foil if edges brown too quickly.
- USED cold eggs → Warm eggs slightly to prevent lumps in filling.
Quick fixes and pantry swaps
- If lemon juice is too tart, splash in a touch of honey to mellow acidity.
- When the filling cracks, gently reheat and stir to smooth out.
- Splash a bit of water on the crust if it browns too quickly, then shield with foil.
- Patch a cracked crust with extra crumbs and press gently to repair.
- Shield the edges with foil if they shimmer too dark during baking.
Prep, store, and reheat tips
- Prepare and bake the crust and lemon filling a day ahead. Cool completely, then cover tightly with plastic wrap. The bright citrus aroma will deepen overnight.
- Store the bars in an airtight container in the fridge for up to 3 days. The flavors meld and the texture firms up, making each slice even more satisfying.
- For longer storage, freeze the bars for up to a month. Wrap tightly in plastic, then foil. Thaw in the fridge or at room temperature, noticing the invigorating lemon scent as they defrost.
- Reheat slices gently in the microwave on low power (about 20 seconds) until just warm. The crust will regain a slight crisp, and the lemon custard will shimmer invitingly.
Top questions about lemon bars
1. Can I use bottled lemon juice instead of fresh?
Use fresh lemons for the brightest, most aromatic zest and juice. Bottled lemon juice lacks that lively punch.
2. How do I know when the lemon bars are done?
Bake until the edges are golden and the filling is just set but still slightly wobbly in the center. It should look glossy.
3. Should I refrigerate the lemon bars before serving?
Chill the bars in the fridge for at least an hour before slicing. This helps them set and makes cutting easier.
4. How fine should I zest the lemons?
Use a microplane to finely zest the lemons, releasing more oils and aroma. Larger zest pieces can taste bitter.
5. What if my crust gets too dark before the filling is ready?
If the crust browns too quickly, cover the edges with foil or parchment to prevent burning while the filling finishes baking.
6. Can I skip the powdered sugar topping?
Dust powdered sugar over cooled bars just before serving for a delicate sweetness and attractive finish.
7. Can I freeze lemon bars?
Yes, you can freeze the bars for up to a month, wrapping them tightly. Thaw in the fridge before serving.
8. Should eggs be cold or at room temperature?
Use room-temperature eggs to ensure a smooth, cohesive custard. Cold eggs can cause lumps or uneven cooking.
9. How can I make lemon bars dairy-free?
For a dairy-free option, substitute butter with coconut oil. Expect a slightly different texture, but still tasty.
10. Can I bake the crust and filling together at once?
Bake the crust and filling separately but in the same pan to avoid overbaking or underbaking the crust.
Making these lemon bars reminds me that simple ingredients—bright lemon zest, buttery crust—can create moments of real joy. There’s something grounding about baking something so lively and straightforward, especially when the kitchen fills with that invigorating citrus scent.
Whenever I serve them, I love watching that little smile when someone takes a bite, surprised by how fresh and vibrant a dessert can be. It’s a reminder that good things often come from honest, unpolished recipes—just like life, really.

Hi, I’m Noah Bennett, the creator behind Breathing In Flavors. For me, cooking begins with a breath. Before the first bite, before the plating, before the garnish, there is that quiet moment when steam rises and you inhale. That is where flavor truly begins. Breathing In Flavors is my space to slow down, appreciate ingredients, and cook with awareness. I am so glad you’re here.
 The creator behind Breathing In Flavors.
For me, cooking begins with a breath. Before the first bite, before the plating, before the garnish, there is that quiet moment when steam rises and you inhale. That is where flavor truly begins.
Breathing In Flavors is my space to slow down, appreciate ingredients, and cook with awareness. I am so glad you’re here.
The creator behind Breathing In Flavors.
For me, cooking begins with a breath. Before the first bite, before the plating, before the garnish, there is that quiet moment when steam rises and you inhale. That is where flavor truly begins.
Breathing In Flavors is my space to slow down, appreciate ingredients, and cook with awareness. I am so glad you’re here.


