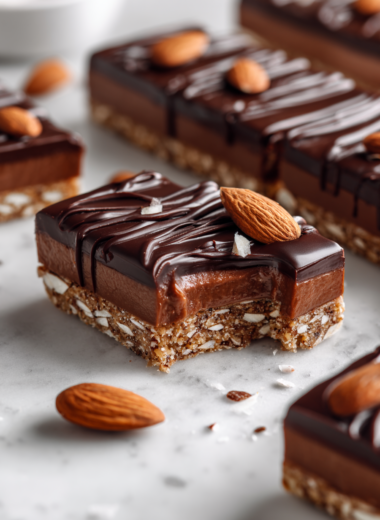
Author: Noah

  • Peanut Butter Chocolate Chip Chewy Bars Recipe

    Sometimes, I get a craving for something sweet but don’t want to fuss with layered cakes or complicated desserts. These peanut butter chocolate chip chewy bars are my go-to — honest, simple, and just the right amount of sticky, nutty, and chocolatey. I love how they come together quickly, especially when I need a quick fix after a long day.

    What really makes these bars special is how forgiving they are, even if I forget a step or tweak the ingredients slightly. It’s a no-fuss recipe that’s perfect for busy days or when I want to use up that jar of peanut butter lurking in the back of the cupboard.

    From a cook’s notes perspective, focusing on the imperfect, real-time tips for making chewy bars that stay just right.

    Why this recipe matters to me

    • I love how forgiving this recipe is, even if I forget to soften the butter.
    • The smell of peanut butter and melting chocolate baking together is pure comfort.
    • I’ve made these with chunky peanut butter, and the texture gets even more interesting.
    • Sometimes I add a handful of chopped nuts for extra crunch, and it’s a hit.
    • These bars remind me of childhood after-school snacks, simple and satisfying.

    Personal story behind the bars

    • This recipe was born from my need for a quick, reliable sweet fix that didn’t require a trip to the store or complicated steps.
    • It’s a mashup of childhood memories and my love for baking fast, comforting treats.
    • Every batch feels like a small victory, especially when I want something homemade but don’t have hours to spare.
    • It’s become a staple in my kitchen, especially during busy weeks or when friends drop by unexpectedly.

    Background and fun facts

    • Inspired by childhood snacks, these bars mimic the classic peanut butter and chocolate combo we all loved.
    • The chewy texture comes from a simple mix of ingredients that don’t require melting or tempering.
    • Adding a pinch of sea salt before baking enhances the chocolate and peanut butter flavors.
    • Using mini chocolate chips ensures even distribution and a delicate melt-in-your-mouth sensation.

    Ingredient insights and tweaks

    • Peanut Butter: I prefer creamy for smooth texture, but chunky adds crunch—try both.
    • Chocolate Chips: Semi-sweet are classic, but dark or milk chocolate also works, depending on your mood.
    • Brown Sugar: Adds moisture and depth; substitute with coconut sugar for a slightly different flavor.
    • Eggs: Bind everything together; flax eggs can be a vegan swap, but expect slightly different texture.
    • Flour: All-purpose is reliable, but whole wheat adds nuttiness and fiber—consider a blend.

    Key ingredients spotlight

    Chocolate Chips: Tiny bursts of melty, bittersweet chocolate that soften but don’t fully melt, creating pockets of gooey goodness.:

    • Peanut Butter: Creamy, rich, and oozing with nutty aroma. It melts slightly during baking, creating a luscious base.
    • It’s the flavor foundation, so quality matters—natural peanut butter delivers a deeper, roasted taste.

    Eggs: They give structure and moisture, turning the dough into a cohesive, pliable batter.:

    • Brown Sugar: Its molasses notes lend a caramel aroma that intensifies as the bars bake, making each bite more complex.
    • The moisture in brown sugar helps keep the bars chewy and tender.

    Smart ingredient swaps for different diets and preferences

    • Dairy-Free: Swap butter for coconut oil or vegan margarine for a similar richness.
    • Vegan: Use flaxseed meal mixed with water instead of eggs, but expect slightly less binding.
    • Sugar-Free: Substitute with erythritol or coconut sugar, though flavor and texture may differ.
    • Gluten-Free: Replace all-purpose flour with a blend of almond flour and gluten-free baking mix.
    • Extra Chocolate: Use chopped dark chocolate or cacao nibs for a different texture and flavor.

    Equipment & Tools

    • Mixing bowls: To combine ingredients and mix dough.
    • Rubber spatula: To fold ingredients and spread batter evenly.
    • 9×13 inch baking dish: To bake the bars in an even layer.
    • Parchment paper: To prevent sticking and for easy removal.
    • Wire cooling rack: To cool the bars evenly and prevent sogginess.

    Step-by-step guide to chewy bars

    1. Preheat your oven to 180°C (350°F). Grease a 9×13 inch baking dish or line it with parchment paper.
    2. In a large bowl, cream together 1 cup of peanut butter, 1/2 cup of softened butter, and 1 cup of brown sugar. Mix until smooth and fluffy, about 2-3 minutes.
    3. Add 2 large eggs and 1 teaspoon of vanilla extract. Mix well until combined.
    4. In a separate bowl, whisk together 2 cups of all-purpose flour, 1 teaspoon baking powder, and a pinch of salt.
    5. Gradually add the dry ingredients to the wet, mixing just until incorporated. Do not overmix, or the bars may turn dense.
    6. Stir in 1 cup of chocolate chips until evenly distributed.
    7. Pour the batter into the prepared baking dish. Smooth the top with a spatula, pressing gently to level.
    8. Bake for 20-25 minutes. The edges should be golden, and the center slightly jiggly but set.
    9. Remove from oven and let cool completely in the pan on a wire rack, about 30 minutes. This helps them firm up and makes slicing easier.
    10. Once cooled, cut into squares or rectangles. Store in an airtight container at room temperature for up to 4 days or freeze for longer storage.

    Allow the bars to cool completely in the pan before slicing. This helps them set and makes cutting cleaner. Slice with a sharp knife, wiping between cuts if needed.

    How to Know It’s Done

    • Edges are golden brown, center is set but slightly soft for maximum chew.
    • A toothpick inserted in the center comes out with moist crumbs, not wet batter.
    • Bars are firm enough to hold their shape when sliced, not crumbly.

    Peanut Butter Chocolate Chip Chewy Bars

    These peanut butter chocolate chip chewy bars are simple no-bake treats that come together quickly. The main ingredients—peanut butter, chocolate chips, and brown sugar—combine to create a sticky, nutty, and chocolatey snack with a tender, chewy texture. Perfect for satisfying sweet cravings without fuss, they are versatile and forgiving, making them ideal for busy days.
    Prep Time 10 minutes
    Cook Time 20 minutes
    Total Time 30 minutes
    Servings: 12
    Course: Main Course
    Cuisine: American
    Calories: 250

    Ingredients
      

    • 1 cup peanut butter creamy preferred
    • 1/2 cup butter softened
    • 1 cup brown sugar
    • 2 large eggs
    • 1 teaspoon vanilla extract
    • 2 cups all-purpose flour
    • 1 teaspoon baking powder
    • 0.5 teaspoon salt
    • 1 cup chocolate chips mini preferred

    Equipment

    • Mixing bowls
    • Rubber spatula
    • 9×13 inch baking dish
    • Parchment paper
    • Wire cooling rack

    Method
     

    1. Preheat your oven to 180°C (350°F) and line a 9×13 inch baking dish with parchment paper, leaving some overhang for easy removal.
    2. In a large mixing bowl, combine the peanut butter, softened butter, and brown sugar. Use a rubber spatula to mix until the mixture is smooth, creamy, and slightly fluffy, about 2-3 minutes. The mixture should be uniformly blended and fragrant.
      1 cup peanut butter
    3. Add the eggs one at a time, mixing well after each addition, then stir in the vanilla extract. The batter will become glossy and slightly thickened. This creates moisture and richness in the bars.
      1 cup peanut butter
    4. In a separate bowl, whisk together the flour, baking powder, and salt to evenly distribute the leavening and flavoring agents.
      1 cup peanut butter
    5. Gradually add the dry ingredients to the wet mixture, folding gently with the spatula until just combined. Be careful not to overmix; this keeps the bars tender. The dough will be thick and slightly sticky.
    6. Stir in the chocolate chips until evenly distributed throughout the batter. Use your spatula to fold them in gently.
      1 cup peanut butter
    7. Pour the batter into the prepared baking dish. Use the spatula to spread it evenly, pressing gently to ensure a flat, compact surface. This helps the bars bake uniformly.
    8. Bake for 20-25 minutes, until the edges are golden brown and the center is set but still slightly soft to the touch. The smell of baked chocolate and peanut butter will fill your kitchen.
    9. Remove the dish from the oven and let it cool completely on a wire rack for about 30 minutes. Cooling helps the bars firm up, making them easier to cut and preventing crumbles.
    10. Once cooled, lift the bars out of the dish using the parchment overhang. Slice into squares or rectangles with a sharp knife, wiping between cuts for clean edges. Serve and enjoy your chewy, nutty, chocolatey bars!

    Notes

    For extra flavor, sprinkle a pinch of sea salt on top before baking. You can also add chopped nuts or use chunky peanut butter for added texture.

    Pro tips for perfect chewy bars

    • Use room temperature ingredients for a smoother batter.
    • Mix just until combined to keep the bars tender.
    • Press batter firmly into the pan for even baking.
    • Add a sprinkle of sea salt on top before baking for flavor.
    • For extra chew, stir in a tablespoon of honey or maple syrup.

    Common mistakes and how to fix them

    • FORGOT TO GREASE THE PAN? Use parchment paper for easy removal.
    • DUMPED TOO MUCH FLOUR? Add a splash of milk or a bit more peanut butter to loosen the batter.
    • OVER-TOASTED CHOCOLATE? Reduce bake time by 2 minutes or cover loosely with foil.
    • CRACKED BARS? Chill fully before slicing, and wipe your knife between cuts for clean edges.

    Fast fixes for common issues

    • When bars crack while slicing, chill them an extra 10 minutes.
    • Splash a little warm water on the knife to help cut through sticky batter.
    • Patch cracks with a smear of peanut butter or melted chocolate.
    • Shield edges with a piece of parchment if they brown too quickly.
    • When in doubt, extend baking time by 2 minutes and check again.

    Make-ahead and storage tips

    • Prepare the batter ahead of time and keep refrigerated for up to 24 hours before baking.
    • Bars can be stored in an airtight container at room temperature for 3-4 days, or frozen for up to a month.
    • Refrigerating the bars slightly firms them up, making slicing easier and cleaner.
    • Reheat by warming in a 150°C (300°F) oven for 5 minutes, until just soft and fragrant.

    10 Practical Q&As about Peanut Butter Chocolate Chip Chewy Bars

    1. What size baking dish should I use?

    Use a sturdy baking dish, like 9×13 inches, for even thickness and easier cutting.

    2. How do I know when to stop mixing?

    Mix until the ingredients are just combined; over-mixing can make the bars dense.

    3. How do I tell if the bars are baked enough?

    Bake until the edges are golden and the center is set, about 20-25 minutes at 180°C (350°F).

    4. Can I cut them while they’re still warm?

    Let the bars cool completely in the pan before slicing; this helps them set and prevents crumbling.

    5. How long do these bars last?

    Store in an airtight container at room temperature for 3-4 days, or freeze for longer storage.

    6. Can I use chunky peanut butter?

    Using natural peanut butter makes the flavor richer, but it may require a slightly longer mixing time.

    7. Should I salt the top before baking?

    Add a pinch of sea salt on top before baking for a sweet-salty contrast.

    8. How can I make these bars chewier?

    To make them extra chewy, add a tablespoon of honey or a bit more brown sugar.

    9. Why should I chill the bars before slicing?

    Chill the bars in the fridge before slicing for clean cuts and a firmer texture.

    10. Can I use chopped chocolate instead of chips?

    Use mini chocolate chips for even distribution and a more delicate chocolate flavor.

    Once cooled, these bars are best enjoyed with a glass of cold milk or just on their own, feeling the chewy bite and chocolate melt on your tongue. They’re a reminder that sometimes, simple ingredients combined well can create something truly satisfying.

    Whether you’re packing them in a lunchbox or grabbing a quick snack, these chewy bars are a little bit of comfort that’s easy to whip up. No matter the season, they bring a bit of homemade joy that can brighten any day.

  • Cashew Crunch Salad Recipe

    This Cashew Crunch Salad isn’t just a salad — it’s a texture revelation. I love how the crispy, toasted nuts meet fresh, crunchy vegetables in every bite. It’s a dish that turns ordinary ingredients into something exciting, especially when you’re craving something satisfying but not heavy.

    What makes it special isn’t just the ingredients but the way each element plays with your senses. The pop of fresh herbs, the smoky nuttiness of toasted cashews, and a zingy dressing make it feel like a complete, balanced meal. It’s a reminder that sometimes, simplicity with a twist is all you need to brighten a day.

    Highlighting the unexpected crunch and texture contrast that elevates this salad from simple to memorable.

    Why this salad keeps me coming back

    • I love how the smell of toasted cashews fills the kitchen.
    • This salad reminds me of summer picnics in the park.
    • I feel proud every time I perfect the balance of crunch and freshness.
    • It’s a relief to have a quick, nutritious dish that doesn’t compromise on flavor.

    The story behind the crunch

    • I was experimenting with different textures in salads when I realized how much crunch can elevate a simple veggie mix.
    • A friend brought a similar salad to a dinner party, and it was a revelation — everyone loved it.
    • It’s become my go-to for casual weeknight dinners or last-minute get-togethers.

    A little history and fun facts about the ingredients and style

    • Cashew trees are native to Brazil but are now widely cultivated in India and Africa.
    • Toasted nuts add a smoky depth; they’re a staple in many traditional Asian and Middle Eastern dishes.
    • Crunchy salads like this gained popularity in health-conscious circles for their satisfying texture.

    Ingredient insights and tweaks

    • Cashews: I prefer raw for a softer bite, but toasted adds smoky flavor. Swap with almonds for a different nutty note.
    • Carrots: Crunchy and sweet, I like them shredded fine. You can use daikon for a milder, juicier crunch.
    • Bell peppers: Bright and juicy, their crispness boosts the salad. For a milder flavor, try yellow peppers.
    • Fresh herbs: Cilantro or parsley add brightness. Basil can be an unexpected, fragrant alternative.
    • Lemon juice: Brightens everything, making the flavors pop. Lime works beautifully in a pinch.

    Spotlight on Cashews and Fresh Herbs

    Cashews:

    • When toasted, they turn golden and fragrant, adding a smoky depth you can almost smell from across the room.
    • They stay crunchy if kept dry, but can turn soggy if stored in humid conditions. Toast just before using.

    Herbs:

    • Fresh herbs: Cilantro or parsley lift the salad with their bright, herbal notes, and they stay vibrant if added last.
    • Chop them finely to distribute flavor evenly, and avoid wilting by adding just before serving.

    Smart substitutions to suit your pantry and taste

    • Dairy-Free: Use olive oil in the dressing to keep it vegan, though it’ll have a slightly different mouthfeel.
    • Nut-Free: Substitute toasted sunflower seeds for crunch, maintaining that nutty warmth.
    • Gluten-Free: Naturally gluten-free, just check any added dressings or extras.
    • Low-Sodium: Skip the salt or use a salt substitute to keep it light.
    • Extra Bright: Swap lemon juice for a splash of vinegar for a tangier punch.

    Equipment & Tools

    • Skillet: Toast nuts evenly without oil.
    • Chef’s knife: Chop vegetables.
    • Whisk: Mix dressing.
    • Large bowl: Combine ingredients.

    Step-by-step guide to making Cashew Crunch Salad

    1. Toast the cashews in a dry skillet over medium heat, about 3-4 minutes, until golden and fragrant.
    2. While nuts toast, chop your vegetables finely: bell peppers, carrots, and thinly sliced cabbage work well.
    3. Whisk together your dressing: lemon juice, olive oil, a touch of honey or maple, salt, and pepper.
    4. Toss the chopped vegetables with half of the dressing in a large bowl.
    5. Add the toasted cashews and fresh herbs (like cilantro or parsley).
    6. Drizzle with the remaining dressing and toss gently.
    7. Serve immediately for maximum crunch, or store separately for later.
    8. Rest the salad for 5 minutes before serving to let flavors meld.

    Toss everything just before serving, and let sit for 5 minutes if time allows.

    How to Know It’s Done

    • Cashews: golden and fragrant, not burnt.
    • Vegetables: vibrant, with crisp edges and fresh aroma.
    • Dressing: well-emulsified, shiny, with a bright lemon scent.

    Cashew Crunch Salad

    This Cashew Crunch Salad features a mix of fresh, crunchy vegetables tossed with toasted cashews, creating a delightful texture contrast. The salad is dressed in a bright, zingy lemon vinaigrette that enhances the nutty and herbal flavors, resulting in a vibrant and satisfying dish with a crispy finish. Perfect for a quick, nourishing meal or a lively side, it elevates simple ingredients into a memorable experience.
    Prep Time 10 minutes
    Cook Time 5 minutes
    Total Time 15 minutes
    Servings: 4
    Course: Main Course
    Cuisine: Healthy
    Calories: 220

    Ingredients
      

    • 1 cup cashew nuts raw or lightly toasted
    • 2 medium carrots shredded finely
    • 1 bell pepper any color, thinly sliced
    • 1/2 small cabbage shredded
    • 1/4 cup fresh herbs cilantro or parsley, chopped
    • 3 tablespoons lemon juice
    • 2 tablespoons olive oil
    • 1 teaspoon honey or maple syrup
    • to taste salt and pepper

    Equipment

    • Skillet
    • Chef’s knife
    • Whisk
    • Large bowl

    Method
     

    1. Place the cashew nuts in a dry skillet over medium heat. Toast, stirring frequently, for about 3-4 minutes until they turn golden and fragrant—this fills the kitchen with a warm, nutty aroma. Remove from heat and set aside.
    2. Meanwhile, finely shred the carrots, thinly slice the bell pepper, and shred the cabbage. Combine all these vegetables in a large mixing bowl for a vibrant, textured base.
    3. In a small bowl, whisk together the lemon juice, olive oil, honey or maple syrup, salt, and pepper until the dressing is well emulsified and shiny. The dressing should smell fresh and look slightly thickened.
    4. Pour half of the dressing over the chopped vegetables and toss gently to coat everything evenly. This helps the flavors meld and keeps the vegetables crisp.
    5. Break the toasted cashews into smaller pieces and sprinkle them over the salad along with the chopped fresh herbs. Their crunch and herbal brightness add a fresh dimension.
    6. Drizzle the remaining dressing over the salad and toss gently once more. Be careful not to bruise the vegetables—just enough to distribute the flavors and crunch.
    7. Serve immediately to enjoy the maximum crunch and freshness. If making ahead, keep the nuts and herbs separate and toss with the dressing just before serving.

    Notes

    For extra flavor, add a pinch of chili flakes or a sprinkle of sesame seeds. To make it vegan, ensure the honey is replaced with maple syrup or agave nectar. Store leftovers in the fridge for up to 2 days, but enjoy it fresh for the best texture.

    Pro tips for perfect crunch and flavor

    • Toast nuts until golden → This brings out their nutty aroma and crunch.
    • Use fresh vegetables → Crispness is key, so don’t skimp.
    • Emulsify dressing properly → Whisk vigorously to achieve a silky texture.
    • Toss gently → Keep the crunch intact, don’t bruise the vegetables.
    • Serve immediately → To enjoy maximum crispiness.

    Common pitfalls and how to fix them

    • FORGOT TO toast nuts → Toast them now for added flavor and crunch.
    • DUMPED TOO MUCH DRESSING → Use less at first; add more to taste.
    • OVER-TORCHED nuts → Lower heat and watch closely, stir often.
    • SALAD WILTS IN THE REFRIGERATOR → Serve at room temp or briefly re-chill with fresh herbs.

    Fast fixes for common salad hiccups

    • When nuts are soggy, toast them again briefly to revive crunch.
    • Splash a little vinegar if dressing needs brightness.
    • Patch over bland veggies with extra herbs and lemon.
    • Shield delicate ingredients from excess moisture with paper towels.
    • When in doubt, serve the salad at room temperature for best texture.

    Tips for prepping and storing

    • Prepare the dressing and toast the nuts up to 1 day ahead. Keep separately in airtight containers.
    • Chop vegetables just before serving to maintain crunch.
    • Store leftovers in the fridge for up to 2 days. Keep nuts separate to stay crispy.
    • Reheat nuts briefly in a dry skillet if they lose their crunch before serving.

    10 Practical Q&As about Cashew Crunch Salad

    1. Can I use roasted cashews instead of raw?

    Use fresh, raw cashews for crunch. Toast them lightly for extra flavor, but keep an eye so they don’t burn.

    2. Should I toast the cashews?

    Yes, but raw cashews keep a softer bite. Toasted add more nutty aroma and crunch.

    3. Can I add other vegetables?

    Use a mix of crunchy vegetables like bell peppers and carrots, plus a hint of fresh herbs for brightness.

    4. What if I want a more filling salad?

    Yes, shredded cabbage or snap peas work well. Keep the dressing balanced to not overpower the crunch.

    5. Can I make this ahead?

    Add some cooked quinoa or chickpeas to boost protein and make it more substantial.

    6. How long can I store leftovers?

    Yes, prepare the dressing and nuts separately, then toss fresh before serving to keep crunch.

    7. Will the dressing get soggy?

    Best eaten within 2 days. Keep refrigerated, and re-toss with dressing if needed.

    8. Can I make the dressing vegan?

    Yes, but if kept separate and added at the last minute, it stays crisp.

    9. Is honey necessary?

    Absolutely, use maple syrup or agave instead of honey for sweetness.

    This salad is perfect for when you want something quick, fresh, and textured. It’s a real crowd-pleaser, especially when served alongside grilled meats or as a main on a busy weeknight.

    Once you’ve got the hang of the basic combo, you can customize endlessly. It keeps well, so leftovers can be a crunchy, bright lunch for the next day, if they last that long. Just remember to keep everything crisp and fresh, and you’re golden.

  • Cranberry Mimosa Recipe

    When I first thought of pairing cranberries with bubbly, it was all about capturing that crisp, tart punch that wakes you up, even after a long night. Cranberries aren’t just for sauces or jams; they bring a lively, almost zingy freshness to a mimosa that’s unexpectedly bright and festive.

    This drink isn’t just about the flavor—it’s about the feeling. The popping cranberries, the shimmering bubbles, and that slight tang on your tongue—it’s a little celebration in a glass, perfect for bright mornings or lazy brunches.

    The Unusual Festive Twist: Cranberry Mimosa as a Morning-After Pick-Me-Up

    Why This Cranberry Mimosa Means a Lot to Me

    • I love how the cranberries pop when you bite into them, adding a playful element.
    • This drink feels like a celebration without the fuss, perfect for a slow weekend morning.
    • The scent of simmering cranberries with citrus fills the kitchen and makes everyone smile.
    • Every time I make this, I think about holiday mornings and bright, chilly days.

    Inspiration Behind the Cranberry Mimosa

    • I was experimenting with holiday brunch ideas when I stumbled on this combination. The tartness of cranberries paired with sparkling wine just clicked.
    • It’s a drink that feels special but is actually quite simple to make, which is a win in my book.
    • The vibrant color makes it a centerpiece on the table, and the flavor is refreshingly different from your typical mimosa.

    Cranberry Mimosa: A Festive Twist with a History

    • Cranberries have been used by Native Americans for centuries, not just as food but for medicinal purposes.
    • The mimosa cocktail dates back to the 1920s, originating in Paris, and was named after the yellow mimosa flower.
    • Adding cranberry to cocktails became popular in the 20th century as a way to incorporate seasonal berries into drinks.
    • The tartness of cranberries balances the sweetness of the sparkling wine, making the drink more refreshing.

    Ingredient Insights for Your Cranberry Mimosa

    • Fresh cranberries: They’re firm and bright, with a tart-sweet flavor that bursts as you bite.
    • Sparkling wine: Should be crisp and bubbly—look for a good-quality brut that’s not overly sweet.
    • Honey: Adds natural sweetness and a subtle floral note, balancing the tartness.
    • Orange liqueur: Provides depth and a citrus aroma, but can be skipped for a lighter version.
    • Mint sprigs: Fresh and fragrant, they add a cooling aroma and a pop of green.

    Spotlight on Cranberries and Sparkling Wine

    Sparkling Wine:

    • Cranberries are firm and glossy, with a deep red color that deepens when cooked.
    • They emit a bright, tart aroma, and burst with juice when simmered.
    • During cooking, cranberries soften and turn a darker hue, releasing their vibrant color.

    Sparkling Wine:

    • It’s bubbly and crisp, with a subtle yeasty aroma that complements fruit flavors.
    • Be sure to chill it thoroughly—warm bubbles won’t be as lively or refreshing.

    Substitutions to Tailor Your Cranberry Mimosa

    • Sweetener: Maple syrup can replace honey for a richer, slightly smoky note.
    • Alcohol-free: Use sparkling water or non-alcoholic sparkling cider for a mocktail version.
    • Cranberries: Substitute with pomegranate seeds for a similar tart burst.
    • Liqueur: Grand Marnier or Cointreau adds complexity, but orange juice can work in a pinch.
    • Herbs: Basil or thyme can add an herbal twist instead of mint.

    Equipment & Tools

    • Saucepan: To simmer the cranberries and make syrup.
    • Fine sieve: To strain out cranberry solids.
    • Pitcher: To mix and serve.
    • Glasses: To present and enjoy.

    Step-by-Step Guide to a Perfect Cranberry Mimosa

    1. Gather your ingredients and tools: a pitcher, a muddler, a fine sieve, and your glasses.
    2. In a saucepan, combine cranberries with a splash of water and a drizzle of honey. Simmer over medium heat until cranberries burst and mixture thickens, about 10 minutes.
    3. Strain the cranberry mixture through a fine sieve, pressing gently to extract as much juice as possible. Let it cool.
    4. Pour 2-3 tablespoons of cranberry syrup into each glass. Add a splash of orange liqueur, if using.
    5. Fill glasses with chilled sparkling wine slowly, to preserve bubbles.
    6. Gently stir to combine, then garnish with fresh cranberries and a sprig of mint.
    7. Serve immediately, with a straw or without, to enjoy the fizz and fresh flavor.

    Serve immediately for maximum fizz. Garnish just before serving to keep it fresh and vibrant.

    How to Know It’s Done

    • Cranberry syrup is deep red, slightly thick, and fragrant with citrus and berry.
    • Bubbles should be lively and persistent, not flat.
    • Garnishes should sit upright and look vibrant, not wilted or soggy.

    Cranberry Mimosa

    This festive drink combines the tart freshness of simmered cranberries with bubbly sparkling wine, creating a bright and lively beverage perfect for brunch or celebrations. The process involves making a flavorful cranberry syrup, then gently mixing it with chilled wine and garnishes for a sparkling, colorful presentation with popping cranberries. Final texture is effervescent and slightly syrupy, with vibrant red hues and fresh fruit accents.
    Prep Time 15 minutes
    Cook Time 10 minutes
    Total Time 25 minutes
    Servings: 4
    Course: Main Course
    Cuisine: Festive
    Calories: 150

    Ingredients
      

    • 1 cup cup fresh cranberries or frozen cranberries
    • 1/4 cup cup honey or maple syrup
    • 1 cup cup sparkling wine chilled
    • 1-2 tablespoons tbsp orange liqueur optional
    • a few cranberries fresh cranberries for garnish
    • 1 sprig mint for garnish

    Equipment

    • Saucepan
    • Fine sieve
    • Pitcher
    • Glasses

    Method
     

    1. Combine cranberries, honey, and a splash of water in a saucepan. Bring to a gentle simmer over medium heat, listening for the cranberries to burst and fill your kitchen with a bright, fruity aroma. Continue simmering until the mixture thickens slightly, about 10 minutes.
    2. Strain the hot cranberry mixture through a fine sieve, pressing gently to extract all the vibrant juice. Discard the solids and let the syrup cool to room temperature.
    3. Once cooled, pour about 2-3 tablespoons of the cranberry syrup into each glass. If you like, add a splash of orange liqueur for extra citrus depth.
    4. Slowly pour chilled sparkling wine into each glass, tilting gently to preserve the bubbles and fill the glass about three-quarters full. Listen for the fizz as the bubbles rise.
    5. Gently stir the mixture to combine the syrup with the sparkling wine, then garnish each glass with a few fresh cranberries and a sprig of mint for a vibrant, festive look.
    6. Serve immediately to enjoy the lively bubbles and bright flavors. Cheers to a sparkling celebration!

    Notes

    For a non-alcoholic version, substitute sparkling water or cider for the wine. Make the cranberry syrup in advance and store in the fridge for up to a week. Garnish just before serving to keep the fresh look and lively bubbles.

    Tips & Tricks for a Perfect Cranberry Mimosa

    • Use fresh cranberries whenever possible—they burst with flavor and color.
    • Simmer the cranberries gently—boiling too hard can make the syrup bitter.
    • Chill your wine and glasses—cold enhances the sparkle and keeps the drink crisp.
    • Add the sparkling wine slowly—pouring too fast causes foam and loss of bubbles.
    • Garnish last—adding fruit too early can make it soggy.

    Common Mistakes and How to Fix Them

    • FORGOT to strain the cranberry syrup? Pass it through a fine sieve again to remove solids.
    • DUMPED too much cranberry syrup? Dilute with a splash of sparkling water for a lighter drink.
    • OVER-TORCHED the cranberries? Use a lower heat and watch closely to prevent burning.
    • MISSED the garnish? A sprig of mint or extra cranberries makes the presentation pop.

    Quick Fixes for Common Cranberry Mimosa Snags

    • When the bubbles are flat, add a splash of fresh sparkling wine.
    • Splash a little lemon juice if the syrup is too sweet.
    • Patch dull flavor with a touch of orange zest.
    • Shield from heat if syrup thickens too much—warm slightly to loosen.
    • If syrup is too tart, stir in a bit more honey or sugar.

    Make-Ahead Tips for the Cranberry Syrup and Assembly

    • Cranberry syrup can be made up to a week in advance and stored in the fridge.
    • Refrigerate the syrup in an airtight container; it thickens slightly but pours easily.
    • Fresh cranberries can be frozen for months, ready for syrup anytime.
    • Add sparkling wine just before serving to keep the fizz lively.

    10 Practical Q&As about Cranberry Mimosa

    1. Can I use frozen cranberries?

    Use fresh cranberries for a tart punch, or frozen ones if fresh aren’t available. They burst with a bright, slightly bitter flavor that balances the sweetness.

    2. Is orange liqueur necessary?

    A splash of orange liqueur adds depth and a hint of citrus zest, but you can skip it for a more straightforward drink.

    3. Should glasses be chilled?

    Chill your glasses beforehand to keep the drink cold longer and enhance the crisp, refreshing sensation.

    4. How do I keep the drink from foaming over?

    Adjust the sparkling wine to taste, but avoid over-carbonation to prevent foaming over when pouring.

    5. How do I balance tartness?

    Sweeten with honey or simple syrup if the cranberries are very tart—add a little at a time and taste.

    6. Can I use sparkling water instead?

    Use good-quality sparkling wine; it makes a real difference in flavor and bubbles, especially for brunch.

    7. What garnish works best?

    Garnish with fresh cranberries and a sprig of mint for a visual pop and extra aroma.

    8. Can I make it ahead?

    Serve immediately after mixing for the best fizz and freshest flavor.

    9. How long can it sit before losing fizz?

    If made in advance, store in the fridge and add sparkling wine just before serving to keep it bubbly.

    10. What’s the best way to mix?

    Use a wide-mouthed pitcher for easy pouring and mixing without losing too much carbonation.

    Cranberry mimosa isn’t just a pretty drink. It’s a reminder to find joy in simple, fresh ingredients, especially when they come together with a little sparkle. Each sip is a tiny burst of seasonal cheer.

    It’s surprisingly versatile—easy enough for a casual weekend or to serve as a standout at celebrations. No matter how you enjoy it, I hope it brings a little sparkle to your day.

  • Sheet Pan Ratatouille Recipe

    When I first started roasting ratatouille, I was overwhelmed by the idea of careful veggie arrangement and slow simmering. But then I realized, the oven can do a lot of the work for me, especially on a busy evening. Laying everything out on a sheet pan, tossing with oil, and letting the oven work its magic felt freeing and forgiving.

    This recipe is a reminder that good food doesn’t need to be complicated or fussed over. It’s about highlighting the vegetables’ natural sweetness, developing a deep caramelization, and making dinner feel like a small celebration of summer’s bounty, no matter the season.

    The unpolished, honest notes of a home cook making a vibrant, vegetable-packed meal on a busy weeknight.

    Why This Recipe Matters to Me

    • I love how this dish turns humble vegetables into something almost celebratory.
    • There’s a real satisfaction in tossing everything on a sheet pan and walking away.
    • It reminds me of summer visits to my grandma’s garden, where everything was ripe and bursting with flavor.
    • This is my go-to when I want something hearty but light, and it’s always a crowd-pleaser.

    The Inspiration Behind My Sheet Pan Ratatouille

    • I first made this dish during a hectic week when I needed something quick but satisfying. The idea of roasting everything together, letting the oven do the work, felt like a small act of kindness to myself. Over time, I’ve tweaked and personalized it, adding my favorite herbs and a splash of balsamic.
    • This dish represents simplicity, resourcefulness, and the joy of using fresh, seasonal produce. It’s become a staple in my kitchen, especially when I want a vegetable-packed meal without fuss.
    • It’s also a reminder that even in a busy life, good food can be effortless and nourishing.

    A Brief History of Ratatoille and Its Modern Makeover

    • Ratatouille originates from Provence, France, and dates back to at least the 18th century.
    • The name ‘ratatouille’ comes from the Occitan word ‘ratatolha,’ meaning ‘chunky stew.’
    • Originally a peasant dish, it’s now a celebrated vegetable medley worldwide.
    • Roasting vegetables on a sheet pan is a modern convenience, but the flavors echo traditional slow-simmered versions.

    Ingredient Insights for Better Roasting

    • Eggplant: absorbs oil and becomes silky. Use a light hand with oil to avoid sogginess, or salt and drain to reduce bitterness.
    • Zucchini: stays tender and slightly sweet. Slice evenly so they cook uniformly, and consider skipping if too watery.
    • Bell peppers: bring a smoky sweetness. Roast until charred for extra depth, or skip if you prefer milder flavor.
    • Tomatoes: burst with juice and acidity. Use ripe, juicy tomatoes for vibrant flavor, or substitute with canned tomatoes for convenience.
    • Garlic: infuses everything with aroma. Mince finely for even flavor, or crush for a milder, roasted garlic note.

    Spotlight on Eggplant and Tomatoes

    Eggplant:

    • When roasting, it becomes creamy and absorbs flavors beautifully. Watch for browning, not burning.
    • Look for shiny, firm eggplants; they’re less bitter and more tender.

    Tomatoes:

    • They release a sweet, tangy juice that caramelizes during roasting. Use ripe, flavor-packed tomatoes.
    • Choose vine-ripened or heirloom varieties for richer flavor and vibrant color.

    Smart Ingredient Swaps for Different Diets and Tastes

    • Dairy-Free: Use olive oil exclusively, no butter or dairy-based spreads, for a clean, bright flavor.
    • Gluten-Free: This dish is naturally gluten-free, just serve with gluten-free bread or grains.
    • Low-Sodium: Skip added salt, rely on herbs and lemon for flavor, and use salt-free seasoning blends.
    • Vegan: No animal products needed, just ensure your herbs and oils are plant-based.
    • Extra Flavor: Toss vegetables with a splash of balsamic vinegar or a sprinkle of smoked paprika before roasting.

    Equipment & Tools

    • Large rimmed baking sheet: To hold all the vegetables in a single, even layer
    • Sharp knife and cutting board: To slice vegetables uniformly
    • Spatula or tongs: To toss vegetables during roasting
    • Measuring spoons and cups: For precise seasoning
    • Oven thermometer (optional): To ensure accurate oven temperature

    Making Sheet Pan Ratatouille: A Simple, Colorful Roast

    1. Preheat your oven to 200°C (about 400°F).
    2. Slice eggplant, zucchini, bell peppers, and tomatoes into roughly 1/4 inch thick slices.
    3. Toss all the vegetables with olive oil, minced garlic, salt, and a pinch of thyme or oregano.
    4. Spread vegetables out in a single layer on a large rimmed baking sheet, overlapping little but not crowded.
    5. Roast for 25-30 minutes, flipping once halfway through. Look for golden edges and a fragrant aroma.
    6. Check for doneness: edges should be crispy, veggies tender, and smell sweet and smoky.
    7. Remove from oven, sprinkle with fresh basil or parsley if desired.
    8. Let sit for 5 minutes before serving to allow flavors to settle.

    Let the dish rest for 5 minutes after removing from oven. Finish with fresh herbs, a squeeze of lemon, and serve hot or at room temperature.

    How to Know It’s Done

    • Vegetables are golden and slightly caramelized.
    • Edges are crispy, not burnt.
    • Veggies are tender when pierced with a fork.

    Sheet Pan Ratatouille

    This vibrant dish features a medley of vegetables like eggplant, zucchini, bell peppers, and tomatoes roasted together on a sheet pan. The oven caramelizes the vegetables, creating a tender, slightly crispy texture with deep, sweet flavors that highlight summer’s bounty. Simple, colorful, and satisfying, it’s perfect for busy weeknights or casual gatherings.
    Prep Time 15 minutes
    Cook Time 30 minutes
    Total Time 45 minutes
    Servings: 4
    Course: Main Course
    Cuisine: French
    Calories: 180

    Ingredients
      

    • 1 medium eggplant shiny and firm, sliced into 1/4 inch rounds
    • 2 medium zucchini sliced into 1/4 inch rounds
    • 2 bell peppers preferably red or yellow, sliced into strips
    • 3 large ripe tomatoes sliced into 1/4 inch rounds
    • 3 cloves garlic minced finely
    • 2 tablespoons olive oil plus extra for drizzling
    • 1 teaspoon dried thyme or oregano for seasoning
    • to taste salt and pepper to season the vegetables

    Equipment

    • Large rimmed baking sheet
    • Sharp knife and cutting board
    • Spatula or tongs
    • Measuring spoons and cups
    • Oven thermometer (optional)

    Method
     

    1. Preheat your oven to 200°C (about 400°F) and line your large rimmed baking sheet with parchment paper for easy cleanup.
    2. Slice the eggplant, zucchini, bell peppers, and tomatoes into approximately 1/4 inch thick rounds or strips, arranging them on your cutting board.
    3. In a large bowl, toss all the sliced vegetables with minced garlic, olive oil, dried thyme or oregano, salt, and pepper until evenly coated. This helps all the flavors meld.
    4. Spread the seasoned vegetables out in a single layer on the prepared baking sheet, overlapping slightly but not crowded. This allows for crisping and caramelization.
    5. Place the sheet in the oven and roast for about 25-30 minutes. Flip the vegetables once halfway through, using a spatula or tongs, to promote even browning and caramelization.
    6. Look for golden edges and fragrant aroma — the vegetables should be tender and slightly crispy on the edges when done.
    7. Remove from the oven and sprinkle freshly chopped basil or parsley over the top for burst of freshness.
    8. Finish by drizzling with a little extra olive oil or a squeeze of lemon if desired, then serve hot or at room temperature with crusty bread or grains.

    Notes

    Use parchment paper for easy cleanup. Slice vegetables evenly for uniform roasting. Toss halfway through for even caramelization. Finish with fresh herbs for maximum flavor.

    Pro Tips for Perfect Sheet Pan Ratatouille

    • Use parchment paper for easier cleanup and to prevent sticking.
    • Cut vegetables uniformly for even roasting and consistent texture.
    • Add fresh herbs after roasting for maximum flavor impact.
    • Toss vegetables halfway through roasting to promote even caramelization.
    • Use a hot oven and high heat to develop depth in flavor and texture.
    • Don’t overcrowd the pan; give veggies space to crisp.
    • Finish with a drizzle of good olive oil or a squeeze of lemon for brightness.

    Common Pitfalls and How to Avoid Them

    • FORGOT to toss veggies evenly? Toss again halfway through roasting to prevent sticking.
    • DUMPED too much oil? Use less next time; you want a light coating, not swimming.
    • OVER-TORCHED edges? Turn down the oven or cover loosely with foil to prevent burning.
    • VEGGIES aren’t tender? Roast a few extra minutes or cut slices thinner for quicker cooking.

    Fast Fixes for Common Roasting Woes

    • If veggies are browning too fast, cover loosely with foil and lower oven temp.
    • When veggies are too dry, splash with a little water or broth during reheating.
    • Patch over burnt edges with fresh herbs and a squeeze of lemon.
    • Shield undercooked areas with foil and roast a few more minutes.
    • Splash balsamic vinegar before serving for a sweet, smoky glaze.

    Prep and Storage Tips for Best Flavors

    • Vegetables can be sliced a day ahead and kept covered in the fridge. They’ll stay fresh and crisp.
    • Roasted ratatouille keeps well in the fridge for up to 3 days. Reheat in a hot skillet until bubbly and fragrant.
    • The flavors deepen overnight, making leftovers even better.
    • Store in an airtight container to prevent moisture loss and keep the dish vibrant.

    10 Practical Q&As about Sheet Pan Ratatouille

    1. What size pan should I use?

    Use a large rimmed baking sheet, about 30×40 cm, to give everything room to breathe and cook evenly.

    2. How thick should the vegetables be sliced?

    Slice your vegetables about the same thickness, around 1/4 inch, so they cook uniformly and look pretty.

    3. How do I season the vegetables?

    Toss everything with a good drizzle of olive oil, a pinch of salt, and minced garlic before roasting.

    4. What’s the right oven temperature and time?

    Roast at 200°C (about 400°F) for 25-30 minutes until the edges are caramelized and veggies are tender.

    5. How do I know when it’s done?

    Check the dish when the vegetables are golden and slightly crispy on the edges, and the house smells sweet and smoky.

    6. Should I toss the vegetables during roasting?

    Use a spatula to toss once halfway through to get even roasting and prevent sticking.

    7. How should I serve it?

    Serve hot, straight from the oven, with crusty bread or over rice or grains.

    8. Can I make it ahead?

    Leftovers keep well in the fridge for 2-3 days. Reheat in a skillet until bubbly and fragrant.

    9. Can I customize leftovers?

    Add fresh herbs or a squeeze of lemon after roasting for brightness.

    10. What if the veggies burn?

    If vegetables are browning too quickly, turn down the heat or cover loosely with foil.

    This sheet pan approach cuts out a lot of the fuss and dishes, which is honestly a relief after a long day. Plus, it’s flexible—use what’s in your fridge, skip the fancy ingredients, and still get a bright, comforting dish.

    It’s a good reminder that sometimes, simplicity wins. A tray of colorful vegetables roasted to perfection can make even the busiest weeknight feel a little more special.

  • Chocolate Peanut Butter Tart Recipe

    There’s something about a tart that feels like a quiet rebellion against overly polished desserts. This chocolate peanut butter tart isn’t about perfection; it’s about honest, bold flavors that slap you with nostalgia and comfort. I love how the simple ingredients—good chocolate, ripe peanut butter, buttery crust—come together in a messy, satisfying way.

    Making this tart reminds me of lazy weekend mornings and the chaos of family gatherings. No fancy techniques, just a bit of melting, mixing, and chilling. It’s a recipe you can customize, fudge around, and still end up with a rich, gooey slice that makes everyone smile.

    The Unlikely Charm of Rustic, No-Buss, No-Fuss Dessert Tarts

    Why This Tart Matters to Me

    • I love how forgiving this tart is—no perfect crust, just rustic charm.
    • Baking it always makes my kitchen smell like childhood.
    • Sharing slices feels like passing around a secret everyone wants to keep.
    • It’s my go-to when I need a quick, cozy dessert that feels special.

    My Inspiration: A Lazy Sunday in the Kitchen

    • This tart was born out of a lazy Sunday craving, a mix of leftover ingredients, and a desire to keep it simple. I wanted something rich and satisfying but not fussy.
    • A quick melt, a stir, and a chill—no complicated steps, just honest, good flavors.
    • It’s become my comfort food—something I turn to when I need a little sweet, salty escape.

    A Little History and Quirky Trivia Behind the Tart

    • The combination of chocolate and peanut butter became popular in the US during the 1960s, thanks to Reese’s Peanut Butter Cups.
    • Tarts have been around since ancient times, originally made with fruit and honey in Middle Eastern cultures.
    • Peanut butter was first invented in the 1890s, initially as a protein-rich food for people with chewing difficulties.
    • Chocolate and peanut butter pairing is a classic American comfort food—rich, salty, sweet, and totally addictive.

    Ingredient Insights: What Makes This Tart Special

    • Dark chocolate: I love the deep, bitter notes that balance the sweetness. Use semi-sweet if you prefer less bitterness.
    • Peanut butter: Creamy and rich, it melts into the chocolate beautifully. Natural peanut butter adds a more intense flavor—try crunchy for texture.
    • Butter: Adds richness and helps the crust hold together. Salted butter enhances flavor, unsalted keeps it neutral.
    • Sugar: Just a touch in the crust for sweetness, but the filling doesn’t need extra—trust the chocolate and peanut butter.
    • Cream: Balances the richness and helps create a glossy, smooth filling. Substitute with coconut milk for a dairy-free version.

    Spotlight on Key Ingredients

    Dark Chocolate:

    • Its rich, slightly bitter flavor makes the filling decadent. Melts smoothly and sets with a shiny, firm finish.
    • Chocolate’s behavior during melting—avoid overcooking or it’ll seize and become grainy. Keep heat low and stir often.

    Peanut Butter:

    • The salty, nutty flavor is the star. It should be smooth, not oily, for easy spreading and blending.
    • Natural peanut butter’s oozy, thick texture can be loosened with a splash of cream or warm water.

    Ingredient Substitutions for Different Diets and Preferences

    • Dairy-Free: Swap regular cream with coconut cream or almond milk for a rich, dairy-free taste.
    • Sugar-Free: Use a natural sweetener like maple syrup or honey, but expect a different texture.
    • Vegan: Use vegan chocolate and a plant-based butter substitute.
    • Crunchy: Opt for crunchy peanut butter and sprinkle some chopped peanuts on top.
    • Gluten-Free: Ensure crust ingredients are gluten-free, and use almond or oat flour.

    Equipment & Tools

    • Tart pan with removable bottom: For easy removal and clean edges
    • Heatproof bowl: Melting chocolate and cream
    • Spatula: Mixing and spreading filling
    • Cooling rack: Cooling the crust evenly
    • Knife or pie cutter: Slicing the tart neatly

    Step-by-Step Guide to Making Your Chocolate Peanut Butter Tart

    1. Preheat your oven to 180°C (350°F).
    2. Press softened butter, powdered sugar, and flour into a 23cm (9-inch) tart pan. Bake for 15 minutes or until golden.
    3. Melt dark chocolate with a splash of cream, then mix in peanut butter until smooth.
    4. Pour the chocolate-peanut butter mixture into the cooled crust. Spread evenly.
    5. Chill the tart in the fridge for at least 2 hours, or until set.
    6. Before serving, optionally top with chopped peanuts, a drizzle of chocolate, or a smear of jam.

    Chill the tart for at least 2 hours. Serve directly from the fridge, slicing with a heated knife for clean edges.

    How to Know It’s Done

    • Crust should be golden and set.
    • Chocolate filling should be shiny and slightly firm.
    • Tart should be chilled and firm to the touch.

    Chocolate Peanut Butter Tart

    This rustic chocolate peanut butter tart combines a simple buttery crust with a rich, gooey filling made from melted dark chocolate and creamy peanut butter. No-fuss and forgiving, it’s finished with a chilled, shiny surface and a satisfying bite that blends sweet, salty, and nostalgic flavors. Perfect for casual gatherings or a cozy weekend treat, it’s all about honest ingredients and bold flavors.
    Prep Time 20 minutes
    Cook Time 15 minutes
    Total Time 2 hours 15 minutes
    Servings: 8
    Course: Main Course
    Cuisine: American
    Calories: 520

    Ingredients
      

    • 1 cup all-purpose flour for crust
    • 1/4 cup powdered sugar for crust
    • 1/2 cup unsalted butter softened
    • 200 g dark chocolate chopped
    • 1/2 cup heavy cream or coconut cream
    • 3/4 cup peanut butter smooth or crunchy
    • Chopped peanuts for garnish optional

    Equipment

    • Tart pan with removable bottom
    • Heatproof bowl
    • Spatula
    • Cooling rack
    • Knife or pie cutter

    Method
     

    1. Mix the flour and powdered sugar in a bowl, then cut in the softened butter until the mixture resembles coarse crumbs. Press this dough evenly into the bottom of your tart pan, making sure to create a rustic, slightly uneven edge. Bake in a preheated oven at 180°C (350°F) for about 15 minutes until golden and fragrant. Let the crust cool on a rack.
    2. Place the chopped dark chocolate in a heatproof bowl. In a small saucepan, heat the cream just until it begins to simmer, then pour it over the chocolate. Let sit for a minute, then stir gently until smooth and glossy. This creates a rich chocolate ganache.
    3. Stir the peanut butter into the warm chocolate ganache until fully combined and silky. The mixture should be smooth and thick, with a luscious sheen. Pour this filling into the cooled crust and spread evenly with a spatula.
    4. Place the tart in the refrigerator and chill for at least 2 hours, or until the filling is firm and shiny. This step helps the flavors meld and the filling set perfectly.
    5. Once chilled, optionally sprinkle chopped peanuts on top for added crunch and visual appeal. Slice the tart with a heated knife for clean, neat pieces. Serve straight from the fridge for the ultimate gooey, satisfying bite.

    Cooking Tips & Tricks for a Flawless Tart

    • Use room temperature ingredients for easier mixing.
    • Melt chocolate slowly over double boiler or in short bursts in the microwave.
    • Chill the tart in a flat position to prevent filling from shifting.
    • Use a heated knife to slice through chilled tart for clean cuts.
    • Lightly tap the tart pan on the counter before slicing to settle the filling.

    Common Mistakes and How to Fix Them

    • FORGOT TO CHILL THE FILLING? → Put it back in the fridge for 30 mins to firm up.
    • DUMPED TOO MUCH PEANUT BUTTER? → Mix in a little cream or milk to loosen.
    • OVER-TORCHED CHOCOLATE? → Add a splash of hot milk to smooth it out.
    • CRACKED TOP? → Gently rewarm and smooth with a spatula, then chill again.

    Quick Fixes for Kitchen Mishaps

    • When filling is too runny, chill for 30 mins to firm up.
    • Splash a little hot water on chocolate to smooth out lumps.
    • Patch cracks with warm chocolate or peanut butter.
    • Shield crust edges with foil if they brown too quickly.
    • When in doubt, refrigerate for 15 mins to set a sticky spot.

    Make-Ahead and Storage Tips

    • Crust can be made a day ahead; keep wrapped in plastic in the fridge.
    • Filling can be prepared a few hours before, stored in the fridge for up to 24 hours.
    • The tart tastes better after chilling overnight, allowing flavors to meld.
    • Leftovers can be wrapped and stored in the fridge for up to 3 days, but the crust may soften.
    • Reheat slices briefly in the microwave or serve straight from the fridge for a firmer texture.

    10 Practical Q&As About Making the Perfect Chocolate Peanut Butter Tart

    1. Can I use different types of chocolate or peanut butter?

    Use good quality dark chocolate and natural peanut butter for the richest flavor.

    2. How long should I chill the tart?

    Chill the tart for at least 2 hours before serving to set the filling properly.

    3. Can I add toppings or glazes?

    A thin layer of warm jam or caramel can add a shiny, sticky finish on top.

    4. What if the filling is too runny?

    Bake the tart in a preheated oven at 180°C (350°F) for about 15 minutes if the filling is too soft.

    5. What equipment is best for serving?

    Use a tart pan with a removable bottom for easy serving and neat edges.

    6. How should I store leftovers?

    Store leftovers in an airtight container in the fridge for up to 3 days.

    7. How do I know when the crust is done?

    Make sure the crust is fully baked and cooled before adding the filling.

    8. What if my peanut butter is too stiff?

    Mix the peanut butter with a bit of cream or milk to loosen if it’s too thick to spread.

    9. How do I get clean slices?

    Chill the tart before slicing to prevent the filling from cracking.

    10. Does ingredient quality matter?

    Use high-quality ingredients for the best flavor; lesser brands can make the tart taste dull.

    In the end, this tart isn’t just a dessert. It’s a little messy, a little nostalgic, and totally honest. Perfect for when you want something sweet that doesn’t fuss too much.

    And honestly, sometimes that’s all I need. A simple, satisfying treat that tastes like a warm hug and a good memory. No expectations, just good flavors and a bit of kitchen chaos.

  • Cauliflower Steaks Recipe

    Cauliflower steaks might sound fancy, but really, they’re just thick slices of cauliflower roasted or grilled until they get that caramelized, smoky crust. I like them because they’re like a blank canvas—whatever you put on them, they soak up. Plus, they’re surprisingly filling, almost meaty, which makes them perfect for a meatless main or a hearty side.

    They’re also a bit of a kitchen challenge in a good way—getting that perfect sear without burning, keeping the inside tender but not mushy. It’s a simple idea, but mastering the technique can turn a boring veggie into something special. It’s honest, no fuss, just straightforward cooking with good ingredients.

    Turning a humble vegetable into a hearty, steak-like centerpiece—unexpected yet satisfying.

    Why cauliflower steaks matter to me

    • I find the process of roasting cauliflower incredibly satisfying.
    • There’s something about the smell of caramelizing spices that makes me feel at home.
    • I love how versatile cauliflower is—can be a side, a main, or even a snack.
    • Getting that perfect sear on the first side always feels like a small victory.

    My inspiration for cauliflower steaks

    • This recipe came from wanting to make a veggie dish that feels substantial. I was tired of the usual steamed or boiled cauliflower.
    • One day, I accidentally left some cauliflower in the pan a bit too long, and it got that beautiful char. That’s when I realized roasting is the secret.
    • Now, I love that I can turn a simple vegetable into something almost meaty, satisfying, and full of flavor.

    Fun facts about cauliflower and its history

    • Cauliflower has been cultivated for over 2,000 years, originally in the Mediterranean region.
    • The idea of roasting vegetables to bring out their sweetness dates back to ancient times.
    • Cauliflower was once considered a luxury item, only for the wealthy in European courts.
    • In some cultures, cauliflower is believed to have health benefits, especially for digestion.

    Ingredient insights: what makes these cauliflower steaks sing

    • Cauliflower: First-person—fresh, firm cauliflower with tight florets. You want it to feel heavy and smell clean. Second-person—look for bright white or creamy color, no brown spots.
    • Olive oil: First-person—good-quality extra virgin olive oil. It helps with browning and adds flavor. Swap with grapeseed oil for a lighter, neutral taste.
    • Spices: First-person—smoked paprika gives a smoky depth. You can use cumin for earthiness or chili powder for heat. Adjust to taste.
    • Lemon: First-person—fresh lemon juice brightens everything. Use it right after baking for a zing. Substitute with lime or a splash of vinegar.
    • Salt & pepper: Basic but crucial. They bring out all the flavors—don’t skimp.

    Spotlight on cauliflower and spices

    Cauliflower:

    • It absorbs flavors beautifully, developing a nutty sweetness when roasted. Watch for the edges to turn deep amber.
    • It reacts to high heat with a slight crisp on the surface, tender inside.

    Spices:

    • Smoked paprika: It gives a hearty, smoky aroma—almost meaty. It’s the magic touch that elevates the dish.
    • The spice can burn if cooked too fast; add it after the initial sear for best flavor.

    Ingredient substitutions for different diets

    • Dairy-Free: Swap butter with coconut oil for a tropical aroma and slightly sweeter flavor.
    • Gluten-Free: Use a gluten-free spice blend or omit flour if using for crust; the flavor remains rich.
    • Low-Sodium: Cut back on salt; enhance flavor with herbs like thyme or rosemary.
    • Vegan: Ensure spices and oils are plant-based, and skip honey—use maple syrup for glaze.
    • Nut Allergies: Keep spices simple; avoid nut-based garnishes or oils.

    Equipment & Tools

    • Chef’s knife: Cut the cauliflower into steaks.
    • Baking sheet or grill pan: Cook the steaks evenly.
    • Basting brush: Apply oil and spices.
    • Tongs or spatula: Flip the steaks safely.
    • Oven or grill: Finish cooking and develop flavor.

    Step-by-step guide to perfect cauliflower steaks

    1. Trim the leaves and cut the cauliflower into 2-3 cm thick steaks. Aim for 3-4 per head.
    2. Mix olive oil, salt, pepper, and spices like smoked paprika or cumin in a bowl.
    3. Brush both sides of each steak generously with the oil mixture.
    4. Preheat your oven to 200°C (390°F) or heat a grill pan over medium-high heat.
    5. Place the steaks on the hot pan or baking sheet, and cook for 4-5 minutes until golden brown.
    6. Flip and cook the other side for another 4-5 minutes, watching for charring and smell of roasted cauliflower.
    7. Transfer to the oven if pan-frying, roast for 15-20 minutes until tender inside and crispy outside.
    8. Check doneness by piercing with a fork; it should slide in easily, but the cauliflower should hold its shape.
    9. Rest for a couple of minutes, then serve hot with a squeeze of lemon or drizzle of balsamic.

    Allow the cauliflower steaks to rest for 2 minutes after removing from oven or pan. Serve with a squeeze of lemon or a sprinkle of fresh herbs for added brightness.

    How to Know It’s Done

    • Edges are dark and caramelized.
    • Fork slides in easily but doesn’t feel mushy.
    • Cauliflower feels firm but not hard in the center.

    Cauliflower Steaks

    Cauliflower steaks are thick slices of cauliflower roasted or grilled until caramelized and smoky, creating a hearty, almost meaty texture. They serve as a versatile main or side dish, absorbing flavors beautifully and showcasing a beautiful golden crust. The final result is tender inside with crispy, flavorful edges.
    Prep Time 10 minutes
    Cook Time 30 minutes
    Total Time 40 minutes
    Servings: 4
    Course: Main Course
    Cuisine: Vegetarian
    Calories: 180

    Ingredients
      

    • 1 head cauliflower firm, fresh, with tight florets
    • 3 tablespoons olive oil extra virgin preferred
    • 1 teaspoon salt
    • 1/2 teaspoon black pepper
    • 1 teaspoon smoked paprika or cumin for earthiness
    • 1 tablespoon lemon juice freshly squeezed

    Equipment

    • Chef’s knife
    • Baking sheet or grill pan
    • Basting brush
    • Tongs or spatula

    Method
     

    1. Start by trimming the leaves from your cauliflower and placing it on a cutting board. Using a sharp chef’s knife, cut the cauliflower into 2-3 cm thick slices, aiming for 3-4 steaks from the whole head. Don’t worry if the slices break apart; you can cook the smaller pieces as well.
    2. In a small bowl, whisk together the olive oil, salt, black pepper, and smoked paprika until well combined. This flavorful mixture will help the cauliflower develop a delicious crust.
    3. Using a basting brush or your hands, generously brush both sides of each cauliflower steak with the spice-infused oil, making sure to coat all surfaces evenly. The oil will help with browning and flavor absorption.
    4. Preheat your oven to 200°C (390°F) or heat a grill pan over medium-high heat until hot. You should hear a gentle sizzle when the cauliflower hits the surface.
    5. Place the cauliflower steaks on the hot pan or baking sheet, ensuring they have enough space between them. Sear for 4-5 minutes until the edges turn a deep golden brown and smell nutty and roasted.
    6. Flip the steaks carefully using tongs or a spatula, then cook for another 4-5 minutes until the other side is equally browned and crispy.
    7. If using the oven, transfer the seared steaks to a baking sheet and roast for 15-20 minutes. The cauliflower should be tender inside with a crisp, caramelized exterior.
    8. Check the doneness by piercing the center of a steak with a fork; it should slide in easily, and the edges will be deeply caramelized. Remove from the oven or pan once ready.
    9. Finish by squeezing fresh lemon juice over the hot cauliflower steaks for brightness and a touch of acidity, which enhances the smoky flavors.
    10. Let the cauliflower rest for 2 minutes, then serve hot, garnished with additional herbs if desired. Enjoy the crispy, tender, and flavorful cauliflower steaks as a satisfying vegetarian main or side.

    Cooking tips & tricks for perfect cauliflower steaks

    • Use a hot pan or oven—get that initial sizzle for good caramelization.
    • Don’t overcrowd the pan—give each steak enough space to brown.
    • Flip carefully—wait for a deep golden crust before turning.
    • Use a brush for even spice application—no patchy seasoning.
    • Rest briefly before serving—retains juices and flavor.

    Common mistakes and how to fix them

    • FORGOT TO DRY THE CAULIFLOWER: Pat it dry or it won’t sear properly.
    • DUMPED TOO MUCH OIL: Use a light, even coating—too much makes it greasy.
    • OVER-TORCHED THE EDGES: Lower heat or cover for a bit to prevent burning.
    • MIXED UP THE SPICES: Adjust seasonings to your taste—start small and build.

    Quick fixes for common issues

    • When burnt edges appear, cover loosely with foil and lower heat.
    • Splash with lemon juice or vinegar if the cauliflower tastes flat.
    • Patch over a burnt spot with a little more oil and spices.
    • Shield from direct heat if it’s browning too quickly.
    • If undercooked, pop back in the oven for a few more minutes.

    Make-ahead and storage tips

    • Slice and season the cauliflower a day in advance. Keep covered in the fridge for up to 24 hours.
    • Refrigerated cauliflower steaks retain flavor but may lose some crispness; reheat in oven at 180°C (350°F) for 10 minutes.
    • For freezer storage, wrap tightly and freeze up to 1 month. Thaw before reheating.
    • Reheat until steaming and edges crackle slightly, smelling smoky and roasted.

    10 Practical Q&As About Making Cauliflower Steaks

    1. How thick should the cauliflower slices be?

    Use a sharp serrated knife to cut the cauliflower into even, thick slices about 2-3 cm. Press down firmly and saw through, not just push.

    2. What’s the ideal oven temperature?

    Preheat your oven to 200°C (390°F). Bake for 20-25 minutes until edges are golden and cauliflower feels firm but tender.

    3. Should I dry the cauliflower before seasoning?

    Pat the cauliflower dry after washing to help the spices stick. Use a paper towel or clean cloth.

    4. How much oil do I need?

    Use a good amount of olive oil to coat the steaks evenly. It helps with browning and flavor.

    5. How do I know when it’s cooked enough?

    Check for doneness by piercing with a fork; it should slide in easily but not be mushy.

    6. What if the cauliflower burns?

    If the edges burn before the middle is tender, lower the heat or cover loosely with foil.

    7. Can I add acidity afterwards?

    Add lemon juice or a drizzle of balsamic vinegar after baking for brightness.

    8. Can I prepare these in advance?

    Serve immediately for the best texture, but leftovers keep in the fridge for 2 days.

    9. Can I prep the night before?

    Slice and season the cauliflower ahead, keep covered in the fridge for up to 24 hours.

    10. How do I flip without breaking?

    Use a fish spatula to carefully flip the steaks. They’re delicate but sturdy enough if handled gently.

    Once you get the hang of it, cauliflower steaks become a go-to for a quick, impressive meal. They’re perfect for those days when you want something warm and satisfying but don’t want to fuss. Plus, their smoky aroma filling the kitchen is a small reminder that good food doesn’t need all the fuss.

    There’s a kind of satisfaction in turning a simple vegetable into a centerpiece, especially when it tastes as good as it smells. It’s not about perfection but about enjoying the process and the flavors that develop. Every time I make them, I remember why I love cooking—making something delicious from humble ingredients.

  • Peanut Butter Smoothies Recipe

    There’s a certain quiet in the mornings when the world feels just a little slower, a little softer. I find myself reaching for this peanut butter smoothie, not just for the taste but for the way it grounds me. It’s warm-ish, creamy, and somehow makes the apartment smell like toasted nuts and honey, even if I only have a few minutes.

    I’ve made this recipe countless times, tweaking it as I go, trying to get that perfect balance of richness and brightness. It’s become my go-to when I want a quick, nourishing start that feels like a hug in a glass. No fuss, just pure, honest comfort.

    The Unlikely Comfort of a Classic Peanut Butter Smoothie During Cold Mornings

    Why this simple smoothie matters to me

    • I love how versatile this smoothie is — it can be a quick breakfast or a nourishing snack.
    • Making this feels like a small act of self-care, especially on busy mornings.
    • I’ve pulled this out during chilly mornings when I needed warmth and familiarity.
    • Sharing this with friends always sparks a smile and a quick chat about favorite toppings.

    The story behind my favorite peanut butter smoothie

    • This recipe was born out of a busy morning when I needed something quick but filling.
    • I wanted the comforting, familiar taste of peanut butter but with a refreshing twist.
    • It’s become a staple because I can tweak it endlessly—adding cocoa, berries, or oats.

    Origins and quirky facts about peanut butter smoothies

    • This classic combo of peanut butter and banana was popularized in American households during the 1950s.
    • Peanut butter was first patented in 1884, but it became a staple only in the early 20th century.
    • Adding honey or sweetener was a way to counteract the natural bitterness of early peanut butters, which often lacked sugar.
    • The smoothie as we know it today gained popularity in the 1960s with the rise of health-conscious eating.
    • Peanut butter smoothies are often linked to nostalgic childhood mornings, simple and satisfying.

    Breaking down the key ingredients and their quirks

    • Peanut Butter: I prefer natural, runny kinds that blend easily—try almond butter if you’re feeling adventurous.
    • Banana: Ripe bananas release more aroma and flavor, plus they make the smoothie naturally sweet.
    • Honey: Adds a warm, floral sweetness—adjust according to your taste and sweetness preference.
    • Milk: Choose based on your dietary needs—almond, oat, cow’s milk—each brings a different flavor.
    • Ice: Optional, but it transforms the texture into a frosty treat—use frozen bananas for a no-ice option.

    Spotlight on peanut butter and banana

    Banana:

    • Peanut Butter: It’s creamy, rich, and can be sticky—pick a smooth, natural brand for best results.
    • Bulky and oozing, it’s the backbone of flavor—try crunchy if you want texture.

    Banana:

    • Bananas: Ripe ones are sweet, fragrant, and soft—perfect for blending.
    • Their natural sugar caramelizes slightly when blended, adding depth.

    Smart substitutions for your peanut butter smoothie

    • Dairy-Free: Swap cow’s milk for almond or oat milk to keep it plant-based.
    • Sweetener: Maple syrup or agave nectar can replace honey for vegan options.
    • Nut Butter: Cashew or almond butter offers a different flavor and texture.
    • Banana-Free: Avocado adds creaminess without sweetness—good for a different twist.
    • Ice: Frozen cauliflower or zucchini can chill and thicken without diluting flavor.

    Equipment & Tools

    • blender: To blend all ingredients into a smooth, even consistency
    • measuring cups & spoons: To measure ingredients accurately
    • spoon: To scoop peanut butter and taste for sweetness
    • glass or bottle: To serve your smoothie comfortably, ready for sipping

    Step-by-step guide to making your peanut butter smoothie

    1. Gather your equipment: blender, measuring cups, spoon. Nothing fancy, just enough power to smooth out nuts.
    2. Pour 1 cup (240 ml) of your favorite milk into the blender. I like almond or oat for their subtle sweetness.
    3. Add 2 tablespoons of peanut butter. Oozing and sticky, make sure it’s well-scooped for maximum flavor.
    4. Toss in a ripe banana for creaminess and natural sweetness. Blend until smooth, about 30 seconds.
    5. Sweeten with 1 tablespoon of honey or maple syrup. Blend again, tasting for balance.
    6. If you like it colder, add a handful of ice or a frozen banana. Blend until frosty and thick.
    7. Check the texture. If it’s too thick, splash in a little more milk, blend briefly, and adjust.
    8. Do a quick visual check: should be smooth, creamy, with a slight sheen. No chunks or separation.
    9. Pour into your favorite glass, and let it sit for a minute to settle. Optional: drizzle with extra honey or sprinkle cinnamon.
    10. Enjoy immediately, or chill for a bit if you prefer it colder.

    Let it sit for a minute after blending so flavors meld and the texture thickens slightly. Serve immediately for best flavor and texture.

    How to Know It’s Done

    • Smooth and creamy texture without lumps.
    • Color should be light tan with a glossy sheen.
    • Smell should be nutty, warm, inviting—no sour or burnt odors.

    Creamy Peanut Butter Banana Smoothie

    This peanut butter banana smoothie is a warm, creamy blend that combines the richness of peanut butter and the natural sweetness of ripe bananas. Blended until smooth, it has a velvety texture with a glossy finish, making it perfect for a quick, comforting breakfast or snack. The process involves simple blending to achieve a luscious, frosty drink with a delightful aroma of toasted nuts and honey.
    Prep Time 5 minutes
    Total Time 5 minutes
    Servings: 1
    Course: Main Course
    Cuisine: American
    Calories: 250

    Ingredients
      

    • 1 cup favorite milk (almond or oat recommended)
    • 2 tablespoons peanut butter natural, runny preferred
    • 1 ripe banana preferably ripe for sweetness and aroma
    • 1 tablespoon honey or maple syrup for vegan option
    • a handful ice or frozen banana for a frosty texture

    Equipment

    • Blender
    • Measuring cups/spoons
    • Spoon
    • Glass or bottle

    Method
     

    1. Pour the milk into your blender, filling it about halfway to start.
    2. Add the peanut butter to the blender, using a spoon to scoop it in, making sure it’s well-measured for a creamy texture.
    3. Break the banana into smaller chunks and add it to the blender for natural sweetness and smoothness.
    4. Spoon in the honey, which adds warmth and floral sweetness to balance the richness.
    5. If you’re using ice or frozen banana, toss it into the blender now for a frosty, chilled drink.
    6. Blend everything on high for about 30 seconds, until the mixture is smooth, creamy, and glossy, with no lumps remaining.
    7. Check the texture—if it’s too thick, splash in a little more milk and give it a quick blend to loosen it up.
    8. Pour the smoothie into a glass or bottle, and let it sit for a minute to settle and meld the flavors.
    9. Optional: drizzle with a little extra honey or sprinkle cinnamon on top for added flavor.
    10. Enjoy immediately with a straw or spoon, savoring the warm aroma and velvety texture.

    Tips & tricks for the perfect peanut butter smoothie

    • Warm your milk slightly—this helps the ingredients blend more smoothly.
    • Use a ripe banana—overripe bananas are sweeter and blend easier.
    • For extra creaminess, add a spoonful of Greek yogurt.
    • To boost flavor, toast your nuts lightly before blending.
    • Keep your blender on high for about 30 seconds to achieve a silky texture.

    Common mistakes and how to fix them

    • FORGOT to add sweetener? Just stir in honey after blending, then pulse briefly.
    • DUMPED too much ice? Dilutes flavor—add a spoonful of peanut butter or banana to compensate.
    • OVER-TORCHED the peanut butter? Switch to natural, less processed brands for smoother blending.
    • SEPARATION after sitting? Re-blend briefly or stir vigorously to restore creaminess.

    Quick fixes for common smoothie woes

    • When too thick, splash in a little more milk and blend until smooth.
    • Splash with hot water if your blender struggles—helps smooth out tough ingredients.
    • Patch bland flavor with a drizzle more honey or a pinch of cinnamon.
    • Shield over-blending to avoid heated, foamy smoothies. Just pulse briefly.
    • Rescue a separation by giving it a good stir or quick re-blend.

    Make-ahead tips and storage advice

    • You can prep the ingredients the night before, measuring out the dry or frozen parts.
    • Keep the smoothie in a sealed jar in the fridge for up to 24 hours. Shake or stir before drinking.
    • The flavor stays pretty stable, but it might thicken; add a splash of milk to loosen it.
    • Frozen smoothies are great for quick mornings—just blend from frozen, no thawing needed.

    10 Practical Q&As About Peanut Butter Smoothies

    1. Can I use crunchy peanut butter?

    Use a natural peanut butter with minimal added sugar for the creamiest texture and purest flavor.

    2. Should I add ice?

    Yes, but blend longer to break down the bits, or pulse a few times for texture.

    3. Can I make this vegan?

    If you want a colder, thicker smoothie, add a handful of ice and blend until smooth.

    4. What’s a good alternative to honey?

    Absolutely, use plant-based milk and ensure your peanut butter is vegan-friendly.

    5. How do I prevent the smoothie from being too thick?

    Maple syrup or agave nectar works well and adds a different but lovely sweetness.

    6. Can I add protein powder?

    Add a splash more milk or water until it reaches your preferred consistency.

    7. How long will leftovers last?

    Yes, just blend it in with the other ingredients for a protein boost.

    8. Is it safe to freeze smoothies?

    Keep in a sealed container in the fridge for up to 24 hours, give it a good stir before drinking.

    9. What if it tastes flat?

    Yes, freeze in individual portions and thaw briefly in the fridge or at room temp before drinking.

    10. How do I make it less sweet?

    Adjust sweetness with more honey or maple syrup, or add a pinch of cinnamon for warmth.

    Sometimes, I skip the fancy toppings and just pour it straight from the blender, letting the thick, nutty aroma fill the room. It’s a simple pleasure that reminds me of childhood mornings and lazy weekends.

    This smoothie doesn’t need bells and whistles. It’s about the honest, familiar flavors that keep me steady through busy days or quiet mornings. A small ritual that’s always there, always welcome.

  • Spinach Artichoke Dip Recipe

    Sometimes I think the best dishes are the ones made with a bit of chaos. Nothing fancy, just a bowl of spinach and artichoke goodness that’s been stirred, baked, and shared with friends. It’s that imperfect, gooey, cheesy mess that makes a gathering feel homey.

    I love how this dip is forgiving—whether it’s leftover spinach or a splash of extra cheese—nothing needs to be perfect. It’s the kind of dish that invites tasting, adjusting, and tweaking as you go, making it a true cook’s project rather than a recipe.

    There’s a certain joy in the smell of melted cheese and roasted garlic filling the kitchen, promising comfort and a little bit of mischief. It’s a dish that’s about more than just flavor; it’s about creating a moment, a messy, cheesy, warm moment.

    Focusing on the nostalgic, messy joy of sharing a warm, cheesy dip during casual gatherings, emphasizing the imperfect, cozy moments.

    Why this dip matters to me

    • I love how forgiving this recipe is—sometimes I toss in a bit more cheese just because.
    • Nothing beats the smell of it baking—cheesy, garlicky, a little nutty from the browned cheese.
    • I’ve made this so many times, I know it by heart, yet I still tweak the ingredients each time.
    • Sharing this dip always feels like an act of love, even if it’s a quick weeknight version.

    A dish born from chaos and love

    • This dip was inspired by a last-minute craving during a chaotic holiday dinner. I threw together what I had, and it turned out to be a hit.
    • It’s a dish that’s seen me through many messy kitchens and imperfect moments, always comforting and forgiving.
    • It reminds me that sometimes, the best recipes are born from improvisation and a little bit of chaos.

    The quirky history of spinach artichoke dip

    • This dip became a staple at American parties in the 1980s, often served in a bread bowl.
    • Originally, it was a way to use up leftover greens and canned artichokes.
    • The combination of spinach and artichoke was popularized by Italian-American cooks.
    • It’s a cousin to French spinach and artichoke dip, but with a distinctly American cheesy twist.
    • The dish is often associated with casual, messy gatherings rather than fine dining.

    Ingredient insights and tweaks

    • Spinach: Frozen is easiest—the thawed, squeezed-dry leaves are perfect for mixing. Fresh works too, just sauté thoroughly.
    • Artichoke hearts: Canned or jarred are convenient, but fresh artichokes, cooked until tender, make a more vibrant dish.
    • Cream cheese: The creamy base that holds it all together. Vegan cream cheese can be swapped in but may alter the texture slightly.
    • Mayonnaise: Adds richness and moisture. Sour cream can replace it, but skip if you want a cleaner taste.
    • Cheese: Use a mix of mozzarella and Parmesan for meltiness and flavor. Sharp cheddar adds a punch.

    Spotlight on Artichokes and Cheese

    Artichoke hearts:

    • They’re the soul of the dish—tender, slightly nutty, and packed with flavor. Look for firm, not mushy, pieces.
    • Cheese: Melts into a gooey, savory blanket. The quality of cheese makes or breaks the dip—go for fresh, high-quality blocks.

    Cheese:

    • Cheese blend: Mozzarella melts smoothly, Parmesan adds depth, and cream cheese creates that luscious texture.
    • Cheese has a slightly oily surface when hot—watch for bubbling and a golden crust for perfect doneness.

    Smart substitutions for different diets and preferences

    • Dairy-Free: Swap cream cheese with cashew-based cheese or vegan cream cheese for a similar creamy texture.
    • Vegan Mayo: Use plant-based mayonnaise to keep the richness without dairy.
    • Cheese Variations: Nutritional yeast can add cheesy flavor without melting, for a different experience.
    • Gluten-Free: Ensure any bread or chips served alongside are gluten-free, as the dip itself is naturally gluten-free.
    • Extra Greens: Kale or Swiss chard can substitute spinach, bringing their own slightly bitter but hearty flavor.

    Equipment & Tools

    • Mixing bowl: Combine all ingredients.
    • Skillet: Sauté garlic and spinach.
    • Oven-safe dish: Bake the dip.
    • Spatula: Mix and spread.
    • Oven: Baking and heating.

    Step-by-step guide to creamy, cheesy perfection

    1. Preheat your oven to 180°C (350°F). Use a medium mixing bowl for everything.
    2. In a skillet, sauté some garlic in a splash of olive oil until fragrant, about 1 min.
    3. Add thawed, squeezed-dry spinach to the skillet. Cook until wilted and water evaporates, about 2-3 mins.
    4. Mix chopped artichoke hearts, cream cheese, sour cream, mayonnaise, and shredded cheese in the bowl.
    5. Stir everything until well combined. Season with salt, pepper, and a pinch of cayenne if you like heat.
    6. Transfer the mixture to an oven-safe dish. Smooth the top with a spatula.
    7. Bake for 20-25 mins until bubbly and golden on top. Check at 20 mins.
    8. Let sit for 5 mins before serving. Garnish with chopped herbs if desired.
    9. Serve warm with crusty bread, chips, or veggie sticks.

    Let the dip rest for 5 mins out of the oven to thicken slightly before serving. Garnish with fresh herbs for a pop of color and aroma.

    How to Know It’s Done

    • Edges are bubbly and slightly browned.
    • Center is hot and gooey when tested with a thermometer (~75°C/165°F).
    • Dip is firm but still creamy, not runny or separated.

    Cheesy Spinach Artichoke Dip

    This warm, gooey dip combines tender spinach and savory artichoke hearts with melty cheese and garlic, baked until bubbly and golden. Its imperfect, cheesy texture makes it perfect for sharing during casual gatherings, inviting tasting and tweaking along the way. The dish’s rustic charm lies in its rich aroma and creamy appearance, served hot with bread or chips.
    Prep Time 10 minutes
    Cook Time 25 minutes
    Total Time 35 minutes
    Servings: 8
    Course: Main Course
    Cuisine: American
    Calories: 250

    Ingredients
      

    • 3 cups frozen spinach, chopped thawed and squeezed dry
    • 1 cup canned artichoke hearts drained and chopped
    • 8 oz cream cheese softened
    • 1/2 cup sour cream
    • 1/4 cup mayonnaise
    • 1 cup shredded mozzarella cheese preferably fresh
    • 1/4 cup Parmesan cheese freshly grated
    • 2 cloves garlic minced
    • 2 tbsp olive oil
    • to taste salt and pepper
    • optional chopped fresh herbs for garnish

    Equipment

    • Mixing bowl
    • Skillet
    • Oven-safe dish
    • Spatula
    • Oven

    Method
     

    1. Preheat your oven to 180°C (350°F). Place a skillet over medium heat and add olive oil.
    2. Add the minced garlic to the skillet and sauté for about 1 minute until fragrant, paying attention not to brown it.
    3. Stir in the thawed, squeezed-dry spinach and cook for another 2-3 minutes until it darkens slightly and any excess moisture evaporates.
    4. In a large mixing bowl, combine the softened cream cheese, sour cream, mayonnaise, shredded mozzarella, and grated Parmesan. Mix until smooth and creamy.
    5. Add the chopped artichoke hearts and cooked spinach mixture to the bowl, folding everything together gently to evenly distribute the ingredients.
    6. Season with salt, pepper, and a pinch of cayenne if you like some heat. Mix again to incorporate.
    7. Transfer the cheesy mixture into an oven-safe dish, smoothing the top with a spatula.
    8. Bake in the preheated oven for 20-25 minutes, until bubbling around the edges and golden on top.
    9. Remove from oven and let rest for about 5 minutes. The dip will thicken slightly and develop a beautiful, bubbly crust.
    10. Garnish with chopped fresh herbs if desired, then serve warm with crusty bread, chips, or veggie sticks for dipping.

    Notes

    Feel free to tweak the cheeses or add a dash of hot sauce for extra flavor. Making it a day ahead allows flavors to meld beautifully; reheat in the oven before serving.

    Tips & tricks for perfect dip

    • GARLIC: Sauté garlic until fragrant, not browned, to avoid bitterness.
    • USE ROOM TEMP CHEESE: Helps ingredients blend smoothly, avoiding clumpy dip.
    • SPINACH PREP: Squeeze out all excess water for a creamy texture.
    • CHEESE VARIATION: Mix different cheeses for complexity, like gouda or fontina.
    • BAKE IN CAST IRON: For a rustic look and even heat distribution.

    Common mistakes and how to fix them

    • FORGOT TO SQUEEZE SPINACH? — Drain excess water with paper towels before mixing.
    • DUMPED TOO MUCH CHEESE? — Add a splash of milk or cream to loosen.
    • OVERTORCHED? — Cover with foil and lower the oven temp, then continue baking.
    • UNDERTEMP? — Bake a few more minutes until bubbling and golden.

    Fast fixes to keep your dip perfect

    • When too thick, splash in a bit of milk to loosen.
    • When bland, add a pinch of cayenne or more garlic.
    • If bubbling over, lower oven temperature or cover loosely.
    • Splash some lemon juice for brightness.
    • Patch a runny dip with extra cheese or bread crumbs.

    Make ahead and storage tips

    • Prepare the dip up to 24 hours ahead, cover and refrigerate.
    • The flavor intensifies overnight, so it’s actually better the next day.
    • Reheat in the oven at 175°C (350°F) until bubbly, about 10-15 mins.
    • Serve warm; if it cools, pop it back in the oven to shimmer again.

    10 Practical Q&As About Spinach Artichoke Dip

    1. Can I use fresh spinach instead of frozen?

    Use frozen chopped spinach, thawed and squeezed dry, for convenience and a consistent texture.

    2. How do I prepare fresh spinach?’

    Yes, sauté fresh spinach until wilted and excess water evaporates before mixing.

    3. Can I substitute fresh artichokes?

    Use high-quality canned or jarred artichoke hearts, drained and chopped, for the best flavor.

    4. Can I use other greens or vegetables?

    Absolutely, cooked and chopped fresh artichokes work well, but they may add a slightly different texture.

    5. Can I make it healthier or dairy-free?

    Cream cheese, sour cream, and mayonnaise create that creamy, cheesy base; adjust quantities for desired richness.

    6. How do I prevent the dip from becoming too greasy?

    Yes, swap dairy ingredients with plant-based alternatives like vegan cream cheese or yogurt.

    7. How do I know when it’s ready?

    Bake it in an oven-safe dish at 180°C (350°F) until bubbly and golden on top.

    8. Can I prepare this ahead of time?

    Look for bubbling edges and a lightly browned top, about 20-25 minutes.

    9. How do I reheat leftovers?

    Yes, assemble and refrigerate up to 24 hours before baking.

    10. What’s a good side or dip partner?

    Reheat in the oven at 175°C (350°F) until warmed through, about 10-15 minutes.

    This spinach artichoke dip is more than just a party starter — it’s a cozy, imperfect hug in food form. It reminds me that sometimes the best things happen when you toss convention aside and just go with your gut.

    Whether you’re making it for a quick snack or a casual gathering, it’s easy to love and even easier to customize. Just keep that cheese gooey, that spinach vibrant, and let the chaos happen. That’s where the real magic lives.

  • Spicy Roasted Tofu Recipe

    This recipe is a love letter to the humble tofu, but with a twist—spicy, smoky, and irresistibly crispy. I’ve always admired how it can absorb flavors like a sponge, yet still hold its shape and texture. The magic happens in the oven, where the heat transforms it into something almost snack-like.

    It’s not just about the spice; it’s about the contrast—the tender interior with the crackly exterior, the burst of flavor in every bite. It’s a dish I turn to when I want something satisfying but not heavy, with a little kick to wake up the senses.

    Focusing on the sensory transformation of tofu from bland to spicy, crispy perfection, highlighting texture and aroma.

    Why this spicy roasted tofu keeps my kitchen lively

    • I love how roasting transforms tofu into something almost snack-like.
    • Sometimes I get impatient and skip marinating—still good, but it misses that flavor punch.
    • I’ve burned more batches than I care to admit, but each time I learn a little more.
    • The smell of roasted spices filling the kitchen is my favorite part.
    • There’s a quiet pride in turning a simple block into a crispy, spicy treat.

    The story behind my fiery tofu obsession

    • This recipe grew out of my love for smoky, spicy flavors and the craving for something crispy without frying. I wanted a method that’s easy, reliable, and that makes tofu taste like it’s been kissed by fire and spice.
    • Once I nailed the marinade and roasting times, it became a staple—quick, flavorful, and versatile enough to toss into salads, wraps, or eat straight from the oven.
    • It’s a reminder that good things happen when you combine patience with a little heat.

    The Curious History and Spice Lore of Tofu

    • Tofu originated in ancient China, where it was valued for its protein and versatility.
    • The name ‘tofu’ comes from the Japanese pronunciation of the Chinese ‘doufu.’
    • Roasting tofu is a modern twist that emphasizes texture and flavor, popular in plant-based cooking.
    • Smoked paprika and chili powders are key to achieving that deep, smoky, spicy profile.

    Ingredient insights and tweaks

    • Firm tofu: I prefer it because it holds up well and crisps nicely. Swap with extra-firm if available.
    • Chili powder: I love the smoky heat it adds, but cayenne can replace it for more punch.
    • Soy sauce: It’s essential for umami; coconut aminos are a good soy-free option.
    • Smoked paprika: It gives that deep, smoky flavor—try regular paprika if you want milder taste.
    • Honey or maple syrup: Balances spice with a touch of sweetness; leave out for vegan version.

    Spotlight on Key Ingredients

    Tofu:

    • It’s all about pressing out moisture—so it crisps up perfectly. Soft tofu will fall apart.
    • The marinade penetrates deeply, so give it time to soak in those spicy, smoky flavors.

    Smoked paprika:

    • It’s the smoky backbone, giving the dish its signature depth. Without it, the spice feels flat.
    • The powder should be vibrant red, not dull—freshness matters.

    Smart substitutions for dietary needs and flavor preferences

    • Dairy-Free: Use maple syrup instead of honey for sweetness—no compromise on flavor.
    • Gluten-Free: Tamari or coconut aminos replace soy sauce—still savory, still satisfying.
    • Low-Sodium: Opt for reduced soy sauce or dilute marinade with water to control salt.
    • Spicy: Adjust chili powder or hot sauce to dial up or down the heat.
    • Oil: Avocado oil can replace sesame or vegetable oil for a milder flavor.

    Equipment & Tools

    • Baking sheet: To hold the tofu while roasting
    • Parchment paper: Prevent sticking and easy cleanup
    • Mixing bowl: Combine marinade ingredients
    • Spatula or toss tool: Ensure even coating of tofu

    Step-by-Step Guide to Spicy Roasted Tofu

    1. Preheat your oven to 200°C (400°F). Line a baking sheet with parchment.
    2. Drain tofu and press for at least 20 minutes to remove excess moisture. Cut into 1-inch cubes.
    3. Mix together spicy marinade: soy sauce, chili powder, smoked paprika, garlic powder, a splash of sesame oil, and a teaspoon of honey or maple syrup.
    4. Toss tofu cubes in marinade, ensuring each piece is well coated. Marinate for at least 30 minutes, or up to 2 hours in the fridge.
    5. Spread tofu on the prepared baking sheet in a single layer. Reserve leftover marinade.
    6. Roast for 12 minutes, then flip tofu pieces. Roast for another 12-15 minutes, or until edges are deep amber and crispy.
    7. During the last 5 minutes, brush with remaining marinade to build up a glaze. Watch for bubbling and slight char.
    8. Remove from oven and let rest for 5 minutes. Serve warm, garnished with chopped scallions or cilantro.

    Let the tofu rest for 5 minutes to firm up before serving. Garnish with herbs or a squeeze of lemon for added brightness.

    How to Know It’s Done

    • Edges are caramelized and crispy.
    • Tofu feels firm but not brittle.
    • Smell should be smoky with spicy undertones.

    Spicy Roasted Crispy Tofu

    This dish features firm tofu baked until crispy and coated in a smoky, spicy marinade. The oven roasting process creates a tender interior contrasted by a crackly exterior, bursting with bold flavors. It’s a satisfying, snack-like plant-based treat with a fiery kick and irresistible texture.
    Prep Time 15 minutes
    Cook Time 30 minutes
    Total Time 45 minutes
    Servings: 4
    Course: Main Course
    Cuisine: Asian-inspired
    Calories: 180

    Ingredients
      

    • 14 oz firm tofu pressed and drained
    • 3 tbsp soy sauce or coconut aminos for soy-free
    • 1 tbsp chili powder smoked preferred
    • 1 tsp smoked paprika deep smoky flavor
    • 1 tsp garlic powder adds depth
    • 1 tsp sesame oil for richness and aroma
    • 1 tsp honey or maple syrup balances heat, omit for vegan

    Equipment

    • Baking sheet
    • Parchment paper
    • Mixing bowl
    • Spatula or toss tool

    Method
     

    1. Preheat your oven to 200°C (400°F). Line a baking sheet with parchment paper to prevent sticking and make cleanup easy.
    2. Drain the tofu well, then press it for at least 20 minutes to remove excess moisture. Once pressed, cut the tofu into 1-inch cubes, aiming for uniform size for even roasting.
    3. In a mixing bowl, whisk together soy sauce, chili powder, smoked paprika, garlic powder, sesame oil, and honey or maple syrup until smoothly combined. You should smell a fragrant, smoky-spicy aroma.
    4. Add the tofu cubes to the marinade and toss gently with a spatula or toss tool until each piece is thoroughly coated with the spicy, smoky mixture. Let the tofu marinate for at least 30 minutes, or up to 2 hours in the fridge for more flavor.
    5. Spread the marinated tofu cubes in a single layer on the prepared baking sheet. Reserve any leftover marinade for glazing later.
    6. Roast the tofu in the oven for 12 minutes, then flip each piece carefully with a spatula to ensure even browning. Continue roasting for another 12-15 minutes, or until the edges are deep amber and crispy, and you hear a slight crackling sound as they bake.
    7. During the last 5 minutes of roasting, brush the tofu with the remaining marinade to build up a glossy, flavorful glaze. Keep an eye on it to prevent burning; edges should be caramelized and slightly charred.
    8. Remove the tofu from the oven and let it rest for 5 minutes. This helps the exterior set and the crispy texture to firm up slightly.
    9. Serve hot, garnished with chopped scallions or cilantro if desired. The tofu should be crackly outside, tender inside, with an irresistible smoky, spicy aroma.

    Tips and tricks for perfect roasted tofu

    • Use high heat to get that crispy exterior.
    • Toss tofu halfway through roasting to ensure even browning.
    • Marinate longer for deeper flavor absorption.
    • Pat tofu dry before marinating to avoid excess moisture.
    • Add a splash of rice vinegar for a tangy kick.

    Common mistakes and how to fix them

    • FORGOT TO PRESS: Drain tofu longer or wrap in a towel with weight.
    • DUMPED MARINADE: Use it to brush during roasting for extra flavor.
    • OVER-TORCHED: Reduce oven temp or check sooner—edges should be amber, not black.
    • UNDER-COOKED: Roast longer, especially if the tofu feels soft and not crispy.

    Fast fixes for common tofu roasting issues

    • When tofu isn’t crispy enough, broil for 2 minutes—watch carefully.
    • Splash a little water if marinade is too thick—thin with a teaspoon of oil.
    • Patch over burnt edges with a sprinkle of fresh herbs.
    • Shield tofu from direct heat if edges blacken too fast.
    • Shimmer some sesame oil on finished tofu for extra aroma.

    Prep, store, and reheat for maximum crunch

    • Marinate tofu up to 2 hours ahead for deeper flavor.
    • Store roasted tofu in an airtight container for up to 3 days in the fridge.
    • Reheat in a hot skillet until crispy again, about 3-5 minutes, or in a 180°C (350°F) oven.
    • The flavors deepen over time, but the tofu may lose some crispness.

    10 Practical Q&As About Spicy Roasted Tofu

    1. Can I use soft tofu?

    Use firm tofu, drained well, and pressed for at least 20 minutes. It absorbs flavors better and crisps up nicely.

    2. How long should I marinate?

    Marinate the tofu in a spicy, smoky sauce for at least 30 minutes. The longer, the better for flavor penetration.

    3. What oven temperature?

    Roast at 200°C (400°F) for about 25-30 minutes. Flip halfway to get even crispness.

    4. How do I know when it’s done?

    Look for a deep amber color on the edges and a crispy exterior. The smell should be smoky with a hint of spice.

    5. How do I serve it?

    Serve hot, garnished with fresh herbs or a squeeze of lemon. The tofu should be crackly outside and tender inside.

    6. Can I make it ahead?

    Store leftovers in an airtight container for up to 3 days in the fridge. Reheat in a hot skillet to restore crispness.

    7. What oil works best?

    Use a high-smoke-point oil like vegetable or peanut oil for roasting. It crisps better and handles heat well.

    8. How can I make it milder or spicier?

    Adjust the spice level by adding or reducing chili powder or hot sauce in the marinade.

    9. Can I substitute soy sauce?

    Use tamari or soy sauce for a salty, umami boost. Coconut aminos works for a soy-free version.

    10. What if I want more heat?

    If you prefer a different heat, add fresh chili slices or a dash of cayenne to the marinade.

    Once you get the hang of roasting tofu this way, it’s hard to go back to plain or pan-fried. It’s perfect for grabbing a quick snack or tossing into salads and bowls. The best part? It stays crisp and flavorful even after a little time in the fridge.

    This dish feels like a little rebellion against the blandness that tofu can sometimes fall into. It’s a reminder that even simple ingredients can surprise us with the right heat, spice, and a touch of patience in the oven.

  • Chickpea Buddha Bowl Recipe

    In my kitchen, the chickpea Buddha bowl isn’t just about eating healthy. It’s about creating a small, colorful world on a plate that feels grounding amid chaos.

    I’ve learned that the way you layer flavors and textures—crisp, creamy, tangy—can turn everyday ingredients into a moment of calm and clarity.

    Turning a humble bowl into a mindful, sensory-rich experience that celebrates simple ingredients in a chaotic world.

    Why This Bowl Matters to Me Now

    • I love how this bowl combines textures and flavors in every bite.
    • It’s a flexible template—change up the veggies and dressings based on what I have.
    • Cooking the chickpeas crispy always reminds me of street food stalls in warm evenings.

    The Inspiration Behind My Chickpea Buddha Bowl

    • This recipe came from a rush to eat something nourishing and quick but with a bit of soul. I was craving crunch and freshness, and it clicked—roasted chickpeas, fresh greens, tangy dressing.
    • It’s a dish that’s easy to customize, so I can adapt it to whatever’s in the fridge or my mood.
    • It’s become a go-to because it feels good, looks pretty, and is genuinely satisfying, especially when I need a little balance.

    Origins and Quirky Trivia of the Chickpea Buddha Bowl

    • The Buddha bowl concept originated from traditional Japanese donburi, but has evolved into a global, health-focused trend.
    • Chickpeas have been cultivated for over 7,000 years, especially prominent in Middle Eastern and Mediterranean cuisines.
    • Roasting chickpeas enhances their nutty flavor and gives a satisfying crunch, making them a perfect topping.

    Ingredient Insights for the Chickpea Buddha Bowl

    • Chickpeas: I like canned, rinsed, and patted dry. They become crispy and nutty when roasted.
    • Use dried chickpeas for a more economical, earthier flavor. Soak overnight and cook until tender.
    • Olive oil: Adds richness to roasting. Use sparingly to avoid greasiness, but enough for crunch.
    • Lemon: Brightens everything. Freshly squeezed is best—zesty and sharp.
    • Tahini: Creamy, nutty, and essential for dressing. Thin with warm water if too thick or pasty.
    • Veggies: Carrots, peppers, cucumbers — all add crunch and color. Switch based on season.
    • Grains: Quinoa or brown rice, both hearty. Rinse well for fluffiness and remove excess moisture.

    Spotlight on Chickpeas and Tahini

    Chickpeas:

    • They’re firm and slightly nutty when raw, but roasting enhances their crunch and flavor.
    • They retain a soft, creamy interior if cooked properly—test by pressing gently.
    • Canned chickpeas are convenient; dried take longer but develop a richer taste.

    Tahini:

    • It’s a sesame paste with a deep, earthy flavor and a slightly oily texture.
    • During dressing prep, tahini can seize up or become grainy—whisk vigorously or thin with warm water.
    • It’s sensitive to heat—add at the end to preserve its nutty aroma.

    Ingredient Substitutions for the Chickpea Buddha Bowl

    • Dairy-Free: Swap yogurt or sour cream with coconut yogurt for creaminess.
    • Gluten-Free: Use gluten-free grains like quinoa or millet, which keep the bowl light.
    • Extra Protein: Tofu or tempeh can replace chickpeas for variety.
    • Vegan: Skip honey and choose maple syrup or agave in dressings.
    • Spice Level: Add hot sauce or chili flakes to the dressing for heat.
    • Crunch: Use toasted nuts or seeds instead of roasted chickpeas for different texture.
    • Fresh Herbs: Cilantro or mint can brighten the bowl even more.

    Equipment & Tools

    • Baking sheet: Roasting chickpeas and sweet potatoes
    • Saucepan: Cooking grains
    • Whisk: Making the dressing
    • Knife and cutting board: Preparing vegetables
    • Measuring spoons and cups: Accurate ingredient measurement

    Step-by-step Guide to the Chickpea Buddha Bowl

    1. Drain and rinse the chickpeas thoroughly. Pat dry.
    2. Preheat oven to 200°C/400°F. Toss chickpeas with olive oil, salt, paprika, and cumin.
    3. Spread on a baking sheet. Roast 25-30 minutes, shaking halfway. Look for crispy, golden edges.
    4. Cook grains—quinoa or brown rice—in boiling water with a pinch of salt, about 15 minutes.
    5. Prepare vegetables: slice carrots thin, bell peppers into strips, and slice cucumbers.
    6. Roast sweet potatoes at 200°C/400°F for 20-25 minutes until caramelized.
    7. Make the dressing: whisk lemon juice, olive oil, salt, honey, and tahini until smooth.
    8. Assemble: start with grains, top with roasted chickpeas, veggies, greens, and drizzle with dressing.
    9. Finish with a sprinkle of sesame seeds or chopped herbs.
    10. Rest for 5 minutes to let flavors meld before serving.

    Let the assembled bowl sit for 5 minutes before eating to allow flavors to meld. Serve with extra herbs or seeds on top.

    How to Know It’s Done

    • Chickpeas are crispy and golden.
    • Grains are fluffy and tender.
    • Vegetables are roasted and caramelized at edges.

    Chickpea Buddha Bowl

    This vibrant bowl features crispy roasted chickpeas, fluffy grains, fresh vegetables, and a tangy tahini dressing, creating a harmonious mix of textures and flavors. The dish is assembled in layers, resulting in a colorful, satisfying meal with a balance of crunch, creaminess, and freshness. Perfect for a quick, nourishing, and customizable lunch or dinner.
    Prep Time 15 minutes
    Cook Time 30 minutes
    Total Time 45 minutes
    Servings: 4
    Course: Main Course
    Cuisine: Global
    Calories: 420

    Ingredients
      

    • 1 can can canned chickpeas rinsed and drained
    • 2 cups quinoa rinsed
    • 2 medium carrots sliced thin
    • 1 bell pepper bell pepper sliced into strips
    • 1 cucumber cucumber sliced
    • 1 sweet potato sweet potato cubed
    • 3 tbsp olive oil divided, for roasting and dressing
    • 1 tsp paprika for chickpeas
    • 1/2 tsp cumin for chickpeas
    • 1 lemon lemon juice freshly squeezed for dressing
    • 3 tbsp tahini for dressing
    • 1 tbsp honey or maple syrup for vegan
    • 1 clove garlic minced for dressing
    • to taste salt for dressing and roasting
    • to taste pepper for dressing and roasting
    • 2 tbsp sesame seeds for garnish

    Equipment

    • Baking sheet
    • Saucepan
    • Whisk
    • Knife and cutting board
    • Measuring spoons and cups

    Method
     

    1. Preheat your oven to 200°C/400°F. Rinse and drain the chickpeas, then pat them dry with a clean towel.
    2. In a bowl, toss the chickpeas with 1 tablespoon of olive oil, paprika, cumin, salt, and pepper until evenly coated.
    3. Spread the chickpeas on a baking sheet in a single layer. Roast for 25-30 minutes, shaking the pan halfway through, until crispy and golden.
    4. While the chickpeas roast, rinse the quinoa under cold water and cook in a saucepan with 4 cups of water until tender, about 15 minutes. Fluff with a fork and set aside.
    5. Slice the carrots into thin matchsticks, cut the bell pepper into strips, and slice the cucumber. Prepare all vegetables and set aside.
    6. Cube the sweet potato, toss it with 1 tablespoon of olive oil, salt, and pepper, then spread on a baking sheet. Roast for 20-25 minutes until caramelized and soft.
    7. In a small bowl, whisk together lemon juice, tahini, honey, minced garlic, remaining olive oil, salt, and pepper until smooth and slightly thickened. Thin with a little water if needed.
    8. Once all components are ready, assemble the bowls by placing a bed of fluffy quinoa, then layering roasted chickpeas, sweet potatoes, and fresh vegetables on top.
    9. Drizzle the tahini dressing generously over each bowl and sprinkle with sesame seeds for added crunch and visual appeal.
    10. Serve immediately, or let sit for a few minutes to allow flavors to meld. Enjoy this colorful, nourishing bowl as a balanced meal.

    Cooking Tips & Tricks for the Perfect Chickpea Bowl

    • Crispy chickpeas—use a hot oven and don’t overcrowd the pan.
    • Fluffy grains—rinse and cook in plenty of water, then fluff with a fork.
    • Bright dressing—whisk ingredients thoroughly to emulsify.
    • Even roasting—spread veggies in a single layer and turn halfway.
    • Fresh greens—add greens last, just before serving to keep crisp.
    • Texture contrast—combine soft grains with crunchy toppings for variety.
    • Flavor balance—taste and adjust salt or acidity before serving.

    Common Mistakes and How to Fix Them

    • FORGOT TO RINSE CHICKPEAS? Rinse again and roast a few extra minutes for crispness.
    • DUMPED TOO MUCH OIL? Use less next time, or bake on parchment for less greasy crunch.
    • OVER-ROASTED VEGGIES? Reduce oven time or lower temperature to prevent burning.
    • MISSED THE SALT? Add a pinch at the end of dressing prep or sprinkle on assembled bowl.

    Quick Fixes for Common Problems

    • When bowl is too dry, splash with a little lemon juice or olive oil.
    • If chickpeas aren’t crispy enough, roast longer or at higher temp briefly.
    • Patch soggy greens with a squeeze of lemon and a pinch of salt.
    • Shield delicate herbs by adding them just before serving.
    • Splash extra dressing if the grains seem dry or bland.

    Make-Ahead and Storage Tips for the Chickpea Buddha Bowl

    • Cook grains and chickpeas ahead; store in airtight containers for up to 3 days.
    • Roast vegetables and prep dressings a day in advance; keep refrigerated.
    • Assemble bowls just before eating to keep greens crisp.
    • Reheat grains and roasted veggies in a skillet or oven, about 5-10 minutes, until warm and fragrant.

    10 Practical Q&As About the Chickpea Buddha Bowl

    1. Can I use dried chickpeas?

    Use cooked chickpeas, either from a can (rinse well) or freshly boiled. They should be soft but not mushy.

    2. How do I achieve crispy veggies?

    Yes, soak and cook dried chickpeas ahead. They take longer but have a nuttier flavor.

    3. How do I prevent the grains from sticking?

    Roast at 200°C/400°F until edges are caramelized, about 20-25 minutes. Toss halfway for even crispiness.

    4. Can I make this vegan?

    Rinse grains thoroughly, cook in plenty of water, drain, then toss with a splash of oil before assembling.

    5. What’s a quick dressing alternative?

    Absolutely. Skip any dairy-based toppings, and use vegan-friendly dressings and garnishes.

    6. How long can I store the assembled bowl?

    Mix lemon juice, olive oil, salt, and a touch of honey or maple syrup for a bright, simple vinaigrette.

    7. How do I reheat without sogginess?

    Best enjoyed fresh, but leftovers can be refrigerated for up to 2 days. Keep ingredients separate if possible.

    8. What if my tahini is too thick?

    Gently warm the grains and roasted veggies in an oven or skillet. Keep greens fresh for serving.

    9. Any tips for making it more filling?

    Thin it out with a teaspoon of warm water or lemon juice until smooth.

    This bowl isn’t just a meal; it’s a little ritual. A pause in the day to focus on what’s nourishing and real.

    Sometimes, I forget how much a simple, well-made meal can anchor me. It’s honest, straightforward, and oddly comforting.