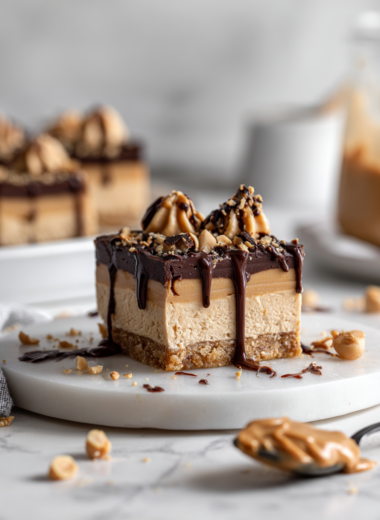
Author: Noah

  • Peppermint Hot Chocolate Recipe

    There’s something about the scent of peppermint swirling into hot chocolate that feels like a warm hug in a mug. It’s a simple comfort, but making it from scratch turns it into an act of care. I like to think of this as a recipe for those little winter moments that sneak up on us—quiet evenings, soft lights, and the gentle shimmer of peppermint.

    This isn’t just about the flavor, though. It’s about the ritual—the whisking, the smell of melting chocolate, the anticipation of that first sip. It’s a small thing, but it feels like wrapping yourself in a favorite sweater, on a cold day that’s begging for a little extra warmth.

    Embracing the nostalgic, sensory experience of peppermint hot chocolate, focusing on homemade warmth and cozy comfort during the chilly season.

    Why I Keep Coming Back to This Recipe

    • I love how the peppermint cuts through the richness of the chocolate, making each sip lively.
    • Sometimes I add a dash more peppermint—just enough to make my nose tingle.
    • Making this from scratch always feels like a small victory, especially when I get the perfect balance.
    • It’s my go-to when I need a little winter magic, no matter how chaotic the day.

    My Inspiration for This Cozy Drink

    • This recipe was born out of a chilly evening when I wanted something special but didn’t want to fuss. I mixed dark chocolate with fresh cream, added a dash of peppermint, and the whole house filled with a warm, minty aroma. It’s become a seasonal staple because it reminds me of childhood winters, but with a grown-up twist.
    • • I experimented with different chocolates until I found one that melted smoothly and tasted rich.
    • • The peppermint extract makes or breaks the flavor—too little and it’s dull, too much and it’s harsh.
    • • I discovered that a quick stir over low heat keeps the chocolate glossy and smooth.

    A Brief History of Peppermint Hot Chocolate

    • Peppermint hot chocolate has roots in European winter traditions, blending chocolate’s warmth with peppermint’s coolness.
    • The first commercial peppermint candies appeared in the late 1800s, but peppermint-flavored drinks are much older.
    • Chocolate and mint became a popular pairing in the 20th century, especially around the holidays.
    • Adding a splash of peppermint liqueur can turn this into a grown-up treat.

    Ingredient Insights and Tweaks

    • Chocolate: I prefer dark chocolate for a bittersweet depth, but milk chocolate makes it softer and sweeter. Expect it to melt slowly, releasing a rich aroma.
    • Milk: Use whole milk for creaminess, but almond or oat milk can lighten it up. Warm it gently—no boiling or it can curdle.
    • Peppermint extract: Just a few drops bring a bright, cool burst. Too much can taste harsh—start small.
    • Sugar: Fine-tunes sweetness; I often skip it if using very sweet chocolate. Adjust to taste.
    • Cream: Adds silkiness. Heavy cream is best but coconut cream works for dairy-free versions. Watch it melt into the chocolate.

    Key Ingredients That Shine

    Chocolate:

    • Dark chocolate: Rich, smooth, with a slightly bitter edge that balances sweetness. Melt it slowly for best texture.
    • Peppermint extract: Bright and cooling. It’s potent, so start small, then build flavor.

    Cream:

    • Heavy cream: Creates a luscious, velvety base. Watch it heat to avoid boiling and splitting.
    • It melts into the cocoa, making it thick and satisfying.
    • For dairy-free, coconut cream adds richness with a tropical twist.

    Substitutions to Customize Your Drink

    • Dairy-Free: Use coconut or almond milk—less creamy but still flavorful.
    • Sweetener: Swap sugar for honey or maple syrup for a different sweetness profile.
    • Chocolate: Try carob for a caffeine-free, slightly earthier flavor.
    • Peppermint: Use peppermint-flavored syrup instead of extract for convenience.
    • Whipped Topping: Use coconut whipped cream for a dairy-free topping.

    Equipment & Tools

    • Saucepan: Warm milk and melt chocolate.
    • Whisk: Combine ingredients smoothly.
    • Measuring spoons: Control peppermint and sugar.
    • Mugs: Serve hot drinks.

    How to Make Peppermint Hot Chocolate

    1. Gather your ingredients—chocolate, milk, cream, peppermint extract, and sugar. Keep everything within arm’s reach.
    2. In a saucepan over medium heat, warm the milk and cream until just steaming—small bubbles around the edges, but don’t let it boil.
    3. Add the chocolate chips or chopped chocolate to the warm milk. Stir continuously until smooth and glossy, about 3–5 minutes.
    4. Stir in sugar and peppermint extract. Taste and adjust—start with 1/4 teaspoon peppermint, then add more if needed.
    5. Continue to heat, but don’t boil. The mixture should be hot enough to steam and shimmer, but not burn.
    6. Once heated through and well combined, remove from heat. Check the texture—should be velvety and smooth.
    7. Pour into mugs. Top with whipped cream or marshmallows if desired. Garnish with a small peppermint candy or a sprig of mint.
    8. Rest for a minute, then serve hot. Sip slowly, enjoying the warm, minty richness.

    Serve immediately, topped with whipped cream and a peppermint candy for a festive touch.

    How to Know It’s Done

    • Chocolate is fully melted and glossy.
    • Milk mixture is steaming but not boiling.
    • Peppermint flavor is balanced, not overpowering.

    Peppermint Hot Chocolate

    This peppermint hot chocolate combines rich, melted dark chocolate with creamy milk and a splash of peppermint extract to create a cozy winter beverage. The process involves gently warming and whisking the ingredients until smooth and glossy, resulting in a velvety drink topped with whipped cream and festive garnishes. It’s the perfect comforting treat for chilly evenings, with a bright peppermint kick in every sip.
    Prep Time 5 minutes
    Cook Time 10 minutes
    Total Time 15 minutes
    Servings: 2
    Course: Main Course
    Cuisine: Holiday, Winter
    Calories: 250

    Ingredients
      

    • 1/2 cup heavy cream or coconut cream for dairy-free
    • 2 cups whole milk
    • 4 oz dark chocolate chopped or chocolate chips
    • 1/4 teaspoon peppermint extract start with less and adjust to taste
    • 1 tablespoon sugar optional, adjust to sweetness
    • whipped cream for topping optional
    • peppermint candy or sprig for garnish optional

    Equipment

    • Saucepan
    • Whisk
    • Measuring spoons
    • Mugs

    Method
     

    1. Pour the heavy cream and milk into a saucepan and warm over medium heat until just steaming, with small bubbles forming around the edges. You should be able to hear a gentle simmer.
    2. Add the chopped dark chocolate or chocolate chips to the warm milk mixture. Stir continuously with a whisk, creating a gentle sizzle, until the chocolate is fully melted and the mixture is smooth and glossy.
    3. Stir in the sugar and peppermint extract, tasting as you go. Adjust the peppermint to your preference—start with a small splash and add more if you want a stronger minty flavor. Continue whisking until everything is well combined and heated through.
    4. Remove the saucepan from heat once the mixture is steaming and smooth. Check the temperature—it’s ready when it’s hot but not boiling. Pour the hot chocolate into mugs, filling them generously.
    5. Top each mug with a dollop of whipped cream and garnish with a peppermint candy or sprig of mint for a festive touch. Serve immediately while warm and fragrant.

    Tips and Tricks for Perfect Peppermint Hot Chocolate

    • Use high-quality cocoa powder for a richer flavor.
    • Warm the milk gradually to prevent scorching and develop flavor.
    • Add peppermint extract at the end to preserve its bright note.
    • Whisk continuously when melting chocolate to avoid lumps.
    • Don’t boil the mixture—just heat until steaming for best texture.
    • Use a thermometer to keep the temperature below boiling point.
    • Top with whipped cream and peppermint for a festive presentation.

    Common Mistakes and How to Fix Them

    • FORGOT TO STIR: Chocolate lumps. Fix: Stir constantly over low heat until smooth.
    • DUMPED TOO MUCH PEPPERMINT: Overpowering flavor. Fix: Add more milk to dilute.
    • OVER-TORCHED CHOCOLATE: Bitter taste. Fix: Lower heat and stir quickly to prevent burning.
    • SERVED COLD: No warmth. Fix: Reheat gently, stirring constantly.

    Quick Fixes for Common Problems

    • When too thick, stir in a splash of hot milk or cream.
    • Splash a little vanilla if peppermint feels overpowering.
    • Patch dull flavor with a pinch more salt or a tiny drop of vanilla.
    • Shield the mixture from direct heat to prevent burning.
    • Stir vigorously if chocolate separates during reheating.

    Prepping and Storing Peppermint Hot Chocolate

    • Prepare the chocolate mixture ahead of time; store in a sealed jar in the fridge for up to 24 hours.
    • Reheat gently on the stove over low heat, stirring constantly, until steaming and smooth—about 3–5 minutes.
    • The peppermint flavor can intensify over time, so taste and adjust when reheating.
    • Whipped cream or marshmallows are best added fresh, just before serving, to keep them fluffy.

    10 Common Questions About Peppermint Hot Chocolate

    1. Can I use milk instead of cream?

    Use a good quality cocoa powder for richness and depth. It makes a noticeable difference in flavor.

    2. What kind of peppermint extract works best?

    Yes, but it will be thinner and less creamy. Adjust the amount of chocolate accordingly.

    3. Can I make this dairy-free?

    Pure peppermint extract gives a bright, clean flavor. Be careful with the amount—it’s potent.

    4. How do I keep the peppermint flavor balanced?

    Absolutely. Use coconut milk or almond milk, and dairy-free chocolate chips for a smooth, creamy drink.

    5. Is this suitable for kids?

    Add the peppermint extract gradually, tasting as you go. Too much can turn the drink harsh.

    6. Can I add marshmallows?

    Yes, but keep the peppermint extract minimal or use peppermint flavoring, which is milder.

    7. How long does it last in the fridge?

    Definitely. Toasted marshmallows on top add a lovely smoky sweetness.

    8. What’s the best way to reheat?

    You can store it for up to 24 hours. Reheat gently, stirring well to restore creaminess.

    9. Can I make it ahead for a party?

    Use low heat in a saucepan, stirring constantly. Avoid boiling to prevent curdling.

    Once you’ve got the hang of it, this peppermint hot chocolate becomes a go-to for cozy nights. It’s a little ritual that makes the cold outside feel just a bit softer. Plus, it’s easy to tweak—more peppermint for a punch, less for a subtle whisper.

    In the end, it’s about those small, sensory moments—the shimmer of whipped cream, the cool kiss of peppermint—that make winter nights special. No matter how busy life gets, a mug of this can slow everything down, even if just for a few minutes.

  • Air Fryer Roasted Green Beans Recipe

    Green beans? Usually just a quick boil or steamed side. But roasting them in the air fryer? That’s a different story. It’s about harnessing that rapid heat to coax out a smoky, slightly crispy edge while keeping the inside tender and bright.

    This method feels like a secret weapon, especially when you want that roasted flavor without firing up the oven. It’s quick, it’s straightforward, and it makes every bite a little more interesting—crunchy, savory, and with a whisper of char that’s oddly satisfying.

    The Unseen Art of Perfectly Roasted Green Beans in the Air Fryer

    Why I Keep Coming Back to This Simple Technique

    • I love how easy this is on busy nights.
    • There’s a satisfying crunch that’s hard to beat.
    • It reminds me of summer barbecues, even in winter.
    • Sometimes I sprinkle a little feta or chili flakes for extra punch.

    A little kitchen improvisation that turned into a favorite

    • I once forgot to preheat my oven and decided to try the air fryer instead. The beans turned out better than expected—crisp, smoky, and vibrant.
    • It was a small victory that made me realize how versatile the air fryer can be.
    • Now, I use this method whenever I want a quick, flavorful veggie side that doesn’t require much fuss.

    Fun facts and history of roasted green beans

    • Green beans have been a staple vegetable since the 16th century, originally cultivated in the Americas.
    • Roasting green beans brings out a smoky, caramelized flavor that’s hard to achieve with steaming or boiling.
    • In some cuisines, green beans are stir-fried or grilled, but roasting enhances their natural sweetness and crunch.
    • The air fryer mimics a small, hot oven, making it a perfect tool for quick roasting without heating up your entire kitchen.

    Ingredient insights: what makes these green beans shine

    • Green beans: I prefer fresh, vibrant, and firm. They should snap when broken.
    • Olive oil: Light coating is enough; too much makes them greasy and soggy.
    • Sea salt: Enhances the natural flavor and balances the smoky notes.
    • Lemon zest: Brightens the dish with a fresh, citrus aroma—don’t skip it.
    • Parmesan: Adds umami and saltiness—use freshly grated for best flavor.

    Key ingredients and their quirks

    Olive oil: Adds a glossy sheen and helps with crisping. Use good quality for richer flavor.:

    • Green beans: Bright green, firm, and snap when fresh. They develop a smoky, sweet note when roasted.
    • They can turn bitter if overcooked, so keep an eye on timing.

    Parmesan: Melts slightly and adds a salty, nutty kick. Best added right after roasting.:

    • Lemon zest: Releases a burst of citrus fragrance when added hot. Brightens and balances the smoky flavor.
    • Use a microplane for fine zest, avoiding the bitter pith.

    Substitutions for common ingredients

    • Olive Oil: Avocado or neutral oil works—less flavor, same crisping effect.
    • Lemon Zest: Lime or orange zest for different citrus notes—still bright and fresh.
    • Parmesan: Pecorino or nutritional yeast for different salty, cheesy flavors.
    • Fresh herbs: Basil, parsley, or cilantro—add at the end for freshness.
    • Sea salt: Flavored salts or Maldon flakes for an extra touch.

    Equipment & Tools

    • Air fryer: Main appliance for roasting.
    • Tongs: Tossing and removing the beans.
    • Small bowl: Mixing oil and seasonings.
    • Lemon or Parmesan (optional): Adding flavor at the end.

    Step-by-step guide to roasting green beans in the air fryer

    1. Wash and trim the green beans, about 250 grams (9 oz).
    2. Toss them in 1-2 teaspoons of olive oil, just enough to lightly coat.
    3. Preheat your air fryer to 200°C (390°F) for 3 minutes.
    4. Place the beans in the basket, spreading them out evenly.
    5. Cook for 8-10 minutes. Shake the basket halfway through.
    6. Check for a slight char and crisp edges — they should be tender inside.
    7. If needed, give them another 2 minutes for extra crunch.
    8. Remove from the air fryer and transfer to a plate.
    9. Sprinkle with sea salt, lemon zest, or Parmesan for a flavor boost.
    10. Serve immediately for the best texture and flavor.

    Let the beans rest for 1 minute before serving to allow flavors to settle.

    How to Know It’s Done

    • Color: Bright green with some darkened, charred spots.
    • Texture: Crispy edges with a tender interior.
    • Smell: Nutty, roasted aroma with a hint of smoky char.

    Air Fryer Roasted Green Beans

    This recipe uses the air fryer to quickly roast fresh green beans, resulting in a smoky, slightly crispy exterior while keeping the inside tender and vibrant. The high heat creates charred edges and enhances their natural sweetness, making for a flavorful and crunchy side dish. Finished with a touch of lemon zest and Parmesan, it’s a simple yet impressive way to enjoy green beans.
    Prep Time 5 minutes
    Cook Time 10 minutes
    Total Time 15 minutes
    Servings: 4
    Course: Main Course
    Cuisine: American
    Calories: 150

    Ingredients
      

    • 250 grams fresh green beans trimmed and washed
    • 1-2 teaspoons olive oil light coating
    • to taste sea salt for seasoning
    • 1 bunch lemon zest freshly grated
    • a handful Parmesan cheese freshly grated, optional

    Equipment

    • Air fryer
    • Tongs
    • Small bowl

    Method
     

    1. Start by washing and trimming the green beans, removing any tough stems or ends.
    2. Place the green beans in a small bowl and toss them with 1 to 2 teaspoons of olive oil, just enough to lightly coat all the beans. This helps them crisp up nicely during roasting.
    3. Preheat your air fryer to 200°C (390°F) for about 3 minutes. This initial heat jumpstart helps achieve that smoky, crispy edge.
    4. Transfer the coated green beans to the air fryer basket, spreading them out in a single, even layer. Avoid overcrowding to ensure they roast evenly.
    5. Cook the green beans for 8 to 10 minutes, shaking the basket halfway through to promote even roasting and prevent sticking. You should hear a gentle sizzle as they roast.
    6. Check the beans for a slight char and crispy edges—these signs indicate they’re ready. They should be tender inside with a smoky, caramelized exterior.
    7. If you want them extra crispy, roast for an additional 2 minutes, keeping a close eye to prevent burning.
    8. Once done, transfer the green beans to a serving plate. Sprinkle with a pinch of sea salt, freshly grated lemon zest, and Parmesan cheese if using. Toss gently to combine.
    9. Serve immediately to enjoy the crispy, smoky, and vibrant green beans at their best texture and flavor.

    Tips and tricks for perfect roasted green beans

    • Use fresh beans for brighter color and better texture.
    • Shake the basket halfway to ensure even roasting.
    • Toss with lemon zest or Parmesan immediately after cooking.
    • Don’t overcrowd the basket—air needs to circulate.
    • For extra crispness, spray lightly with cooking spray before roasting.

    Common pitfalls and how to fix them

    • FORGOT TO PREHEAT: Preheat your air fryer to avoid soggy beans.
    • DUMPED TOO MUCH OIL: Use just a teaspoon or so—less is more for crunch.
    • OVER-TORCHED: If they turn too dark, lower the temp to 180°C (355°F) and cook 2 more minutes.
    • SOGGY BEANS: Spread them out in a single layer, don’t overcrowd the basket.

    Fast fixes to common roasting issues

    • When beans are limp, toss them back for 1-2 more minutes.
    • If they burn, lower the temperature and cook longer.
    • Splash with lemon juice if they’re too bland.
    • Patch over soggy beans with a sprinkle of fresh herbs.
    • Shield from over-browning by checking early, especially at high temps.

    Prep and storage tips for maximum freshness

    • Trim and wash the beans ahead of time, keep in the fridge for up to 24 hours.
    • Pre-seasoned beans can be stored in an airtight container for a day—best eaten fresh.
    • Refrigerated beans lose some crunch but can be reheated in the air fryer for 2-3 minutes.
    • The flavor remains good, but they’re best enjoyed fresh for that crispy texture.

    10 Practical Q&As About Air Fryer Roasted Green Beans

    1. Can I use frozen green beans?

    Use fresh green beans for the best crunch and vibrant color. Frozen can work but may be soggy.

    2. How much oil do I need?

    Toss the beans in a little oil, just enough to coat. Too much makes them greasy.

    3. Should I preheat the air fryer?

    Preheat your air fryer to 200°C (390°F). It helps the beans start roasting immediately.

    4. How long do I cook green beans in the air fryer?

    Cook for 8-10 minutes, shake halfway. They should be tender, slightly crispy, and bright green.

    5. How do I know when they are done?

    Check for a slight char and a crispy edge. The beans should be tender but not mushy.

    6. Can I make these ahead of time?

    Serve immediately for maximum crunch and flavor. They tend to get soggy if left too long.

    7. How do I reheat them?

    Store leftovers in an airtight container in the fridge for up to 2 days. Reheat in the air fryer for 2-3 minutes.

    8. What if my beans are thick or thin?

    Adjust the cooking time if your beans are thicker or thinner than average. Thin beans cook faster.

    9. Can I add cheese or lemon?

    Add a squeeze of lemon or a sprinkle of Parmesan right before serving for extra flavor.

    10. Do I need special tools?

    Use tongs to toss the beans. It keeps them intact and evenly coated with oil and seasoning.

    Once you get the hang of roasting green beans in your air fryer, it’s hard to go back. They’re perfect as a snack, a side, or even tossed into salads for a smoky crunch.

    This approach keeps things simple but delivers a flavor punch, especially when you’re craving something fresh but with a little edge. Plus, it’s a handy way to use up those beans sitting in your fridge, waiting for their moment.

  • Peanut Butter Cups Recipe

    Making peanut butter cups from scratch isn’t just about tasting better, it’s about the messy, joyful process of creating something sweet with your own hands. I love the way the chocolate melts on your tongue, the salty-sweet peanut filling pulling a smile out of even the grumpiest kid.

    This recipe isn’t about perfection but about capturing that nostalgic feel—rich, creamy, and just a little bit chaotic. It’s the kind of treat that makes you want to grab some spoons and a handful of ingredients, then just wing it.

    The unpolished, honest journey of perfecting homemade peanut butter cups, from melting chocolate to the final bite.

    Why homemade peanut butter cups matter to me

    • There’s something satisfying about melting chocolate slowly, the smell of cocoa filling the kitchen.
    • I love experimenting with different toppings—sea salt, crushed pretzels, even a drizzle of caramel.
    • Making these at home reminds me of childhood, sneaking into the kitchen for a sweet treat.
    • Every batch is a little different, which keeps the process exciting rather than routine.

    A personal story of creating and perfecting this treat

    • My grandma used to make these for us during holidays. The smell of melted chocolate and peanut butter always brings back warm memories.
    • I started experimenting with making them vegan, swapping out dairy chocolate for coconut oil-based melts.
    • The process is forgiving—sometimes the chocolate seizes, sometimes it’s perfect, but the fun is in adjusting and tasting.

    A little history behind the peanut butter cup

    • The first commercial peanut butter cups were created by Hershey in 1928.
    • Peanut butter cups originated as a way to combine chocolate and peanut butter, both American inventions.
    • The classic Reese’s cup was inspired by a candy made by a candy-maker named H.B. Reese.
    • Homemade versions often taste richer because of better quality chocolate and natural peanut butter.

    Ingredient insights: chocolate and peanut butter

    • Chocolate: Rich, melts smoothly, and sets with a shiny finish. Use high-quality for best results. Consider adding a teaspoon of coconut oil for extra gloss.
    • Peanut Butter: Creamy and salty, it’s the star filling. Natural peanut butter gives a more authentic flavor. Stir well to avoid oil separation.
    • Sweetener (if added): A touch of honey or maple syrup can add a subtle sweetness and help the filling stick better.
    • Vanilla Extract: Adds depth and aroma. Use pure vanilla for a richer scent.
    • Salt: Just a pinch enhances all flavors. Flaky sea salt on top is a nice touch.

    Spotlight on chocolate and peanut butter

    Chocolate:

    • It’s the backbone of the cup—smooth, shiny, and melts on your tongue. Watch out for seizing if overheated.
    • Peanut Butter: The creamy, salty core—warm it slightly for easier mixing. It’s more than just filling, it’s the flavor anchor.

    Peanut Butter:

    • Cocoa butter in good chocolate gives it a glossy sheen and smooth melt. It’s worth finding quality bars.
    • Peanut oil in natural peanut butter can make the filling softer but watch for separation during chilling.

    Substitutions to customize your peanut butter cups

    • Dairy-Free: Swap dark chocolate with coconut oil-based melts for a smooth, dairy-free finish.
    • Sweetener: Use honey or maple syrup instead of sugar for a more natural sweetness.
    • Peanut Butter: Almond or cashew butter as a nutty alternative, slightly different flavor but just as creamy.
    • Salted Caramel: Replace some peanut butter with caramel for a richer, gooey center.
    • Vegan: Use plant-based chocolates and nut butters for a vegan-friendly treat.

    Equipment & Tools

    • Muffin tin or silicone molds: Shape and contain the cups
    • Double boiler or microwave-safe bowl: Gently melt chocolate
    • Spatula or small spoon: Spread chocolate and peanut butter
    • Cooling rack or plate: Place cups to set
    • Parchment paper: Lining or protecting work surface

    Step-by-step guide to homemade peanut butter cups

    1. Line a muffin tin with paper cups or silicone molds.
    2. Melt the chocolate slowly over a double boiler or microwave, stirring until smooth.
    3. Spoon about a teaspoon of melted chocolate into each mold, spreading it slightly up the sides. Chill for 10 minutes.
    4. Warm the peanut butter slightly so it’s spreadable. Drop a small spoonful into each chocolate shell.
    5. Cover the peanut butter with more melted chocolate, ensuring it’s completely sealed.
    6. Chill the cups in the fridge for at least 1 hour until set.
    7. Optional: garnish with a sprinkle of flaky salt or crushed peanuts before the final chill.
    8. Remove from molds carefully, using a knife if needed to loosen edges.
    9. Store in an airtight container in the fridge. Serve at room temp for the best texture.

    Chill the cups in the fridge for at least 1 hour. Let them sit at room temperature for 10 minutes before serving for optimal texture.

    How to Know It’s Done

    • Chocolate is glossy and smooth when melted.
    • Peanut butter sits comfortably without overflowing.
    • Chocolate edges are sealed and not streaked with peanut butter.

    Homemade Peanut Butter Cups

    These peanut butter cups are crafted by melting rich chocolate and layering it with creamy, salty peanut butter filling. The process involves melting chocolate, filling molds, and chilling until set, resulting in glossy, bite-sized treats with a smooth, melt-in-your-mouth texture. Perfect for nostalgic snacking or customizing with toppings, they showcase a satisfying combination of sweet, salty, and chocolatey flavors.
    Prep Time 20 minutes
    Cook Time 10 minutes
    Total Time 30 minutes
    Servings: 12
    Course: Main Course
    Cuisine: American
    Calories: 150

    Ingredients
      

    • 1 cup high-quality chocolate (semi-sweet or dark) chopped for melting
    • 1/2 cup natural peanut butter smooth and salty
    • 2 tablespoons honey or maple syrup optional for sweetness
    • 1 teaspoon vanilla extract for added aroma
    • pinch sea salt or flaky salt optional garnish

    Equipment

    • Muffin tin or silicone molds
    • Double boiler or microwave-safe bowl
    • Spatula or small spoon
    • Cooling rack or plate
    • Parchment paper

    Method
     

    1. Place paper cups or silicone molds into a muffin tin for easy shaping.
    2. Gently melt the chocolate using a double boiler or microwave, stirring often until smooth and glossy. The chocolate should be warm but not overheated, with a pleasant aroma filling the kitchen.
    3. Spoon about a teaspoon of melted chocolate into each mold, tilting and swirling to spread it up the sides. Gently tap the tin on the counter to remove air bubbles. Chill in the fridge for 10 minutes to set the base layer.
    4. While the chocolate chills, warm the peanut butter slightly in the microwave for a few seconds until soft and spreadable. Stir in honey and vanilla extract if using, to enhance flavor and smoothness.
    5. Drop small spoonfuls of the softened peanut butter into each chocolate shell, pressing gently to fill the center. Be careful not to overfill—just enough to create a nice, centered filling.
    6. Cover the peanut butter with more melted chocolate, ensuring the filling is completely sealed. Use the back of a spoon or small spatula to smooth the top if needed. Chill again for at least 1 hour until fully set.
    7. Optional: Before the final chill, sprinkle a tiny pinch of flaky salt or crushed nuts on top for extra flavor and visual appeal. Once set, carefully remove the peanut butter cups from the molds and place on a plate.
    8. Let the peanut butter cups sit at room temperature for about 10 minutes before enjoying. This allows the chocolate to soften just slightly, enhancing the melt-in-your-mouth experience. Store leftovers in an airtight container in the fridge for up to two weeks.

    Cooking tips & tricks for perfect peanut butter cups

    • Use room temperature peanut butter for easier spreading.
    • Chill each layer for at least 10 minutes to prevent mixing of layers.
    • Add a pinch of sea salt to the chocolate for a salty-sweet contrast.
    • Use a small spatula or spoon for neat layers.
    • Rewarm chocolate gently if it thickens, to keep it smooth.

    Common mistakes and how to fix them

    • FORGOT TO temper the chocolate? Gently rewarm and stir in a teaspoon of vegetable oil.
    • DUMPED too much peanut butter? Use a damp spoon to level it without overflow.
    • OVER-TORCHED the chocolate? Add a small spoon of coconut oil and stir gently.
    • CRACKED the chocolate after chilling? Let them sit at room temp for 10 minutes before eating.

    Quick fixes for common peanut butter cup mishaps

    • If the chocolate isn’t melting smoothly, splash in a little coconut oil.
    • When chocolate cracks, patch with melted chocolate and smooth over.
    • Shield the cups from humidity by keeping them in a sealed container.
    • When the peanut butter is too stiff, microwave for 5 seconds to loosen.
    • Smell the chocolate—if it smells burnt, start over with fresh chocolate.

    Make-ahead and storage tips for peanut butter cups

    • Prepare the chocolate shells and store them in an airtight container for up to a week.
    • Keep the filled cups in the fridge for 1–2 weeks, or freeze for up to a month.
    • Flavors deepen and meld after a day or two, so they taste even better then.
    • Reheat in the fridge for 10 minutes or at room temp for 20 to restore softness.

    10 practical Q&As about making peanut butter cups at home

    1. How do I melt chocolate without burning it?

    Use a good quality semi-sweet or dark chocolate for a richer flavor. Melt slowly over low heat or in short bursts in the microwave. Be patient, stirring often to prevent burning.

    2. How do I prevent the chocolate from sticking?

    Line your muffin tin with paper cups or silicone molds. This makes removal easier and cleaner. Just a thin layer of oil on the mold surface helps with release.

    3. Can I use crunchy peanut butter?

    Choose a creamy peanut butter, preferably natural or with minimal additives. Stir well before measuring, so it spreads smoothly and bonds well with the chocolate.

    4. Should I heat the peanut butter before filling?

    For a softer center, warm the peanut butter slightly so it’s spreadable but not runny. For a firmer bite, chill the peanut butter before adding to the chocolate.

    5. How long do I need to chill the peanut butter cups?

    Chill your assembled cups in the fridge for at least 1 hour to set the chocolate completely. For quicker setting, pop them in the freezer for about 20 minutes.

    6. What’s the best way to fill the molds neatly?

    Use a small spoon or piping bag to fill the molds to avoid messes. Keep a damp cloth nearby to wipe drips immediately.

    7. My melted chocolate gets thick, what do I do?

    If the chocolate cools and thickens before filling, gently rewarm it in short bursts. Keep the temperature low to prevent seizing.

    8. How do I get shiny, glossy chocolate?

    Add a pinch of coconut oil or shortening to the melted chocolate to make it glossy and easier to pour. It helps with smoothness and shine.

    9. How should I store leftover peanut butter cups?

    Store your peanut butter cups in an airtight container in the fridge for up to two weeks. Bring to room temp before eating for best texture.

    10. Why do my peanut butter cups crack?

    If the chocolate cracks when you bite, it’s over-chilled. Let them sit at room temp for a few minutes before eating.

    Once you get the hang of it, these peanut butter cups become your go-to homemade gift or quick fix. They’re imperfect, but that’s part of the charm, right? Plus, no preservatives, just pure peanut butter, chocolate, and a little love.

    In the end, it’s about the simple pleasure of making something delicious with your own hands—no fancy equipment needed, just a little patience and a lot of good vibes.

  • Black Bean Salad Recipe

    This Black Bean Salad isn’t fancy, but it’s honest and flexible. I love how it comes together in about 10 minutes, and it always hits a spot of cool, smoky, tangy freshness. It’s perfect for hot days when I want something quick but satisfying, or when I need a side that can hold up in a picnic basket.

    There’s something about the way the cumin, lime, and fresh herbs dance together—kind of like a secret handshake between ingredients. I’ve made it a hundred times, tweaking the seasonings and adding whatever’s in the fridge, and it never disappoints.

    A cook’s notes approach, focusing on the comforting, everyday magic of simple, honest food.

    Why This Salad Matters to Me

    • I love how this salad reminds me of summer cookouts with friends.
    • Making it always feels like a small victory—fast, fresh, and satisfying.
    • It’s one of those recipes I keep in my back pocket for busy weekdays.

    A Personal Story Behind the Recipe

    • I first made this salad during a heatwave, craving something cool and quick. It’s become a staple ever since—simple, fresh, and endlessly adaptable.
    • I experimented with different herbs and dressings, but the classic combo of lime and cumin keeps winning.
    • It’s a reminder that good food can come together fast and still be full of flavor.

    A Bit of History and Trivia about Black Bean Salad

    • Black beans have been a staple in Latin American cuisine for centuries.
    • The addition of lime and herbs is a nod to fresh, vibrant flavors typical in summer dishes.
    • Canned beans became popular in the 20th century as a quick, shelf-stable protein source.
    • This salad is a modern take on traditional bean salads, emphasizing speed and freshness.

    Deep Dive into Key Ingredients

    • Black beans: I prefer rinsed, canned beans—soft, creamy, and reliable.
    • Lime juice: Brightens everything and cuts through the richness—fresh is best, but bottled works.
    • Fresh herbs: Cilantro adds a fragrant, slightly citrusy note—parsley can substitute for milder flavor.
    • Red onion: Adds sharpness and crunch—soaking briefly cuts the bite.
    • Olive oil: Adds richness—use a good quality, fruity oil for depth.

    Spotlight on Black Beans and Lime

    Lime:

    • Black beans: Their dense, meaty texture is perfect for salads; they hold their shape well.
    • They turn creamy with a slight chew, providing a satisfying bite.

    Fresh herbs:

    • Lime: The juice gives a punch of acidity—smells bright and citrusy, almost like summer in a glass.
    • The zest can add extra zing if you like more citrus complexity.

    Substitution Tips for Flexibility

    • Dairy-Free: Omit cheese or creamy dressings—this salad is naturally dairy-free.
    • Vinegar: Swap lime juice for apple cider vinegar for a milder acidity.
    • Fresh Herbs: Use parsley or basil if cilantro isn’t your thing, but skip the cilantro for a different flavor profile.
    • Oil: Use avocado oil or a neutral oil if you prefer a different richness.
    • Sweetener: Add a touch of honey or agave if you want a hint of sweetness.

    Equipment & Tools

    • Can opener: To open the canned beans.
    • Mixing bowl: To toss and combine ingredients.
    • Knife and chopping board: To chop herbs and onion.
    • Small jar or bowl with lid: To mix dressing.

    Simple Step-by-Step for a Bright Black Bean Salad

    1. Drain and rinse the canned black beans thoroughly, then transfer to a mixing bowl.
    2. Finely chop a small red onion and a handful of fresh cilantro—about 2 tablespoons.
    3. In a small jar, shake together 2 tablespoons of olive oil, juice of 1 lime, 1/2 teaspoon cumin, and a pinch of salt.
    4. Pour the dressing over the beans, then add the chopped onion and herbs.
    5. Toss everything gently until well combined. Taste and adjust salt or lime if needed.
    6. Let the salad sit in the fridge for at least 30 minutes to meld flavors.

    Serve immediately or chill for 30 minutes. Garnish with extra herbs before serving.

    How to Know It’s Done

    • Beans should be shiny and coated with dressing.
    • Herbs should be fresh and vibrant—no wilted leaves.
    • The salad should smell bright, with lime and cumin prominent.

    Simple Black Bean Salad

    This Black Bean Salad is a quick, refreshing dish that combines rinsed canned black beans with fresh herbs, red onion, and a tangy lime dressing. It’s assembled in just about 10 minutes, resulting in a vibrant, slightly smoky, and tangy salad with a creamy yet firm texture. Perfect for hot days or picnics, it’s a versatile side that’s both satisfying and easy to customize.
    Prep Time 10 minutes
    Total Time 10 minutes
    Servings: 4
    Course: Main Course
    Cuisine: Latin American
    Calories: 180

    Ingredients
      

    • 1 can black beans rinsed and drained
    • 1/2 small red onion finely chopped
    • 2 tablespoons olive oil good quality preferred
    • 1 piece lime juiced
    • 2 tablespoons fresh cilantro chopped
    • 1/2 teaspoon cumin ground
    • Salt to taste

    Equipment

    • Can opener
    • Mixing bowl
    • Knife and chopping board
    • Small jar or bowl with lid

    Method
     

    1. Use a can opener to open the black beans, then rinse them thoroughly under cold water until the liquid runs clear. Transfer the beans to a large mixing bowl.
    2. Finely chop the red onion and add it to the beans. The small dice will add a crisp, sharp bite to contrast the creamy beans.
    3. In a small jar or bowl, combine the olive oil, freshly squeezed lime juice, ground cumin, and a pinch of salt. Shake or whisk until well blended and fragrant.
    4. Pour the dressing over the beans and onions, then add the chopped cilantro. Gently toss everything together so the beans are evenly coated and herbs are distributed.
    5. Taste the salad and add more salt or lime juice if needed. The flavors should be bright, with a good balance of acidity and herbaceous freshness.
    6. Let the salad sit in the fridge for at least 30 minutes to allow the flavors to meld and develop depth.
    7. Give the salad a gentle toss before serving. Garnish with extra cilantro if desired for a fresh, vibrant finish.

    Tips & Tricks for Perfect Black Bean Salad

    • MINIMAL: Use fresh herbs for a vibrant flavor.
    • TECHNIQUE: Toss the beans and dressing while slightly warm to help flavors meld.
    • TIP: Use a microplane for fine onion and herb chopping.
    • HACK: Rinse canned beans under cold water to remove excess sodium and canning liquid.
    • OBSERVATION: The salad tastes better after a short rest—let those flavors mingle.

    Common Mistakes and How to Fix Them

    • FORGOT TO RINSE THE BEANS? Rinse again to remove metallic taste.
    • DUMPED TOO MUCH DRESSING? Add more beans or a splash of water to balance.
    • OVER-TORCHED THE ONION? Soak in cold water 10 minutes to mellow.
    • SALT OFF? Add a pinch more, taste again—balance is key.

    Quick Fixes for Common Problems

    • When too salty, add a squeeze of lemon to brighten.
    • Splash cold water if the salad is too spicy from the onion.
    • Patch dull flavor with extra lime or herbs.
    • Shield from excess moisture by draining beans thoroughly.
    • Rescue a bland salad with a dash of hot sauce or vinegar.

    Make-Ahead and Storage Tips

    • The salad can be made up to 24 hours in advance—flavors deepen overnight.
    • Store in an airtight container in the fridge; it keeps for about 3 days.
    • The herbs may wilt slightly, but the flavors will meld beautifully.
    • Re-toss with a squeeze of lime and a drizzle of olive oil before serving.

    10 Practical Q&As about Black Bean Salad

    1. Can I use dried beans instead of canned?

    Use canned black beans for convenience, just rinse thoroughly to remove any metallic taste.

    2. Can I make this with dried beans?

    Yes, soak and cook dried beans, but it takes longer—about 1-2 hours on the stove.

    3. Is bottled lime juice okay to use?

    Fresh lime juice brightens the salad; bottled works, but fresh is better.

    4. Can I leave out the herbs?

    Add chopped cilantro or parsley for a fresh contrast, or skip if you dislike herbs.

    5. Should I chill it before serving?

    Chill the salad for at least 30 minutes to let flavors meld.

    6. What if I want more crunch?

    You can add chopped tomatoes or corn for extra sweetness and texture.

    7. How do I know if it’s seasoned right?

    Adjust salt and acid to taste—taste as you go.

    8. Can I use a food processor?

    Use a sharp knife to chop ingredients finely; uneven cuts spoil presentation.

    9. What’s a good way to serve it?

    Serve with tortilla chips or on top of greens for variety.

    10. How long does it keep?

    Keep leftovers in an airtight container in the fridge for up to 3 days.

    This salad is a reminder that good food doesn’t need to be complicated. Sometimes, the simplest combinations—black beans, lime, herbs—are the most satisfying. It’s a quick, easy dish that feels like a little victory in the middle of a busy day.

    Whenever I make this, I think about how food can be both humble and full of flavor. It’s one of those recipes that’s always there, dependable and true, waiting for you to tweak and enjoy.

  • Peanut Butter & Jelly Smoothie Bowl Recipe

    This peanut butter & jelly smoothie bowl started as a way to reclaim my childhood mornings—bright, sweet, and simple. I love how the familiar combo transforms into something cool and thick, almost like a dessert you can spoon into. It’s a little messy, a little nostalgic, but always satisfying.

    Sometimes, I crave that burst of fruity sweetness and the rich, salty punch of peanut butter without reaching for toast or cereal. This bowl is my answer—quick to whip up, and it keeps me connected to those carefree, sunny mornings, even when life gets busy.

    Turning a childhood classic into a textured, nourishing breakfast that feels like a treat but fuels your morning.

    Why This Recipe Matters to Me

    • I love how versatile this bowl is—almost anything can be a topping.
    • It’s a quick morning fix that satisfies both my sweet tooth and my need for crunch.
    • Every time I make it, I’m reminded of lazy weekends and simple joys.

    From Nostalgia to Nutrition: The Birth of My Favorite Breakfast

    • Inspired by childhood snacks, I wanted to create a breakfast that felt playful yet nourishing. The idea of blending jam into a smoothie was a happy accident that stuck.
    • It’s become my go-to when I need comfort but also want something healthy and quick.
    • Sometimes I add a sprinkle of chia seeds or a dash of cinnamon for an extra layer of flavor.

    The Surprising History of PB&J and Modern Smoothie Bowls

    • This flavor combo harks back to childhood PB&J sandwiches, but in a new, chilled form.
    • The idea of smoothie bowls gained popularity in health-conscious circles around 2010.
    • Using frozen berries intensifies the flavor and keeps the bowl icy without ice cubes.
    • Peanut butter adds protein and richness, making this more than just a sweet treat.
    • Jelly or jam brings a burst of fruitiness, reminiscent of sticky fingers and sunny picnics.

    Ingredient Insights & Tips

    • Frozen berries: I love their intense, sweet-tart flavor; use fresh berries if you prefer a softer, less icy bowl.
    • Peanut butter: Creamy peanut butter gives a smooth texture; try almond butter for a nutty twist.
    • Jelly/jam: Adds a fruity punch; opt for seedless or chunky if you like texture.
    • Milk: Dairy or plant-based, it helps blend everything smoothly; coconut milk adds richness and flavor.
    • Sweetener: Honey, maple syrup, or agave deepen sweetness; adjust based on your fruit’s natural sugar.

    Spotlight on Key Ingredients

    Peanut butter: It’s the salty, creamy core. Look for natural, with just peanuts and salt.:

    • Frozen berries: They’re the backbone of the chill and flavor. Keep a stash in the freezer for instant smoothies.
    • They release a sweet, fruity aroma as they blend, making the kitchen smell like summer.

    Jelly or jam: The sweet burst. Use a good-quality, fruit-forward one for maximum impact.:

    • It’s rich, slightly oily, and adds depth. Stir well before measuring to incorporate all that peanutty goodness.
    • The oil can separate; a quick stir brings back smoothness and flavor.

    Smart Swaps to Customize Your Bowl

    • Dairy-Free: Swap cow’s milk for almond or oat milk for a subtle, nutty flavor.
    • Sweetener-Free: Use ripe bananas for natural sweetness and creaminess.
    • Nut-Free: Try sunflower seed butter or tahini for a different nutty profile.
    • Vegan: Ensure your jam and sweetener are plant-based.
    • Extra Protein: Add a scoop of protein powder or Greek yogurt for extra filling power.

    Equipment & Tools

    • High-powered blender: Smoothly purees frozen ingredients for a creamy texture.
    • Measuring cups and spoons: Precisely portion ingredients for balance and consistency.
    • Spatula: Scrapes down sides and helps blend evenly.
    • Spoon: For serving and topping.

    Quick & Creamy: How to Make Your Peanut Butter & Jelly Smoothie Bowl

    1. Gather your ingredients and tools: blender, spatula, measuring cups, spoon.
    2. Add 1 cup frozen berries, 2 tbsp peanut butter, 1 tbsp jelly or jam, ½ cup milk, and 1 tbsp sweetener to the blender.
    3. Blend on high for about 30-45 seconds. Stop and scrape down sides as needed.
    4. Blend again until smooth, checking for thickness. Add more milk if too thick; a splash at a time.
    5. Pour into a bowl. The mixture should be thick but scoopable, with a glossy surface.
    6. Top with granola, sliced bananas, or extra dollops of jelly for texture and flavor.
    7. Serve immediately for the best cold, creamy experience.

    Eat immediately after blending. If you must pause, cover with plastic wrap and keep refrigerated up to 24 hours, though texture may slightly change.

    How to Know It’s Done

    • The mixture is thick and glossy, with a slight jiggle when shaken.
    • The color is vibrant, with visible flecks of berry and a smooth surface.
    • Toppings stay put without sinking, indicating the right consistency.

    Peanut Butter & Jelly Smoothie Bowl

    This peanut butter & jelly smoothie bowl is a thick, creamy treat that combines frozen berries, peanut butter, and jam blended into a dessert-like bowl. Its vibrant color and luscious texture make it perfect for a quick, nostalgic breakfast or snack, topped with fresh fruit or granola for added crunch.
    Prep Time 5 minutes
    Total Time 5 minutes
    Servings: 2
    Course: Main Course
    Cuisine: Breakfast, Healthy
    Calories: 250

    Ingredients
      

    • 1 cup frozen berries preferably mixed berries
    • 2 tbsp peanut butter creamy preferred
    • 1 tbsp jelly or jam fruit-forward flavor
    • ½ cup milk dairy or plant-based
    • 1 tbsp sweetener honey, maple syrup, or agave

    Equipment

    • High-powered blender
    • Measuring cups and spoons
    • Spatula
    • Spoon

    Method
     

    1. Add the frozen berries, peanut butter, jam, milk, and sweetener into the blender.
    2. Secure the lid and blend on high for about 30-45 seconds, stopping to scrape down the sides with a spatula if needed. The mixture should start to look thick, smooth, and vibrant in color.
    3. Continue blending until the mixture is glossy, thick, and completely smooth — it should hold a slight jiggle when gently shaken, with no lumps remaining.
    4. Pour the thick, creamy mixture into a bowl. The surface should be shiny and slightly domed, ready for toppings.
    5. Top the bowl with your favorite toppings—sliced bananas, granola, additional dollops of jelly, or a sprinkle of chia seeds for extra crunch and flavor.
    6. Serve immediately with a spoon and enjoy this nostalgic, nourishing treat that feels like dessert but fuels your morning.

    Tips & Tricks for a Perfect Smoothie Bowl

    • START: Use frozen berries—adds chill and enhances flavor.
    • START: Start blending on low, then increase speed for smoother texture.
    • START: Adjust milk gradually—less for thicker, more for pourable consistency.
    • START: Keep ingredients cold for maximum refreshment.
    • START: Toppings should be crunchy or fresh—add just before serving.

    Common Mistakes and How to Fix Them

    • FORGOT TO THAW FROZEN BERRIES? Run them under warm water for a quick thaw.
    • DUMPED TOO MUCH MILK? Add more frozen berries or a spoonful of oats to thicken.
    • OVER-TORCHED THE TOP? Use a gentle flame or skip caramelizing toppings altogether.
    • SEEDY OR Lumpy? Blend longer and scrape down sides—smoothness is key.

    Quick Fixes for Common Smoothie Bowl Woes

    • When too thick, splash in more milk and blend briefly.
    • If too icy, let the mixture sit for 2 minutes to soften.
    • Splash a little warm water if blending stalls.
    • Patch flavor with a dash of honey or extra jam.
    • Shield toppings with a light layer of yogurt if they sink.

    Prepping and Storing Your Smoothie Bowl

    • Prepare the smoothie base ahead and keep in the fridge for up to 24 hours, but stir before serving.
    • Add toppings just before eating to keep them crisp and fresh.
    • Frozen berries can be pre-measured in ice cube trays for quick assembly.
    • The mixture may separate slightly over time; stir well to recombine.

    10 Practical Q&As About the Peanut Butter & Jelly Smoothie Bowl

    1. Can I use crunchy peanut butter?

    Use natural peanut butter for creaminess and better flavor. Stir well to prevent clumping.

    2. Is it better with frozen or fresh berries?

    Frozen berries make the bowl chill and thicken. Thaw slightly if too icy to blend smoothly.

    3. Should I add sweetener?

    Maple syrup or honey adds sweetness. Adjust to taste; start small and build up.

    4. Can I make it dairy-free?

    A splash of milk helps blend thicker ingredients. Use dairy or plant-based milk according to preference.

    5. What toppings work best?

    Toppings like granola, sliced bananas, or a drizzle of extra peanut butter add texture and flavor.

    6. How long does it last in the fridge?

    Serve right away for the best texture. If storing, keep in airtight container and consume within 24 hours.

    7. What equipment do I need?

    Use a high-powered blender for smooth results. Small spatula helps scrape down sides.

    8. How do I make it thicker or thinner?

    Adjust the thickness by adding more milk or frozen fruit. Use less for a thicker bowl.

    9. Can I swap the jelly or peanut butter?

    Experiment with different fruit jams or nut butters for variety. It’s flexible and forgiving.

    10. When should I eat it for best flavor?

    Enjoy immediately for the best frosty, creamy texture. The flavors meld beautifully when fresh.

    Making this smoothie bowl is a small act of rebellion against rushed mornings. It’s honest, grounding, and tastes like a warm memory with a modern twist. Plus, it’s endlessly adaptable, which keeps it interesting.

    When I sit down with my spoon, I feel a little more at home—like I’ve paused life for just a moment. It’s not fancy, just real, honest food that reminds me of simpler times, but still works for today.

  • Vegan Stuffed Peppers Recipe

    Sometimes, I think of stuffed peppers as a blank canvas — a way to turn humble ingredients into something comforting and vibrant. I love the way the peppers soften and sweat out a little of their sweetness, while the filling gets all toasty and hearty in the oven.

    This recipe is about making that process feel natural and unforced. I want you to see how straightforward it is, but also how forgiving. It’s a dish that’s good on a weekday, but hearty enough for a lazy weekend dinner too.

    A cook’s notes on making vegan stuffed peppers using everyday pantry ingredients, focusing on the sensory journey and practical tweaks.

    Why This Recipe Matters to Me

    • I love how adaptable this dish is — you can swap ingredients based on what’s in the fridge.
    • There’s something satisfying about stuffing peppers with a hearty, spiced filling that feels like comfort food.
    • I’ve made these for friends who aren’t veggie fans, and they’re always surprised at how filling they are.

    A Personal Journey with Stuffed Peppers

    • I first started making these when I wanted something nourishing and easy to throw together after a long day.
    • They remind me of summer nights when my family would eat outside, peppers roasting on the grill, filling the air with a smoky sweetness.
    • Now, they’re my go-to for a quick, wholesome dinner that’s satisfying without any fuss.

    A Brief Look at the History and Trivia of Stuffed Peppers

    • The concept of stuffing vegetables dates back thousands of years, with roots in Middle Eastern and Mediterranean cuisines.
    • Vegan stuffed peppers became popular as plant-based diets gained traction, especially in the last decade.
    • Bell peppers are native to Central and South America and were once called ‘pimentos’ in some regions.
    • The name ‘pimiento’ is Spanish for ‘pepper,’ and these peppers have a mild, sweet flavor that pairs well with savory fillings.

    Ingredient Insights and Tips

    • Bell peppers: I prefer the sweet, mild flavor of red or yellow peppers. Squeeze out excess moisture before stuffing.
    • Canned tomatoes: They add a juicy tang and help keep the filling moist. If using fresh, add a splash of water.
    • Cooked grains: I love the texture of quinoa, but rice or millet work too. Cook until just tender.
    • Onion & garlic: They’re the flavor backbone. Sauté until fragrant and slightly caramelized.
    • Nutritional yeast: It gives a cheesy, nutty flavor. Sprinkle on top before baking for best results.

    Spotlight on Peppers and Quinoa

    Quinoa: It’s nutty and fluffy, absorbing the flavors of spices and herbs. Rinse well before cooking to remove bitterness.:

    • Red bell peppers: Their natural sweetness caramelizes in the oven, creating a smoky aroma.
    • They soften beautifully but still hold shape if not overcooked.
    • Look for firm, shiny skins with no wrinkles for the best roasting experience.

    Canned tomatoes: Bright, juicy, and slightly acidic. Use good-quality brands for richer flavor.:

    • Cooked quinoa: Adds a light, airy texture and absorbs flavors. Overcooking makes it mushy, so keep an eye on it.
    • Serve slightly underdone; it’ll finish cooking in the filling.
    • Cool before mixing into the filling to prevent sogginess.

    Substitutions for Versatility and Personal Taste

    • Dairy-Free: Nutritional yeast for cheesy flavor, skip cheese or use vegan cheese.
    • Grains: Swap quinoa for rice, millet, or cooked lentils for variety.
    • Vegetables: Add chopped zucchini or mushrooms to the filling for extra umami.
    • Spice Blend: Tweak with smoked paprika or cumin for different flavor profiles.
    • Herbs: Fresh basil, parsley, or cilantro for a fresh lift, or dried herbs for convenience.

    Equipment & Tools

    • Baking dish: Holds the peppers during baking
    • Pan: Cook the filling ingredients
    • Sharp knife: Cut tops and deseed peppers
    • Spoon: Fill the peppers
    • Oven: Bake the peppers

    How to Make Vegan Stuffed Peppers from Scratch

    1. Preheat your oven to 180°C (356°F).
    2. Cut the tops off the peppers and remove seeds and membranes. Arrange in a baking dish.
    3. In a pan, heat a splash of oil over medium; add chopped onion and garlic. Cook until fragrant, about 3 minutes.
    4. Add cooked grains, canned beans (drained), chopped tomatoes, and spices. Stir well and cook for 8-10 minutes until heated through.
    5. Scoop the filling into the peppers, pressing lightly. Top with a sprinkle of nutritional yeast or vegan cheese.
    6. Bake the peppers for 25-30 minutes. Check for tenderness and slight blistering.
    7. Remove from oven, let rest for 5 minutes.
    8. Sprinkle with fresh herbs if using, then serve.
    9. For a more charred top, broil for 2-3 minutes at the end, watching carefully.

    Let the stuffed peppers rest for 5 minutes before serving to allow flavors to meld.

    How to Know It’s Done

    • Peppers are soft but hold their shape.
    • Filling is heated through and slightly browned.
    • Peppers are blistered and fragrant.

    Vegan Stuffed Peppers

    These vegan stuffed peppers feature colorful bell peppers filled with a hearty mixture of cooked grains, tomatoes, and aromatic spices. The peppers are baked until tender, their skins slightly blistered, and the filling is heated through, creating a dish that’s both vibrant and comforting with a satisfying texture.
    Prep Time 15 minutes
    Cook Time 30 minutes
    Total Time 45 minutes
    Servings: 4
    Course: Main Course
    Cuisine: Mediterranean
    Calories: 250

    Ingredients
      

    • 4 large bell peppers preferably red or yellow for sweetness
    • 1 cup cooked quinoa cool before mixing into filling
    • 1 cup chopped canned tomatoes drained if excess liquid
    • 1/2 cup chopped onion sautéed until fragrant
    • 2 cloves garlic minced and cooked until fragrant
    • 1 can cooked beans drained and rinsed
    • 2 tablespoons olive oil for sautéing
    • 1 teaspoon paprika or smoked paprika
    • 1 tablespoon nutritional yeast sprinkled on top before baking
    • to taste salt and pepper adjust as needed

    Equipment

    • Baking dish
    • Pan
    • Sharp knife
    • Spoon
    • Oven

    Method
     

    1. Preheat your oven to 180°C (356°F). Carefully cut the tops off the bell peppers and remove seeds and membranes. Arrange them upright in a baking dish.
    2. In a pan, heat olive oil over medium heat and add the chopped onion. Sauté for about 3 minutes until it becomes fragrant and slightly translucent.
    3. Add the minced garlic to the pan and cook for another minute, until it smells fragrant and begins to soften.
    4. Mix in the cooked quinoa, drained tomatoes, cooked beans, paprika, salt, and pepper. Stir everything well and cook for 8-10 minutes until the mixture is heated through and slightly thickened.
    5. Use a spoon to fill each pepper generously with the hearty mixture, pressing down lightly to pack it in.
    6. Sprinkle the nutritional yeast evenly over the filled peppers for a cheesy accent.
    7. Place the baking dish in the oven and bake for 25-30 minutes, until the peppers are soft and slightly blistered, and the filling is bubbling.
    8. Remove from the oven and let the peppers rest for 5 minutes, allowing the flavors to meld and the filling to set slightly.
    9. Garnish with fresh herbs if desired, then serve hot, enjoying the tender peppers and flavorful filling.

    Cooking Tips & Tricks for Perfect Vegan Stuffed Peppers

    • FLAVOR: Toast spices briefly in the pan before adding other ingredients for depth.
    • TEXTURE: Use slightly undercooked grains; they’ll finish cooking in the oven and stay firm.
    • TECHNIQUE: Roast the peppers for 10 minutes first for extra flavor and easier stuffing.
    • TIP: Add chopped olives or capers for a salty punch.
    • TRICK: Use a small spoon or piping bag to fill peppers neatly.

    Common Mistakes and How to Fix Them

    • FORGOT TO PRE-HEAT THE OVEN? Turn it on now; peppers will still cook, but slightly uneven.
    • DUMPED TOO MUCH WATER IN THE FILLING? Drain excess moisture or cook longer to evaporate.
    • OVER-TORCHED THE TOP? Cover loosely with foil and lower oven temperature for a gentle finish.
    • PEPPERS AREN’T SOFTENING? Cover with foil and bake longer, or microwave for 2 minutes first.

    Quick Fixes for Common Stuffed Pepper Problems

    • When filling is too dry, stir in a splash of vegetable broth or tomato sauce.
    • If peppers are too firm, microwave briefly before stuffing.
    • Splash a little lemon juice if filling needs brightness.
    • Patch over burnt spots with extra filling and a sprinkle of herbs.
    • Shield peppers with foil if they start to brown too quickly.

    Make-Ahead and Storage Tips

    • Prepare the filling a day ahead, store in an airtight container in the fridge for up to 2 days.
    • Stuffed peppers can be assembled a few hours before baking; keep refrigerated until oven time.
    • The flavors develop more if you let the stuffed peppers sit overnight; just cover and refrigerate.
    • Reheat in the oven at 180°C (356°F) for about 15-20 minutes, until hot and bubbling. Check for steam and aroma.

    10 Practical Q&As About Vegan Stuffed Peppers

    1. Can I use different types of peppers?

    Use bell peppers of similar size so they cook evenly and hold the filling well.

    2. How do I know when the filling is done?

    Cook the filling until it’s tender but not mushy, about 8-10 minutes over medium heat.

    3. What oven temperature is best?

    Bake at 180°C (356°F) for about 25-30 minutes until the peppers are soft and slightly blistered.

    4. Should I rest the stuffed peppers before serving?

    Let the peppers rest for 5 minutes after baking to set the filling before serving.

    5. Can I skip grains or use something else?

    Use cooked quinoa or rice as a base; they add texture and absorb flavors well.

    6. How do I brighten the flavors?

    Add a squeeze of lemon or a splash of vinegar for brightness in the filling.

    7. When should I add herbs?

    Top with fresh herbs just before serving for a burst of freshness.

    8. What are good flavor enhancers?

    Use nutritional yeast for a cheesy flavor without dairy, or try miso for umami depth.

    9. How do I check if peppers are tender?

    Ensure the peppers are tender but not collapsing; they should hold their shape.

    10. What if some peppers are softer than others?

    If peppers are unevenly cooked, rotate the baking tray midway through baking.

    In the end, these peppers are less about perfection and more about the small joys of cooking — the smell of roasting peppers, the first bite that hits just right, the way leftovers taste even better the next day.

    Sometimes, I serve them with a dollop of dairy-free yogurt or a sprinkle of fresh herbs, but honestly, they’re good plain too. It’s a simple dish, but one that makes me feel a little more grounded in the kitchen, even on busy nights.

  • Sweet Potato Carrot Soup Recipe

    When I first started making this soup, it was more about clearing out the fridge than anything. But each batch turned into a quiet ritual—chopping sweet potatoes while the house filled with a warm, earthy aroma. It’s one of those dishes that feels like a small act of kindness, especially now.

    There’s a gentle magic to transforming humble ingredients into something that nourishes both body and soul. It’s simple, honest, and frankly, a bit nostalgic—reminding me of cozy evenings and the quiet comfort of home. This soup isn’t just food; it’s a little moment of peace in a hectic world.

    The Unseen Comfort: How This Soup Connects Us to Our Roots During Challenging Times

    Why This Soup Matters to Me

    • I love how roasting brings out the natural sugars in the vegetables.
    • This soup always reminds me of my grandma’s kitchen—simple, hearty, full of love.
    • Making this soup feels like pressing pause, a moment to nourish myself quietly.
    • I get a little proud every time I turn humble roots into a velvety bowl.
    • It’s one of those dishes that tastes better the next day, after the flavors meld.

    The Inspiration Behind My Favorite Winter Soup

    • I first made this soup on a cold winter evening, craving something warm and familiar. It turned out to be a hit with my family, who loved the smoky sweetness and smooth texture.
    • Over time, I tweaked the roasting process and added coconut milk for creaminess. It became a staple in my kitchen, especially during busy weekdays.
    • The act of roasting feels almost meditative—waiting for the caramelization, smelling the sweet aroma that fills the house.
    • It’s a dish that’s easy to adapt, forgiving enough for beginners but satisfying enough for seasoned cooks.

    Origins and Quirks of This Cozy Classic

    • Sweet potatoes and carrots are staples in many cultures, symbolizing abundance and nourishment.
    • The combination of sweet and earthy flavors is a classic pairing in winter soups.
    • Roasting vegetables before blending is an ancient technique to enhance sweetness and depth.
    • This soup’s roots trace back to peasant cooking—simple ingredients turned into comfort food.
    • Adding coconut milk is a nod to tropical influences, giving it a creamy, exotic twist.

    Ingredient Insights and Tweak Tips

    • Sweet Potato: I rely on firm, bright orange sweet potatoes for natural sweetness. Swap with yams if you prefer a milder flavor.
    • Carrots: Fresh, crunchy carrots give a vibrant color and slightly sweet aroma. Frozen carrots work in a pinch, just adjust cooking time.
    • Coconut Milk: Adds richness and a hint of tropical flavor. Use regular cream if dairy is no issue.
    • Garlic & Onion: Build the flavor base with aromatic, pungent garlic and onion. Shallots can substitute for a milder taste.
    • Vegetable Broth: The unsung hero—choose a good quality, preferably homemade, for depth. Water with a dash of soy sauce is a good backup.

    Spotlight on Sweet Potatoes and Carrots

    Carrots:

    • Sweet potatoes are naturally sweet and creamy when cooked, with a velvety texture that blends beautifully.
    • Their orange hue is a visual cue of beta-carotene, a powerful antioxidant.

    Carrots:

    • Carrots add a bright, earthy sweetness that balances the richness of the sweet potatoes.
    • They soften into a tender, juicy bite, releasing a fresh, vegetal aroma.

    Smart Ingredient Swaps for Different Tastes and Needs

    • Dairy-Free: Coconut milk or cashew cream swap in seamlessly, adding richness without dairy.
    • Low-Sodium: Use water or low-sodium broth to control salt intake.
    • Vegan: Ensure the broth is vegetable-based and skip any dairy toppings.
    • Extra Heat: Add a pinch of cayenne or chili flakes for a spicy kick.
    • Herbaceous: Fresh thyme or cilantro can brighten up the finished soup.

    Equipment & Tools

    • Large baking sheet: Roast vegetables evenly
    • Immersion blender or regular blender: Puree the soup smoothly
    • Large pot with lid: Cook and simmer the soup
    • Chef’s knife and chopping board: Prep vegetables and aromatics

    Step-by-Step: How to Make Sweet Potato Carrot Soup

    1. Preheat your oven to 200°C (390°F). Slice the sweet potatoes and carrots into uniform chunks, about 2.5 cm (1 inch).
    2. Toss the veggies with olive oil, salt, and a pinch of pepper. Spread on a baking sheet lined with parchment paper.
    3. Roast for 25-30 minutes; they should be golden and slightly caramelized. The smell will be sweet and smoky.
    4. While they roast, peel and chop an onion and a clove of garlic. Sauté in a large pot with a splash of oil over medium heat until translucent, about 5 minutes.
    5. Once the vegetables are roasted, add them to the pot with the sautéed onion and garlic. Cover with vegetable broth—enough to just cover the veggies.
    6. Bring to a simmer, then cook for another 10 minutes. The vegetables should be very soft, and the broth fragrant.
    7. Use an immersion blender directly in the pot, or transfer to a blender in batches. Puree until smooth and velvety.
    8. Return the soup to the heat, stir in a splash of coconut milk or cream if desired. Warm through, about 2-3 minutes.
    9. Taste and adjust seasoning with salt, pepper, or a squeeze of lemon. Serve hot, garnished with fresh herbs if you like.

    Let the soup sit for a few minutes after blending to settle. Serve in warm bowls, garnished with herbs or a swirl of cream.

    How to Know It’s Done

    • Vegetables are caramelized and fragrant.
    • Soup is smooth and velvety after blending.
    • Taste for seasoning and brightness before serving.

    Roasted Sweet Potato and Carrot Soup

    This hearty soup combines roasted sweet potatoes and carrots blended into a smooth, velvety texture, enhanced with aromatic onion, garlic, and coconut milk. The roasting process deepens the natural sweetness, resulting in a warm, comforting bowl perfect for chilly days. It’s simple to prepare and rich in flavor, with a touch of tropical richness from the coconut milk.
    Prep Time 10 minutes
    Cook Time 40 minutes
    Total Time 50 minutes
    Servings: 4
    Course: Main Course
    Cuisine: Comfort Food
    Calories: 180

    Ingredients
      

    • 2 large sweet potatoes firm, bright orange
    • 3 large carrots fresh and crunchy
    • 1 medium onion yellow or white
    • 1 clove garlic peeled
    • 4 cups vegetable broth preferably homemade
    • 1/2 cup coconut milk full-fat for creaminess
    • 2 tablespoons olive oil for roasting and sautéing
    • to taste salt and pepper

    Equipment

    • Large baking sheet
    • Immersion blender or regular blender
    • Large pot with lid
    • Chef’s knife and chopping board

    Method
     

    1. Preheat your oven to 200°C (390°F). Peel and chop the sweet potatoes and carrots into uniform chunks about 2.5 cm (1 inch) in size.
    2. In a bowl, toss the chopped vegetables with olive oil, salt, and pepper until evenly coated. Spread them out on a large baking sheet lined with parchment paper.
    3. Roast the vegetables in the oven for 25-30 minutes, until they are golden and caramelized around the edges. You’ll notice a sweet aroma filling the kitchen as they cook.
    4. While the vegetables roast, peel and chop the onion and garlic. In a large pot, heat a tablespoon of olive oil over medium heat. Sauté the onion and garlic until translucent and fragrant, about 5 minutes.
    5. Once the vegetables are roasted and tender, add them to the pot with the sautéed onion and garlic. Pour in the vegetable broth, just enough to cover the vegetables.
    6. Bring the mixture to a gentle simmer and cook for another 10 minutes, allowing the flavors to meld and the vegetables to soften further.
    7. Use an immersion blender directly in the pot, or carefully transfer the soup in batches to a blender. Puree until the mixture is smooth and velvety, about 1-2 minutes.
    8. Return the pureed soup to the stove over low heat. Stir in the coconut milk and warm through for 2-3 minutes, adjusting seasoning with salt and pepper to taste.
    9. Once heated through and seasoned to your liking, ladle the soup into bowls. Garnish with herbs or a drizzle of coconut milk if desired, and serve hot.

    Notes

    Roasting vegetables deeply enhances their sweetness and adds a smoky depth to the soup. Feel free to add a pinch of chili flakes for heat or fresh herbs for brightness.

    Cooking Tips & Tricks to Elevate Your Soup

    • FLAVOR: Roast vegetables until deeply caramelized for maximum sweetness.
    • TECHNIQUE: Use an immersion blender for easy, splatter-free pureeing.
    • SEASONING: Taste and adjust salt after blending—soup can taste flat otherwise.
    • TEXTURE: Add a splash of warm broth before blending for a silkier finish.
    • FLAVOR BOOST: Finish with a squeeze of lemon to brighten the overall flavor.

    Common Mistakes and How to Fix Them

    • FORGOT TO peel? Rinse thoroughly and chop smaller for a smoother blend.
    • DUMPED too much broth? Reduce or add more roasted veggies for richness.
    • OVER-TORCHED the garlic? Discard and start fresh; burnt garlic turns bitter.
    • FORGOT to blend? Use a potato masher for a chunky, rustic texture.

    Quick Fixes for Common Soup Troubles

    • When too thick, splash in hot water or broth and stir until smooth.
    • When bland, add a dash of soy sauce or a pinch of smoked paprika.
    • Splash a little apple cider vinegar if the flavor is dull.
    • Patch over burnt bits with extra roasted veggies or a splash of broth.
    • Shield the soup from overcooking by removing from heat once smooth.

    Prepping and Storing for Convenience

    • Roast the vegetables a day ahead; store in airtight container in the fridge for up to 24 hours.
    • The soup can be made entirely a day in advance. Reheat gently, stirring to maintain smoothness.
    • Flavors deepen overnight, making it even more comforting the next day.
    • Reheat on the stove over low-medium heat until steaming, about 10 minutes, checking for even warmth.

    10 Practical Q&As About Sweet Potato Carrot Soup

    1. What equipment do I need?

    Use a large, heavy-bottomed pot to get even heat and prevent sticking. A blender with a good lid keeps splatters in check.

    2. Should I peel the vegetables?

    Peel the sweet potatoes and carrots for a smoother, more uniform soup. Leave skins on if you like a rustic texture.

    3. Why roast the vegetables?

    Roast the vegetables first to deepen flavor; they caramelize slightly and add a smoky sweetness.

    4. How do I know when it’s done?

    Simmer the soup until the carrots and sweet potatoes are soft enough to mash or blend easily, about 20-25 minutes.

    5. How do I finish the soup?

    Adjust seasoning after blending; a squeeze of lemon or a dash of cayenne can brighten or spice it up.

    6. Can I make it creamy without dairy?

    Add a splash of coconut milk or cream at the end for richness, if you like a creamier texture.

    7. How to store and reheat?

    Store leftovers in an airtight container for up to 3 days in the fridge; reheat gently, stirring occasionally.

    8. Any safety tips for blending hot soup?

    Pureeing hot soup can cause splatters. Let it cool slightly or blend in batches with a towel over the lid.

    9. What if it’s too thick?

    If the soup is too thick, thin it with a little vegetable broth or water until it reaches your preferred consistency.

    10. How to balance the flavors?

    Taste and adjust seasoning before serving—sometimes a pinch more salt or a drizzle of honey makes a difference.

    Sometimes, I find myself craving this soup on a chaotic day—something grounding and straightforward. Its velvety texture and sweet, smoky flavor keep me coming back, especially when the seasons shift.

    It’s a reminder that simple ingredients, treated with care, can create something truly satisfying. No fuss, just honest cooking. And in those quiet moments of spooning it into my mouth, I remember why I love gathering around the table.

  • Cranberry Brie Bites Recipe

    Cranberry brie bites are more than just a holiday appetizer; they’re a little celebration in your hand. I love how the tart cranberries cut through the rich, melty cheese, all wrapped up in flaky pastry that crunches just right. It’s a messy, delicious moment that feels both fancy and totally doable.

    This recipe is a reminder that simple ingredients, when combined thoughtfully, can turn into something memorable. The first time I made these, I was searching for a way to use leftover cranberry sauce, and suddenly, these bites appeared — a mix of chaos and comfort, perfect for sharing with friends or just enjoying solo.

    A nostalgic twist—pairing tart cranberries with creamy brie in a flaky, buttery pastry, inspired by holiday memories.

    Why These Bites Matter to Me

    • I love how these bites look like tiny jewels on a platter.
    • They remind me of holiday parties and the chaos of preparing for guests.
    • Making them is a bit messy, but that’s part of the charm.
    • I feel proud every time I see someone’s face light up when they try one.

    My Inspiration for Cranberry Brie Bites

    • These bites came from a moment of improvisation, trying to use what I had in the fridge. They turned out better than I expected, becoming a staple for small gatherings.
    • The combination of tart cranberries and creamy brie is nostalgic, reminding me of family holidays.
    • I love how they bring a festive touch without much fuss, perfect for busy days or last-minute get-togethers.

    A Little History Behind the Bites

    • This recipe is inspired by classic holiday flavors, blending tart cranberries with rich cheese.
    • Mini bites like these have been around since the early 20th century, evolving as party appetizers.
    • Cranberry sauce, once a simple side, became a popular topping for all kinds of canapés.
    • Brie cheese originated in France, dating back centuries, and became a favorite for melting.

    Ingredient Insights

    • Cranberries: Fresh or frozen, they add tartness. Fresh cranberries burst with juice, frozen ones are easier to handle.
    • Brie: Creamy and mild, it melts beautifully. Aged brie is firmer, better for slicing.
    • Puff Pastry: Flaky and buttery, it creates that crisp shell. Use good quality or homemade if possible.
    • Honey: Optional drizzle adds sweetness and aroma. Use lavender honey for a floral note.
    • Thyme: Fresh thyme adds earthy aroma. Dried works in a pinch, but fresh is better.

    Focus on Cranberries and Brie

    Cranberries:

    • Their sharp, tangy flavor balances the rich cheese, and they pop with a juicy burst.
    • Use fresh cranberries for a brighter flavor; frozen cranberries are a good substitute, just thaw and drain.

    Brie:

    • Melts into a silky layer that complements the tartness. It’s creamy and mild with subtle earthy tones.
    • Room-temperature brie melts more evenly; keep it out for about 30 minutes before assembling.

    Ingredient Substitutions

    • Dairy-Free: Swap brie for almond-based cheese or a mild vegan cheese. Expect a different melt and flavor.
    • Gluten-Free: Use a gluten-free puff pastry or crisped sliced almonds as a crust.
    • Sweetener: Drizzle with maple syrup instead of honey for a different sweetness profile.
    • Fruit: Substitute cranberries with chopped dried cherries or apricots for variety.
    • Herbs: Add rosemary or sage instead of thyme for a different herbal note.

    Equipment & Tools

    • Mini muffin tin: Shape and hold the bites during baking
    • Sharp knife: Cut pastry into squares
    • Pastry brush: Lightly brush the pastry if needed
    • Cooling rack: Cool the bites after baking

    Step-by-Step Guide to Cranberry Brie Bites

    1. Preheat your oven to 190°C (375°F). Use a mini muffin tin and grease lightly.
    2. Cut puff pastry into 2-inch squares. Press each square into muffin cups, making a small cup shape.
    3. Place a small piece of brie in each pastry shell. Top with a teaspoon of cranberry sauce.
    4. Bake for 12-15 minutes, until the pastry is golden and cheese is bubbling.
    5. Remove from oven. Let sit for 5 minutes to set slightly. Garnish with thyme or a drizzle of honey if desired.
    6. Serve warm or at room temperature, with a side of extra cranberry sauce.

    Let the bites rest for 5 minutes before removing from tin. Serve warm or at room temperature.

    How to Know It’s Done

    • Pastry edges are golden and crisp.
    • Cheese is bubbling and melty.
    • Cranberry topping is shiny and slightly caramelized.

    Cranberry Brie Bites

    Cranberry Brie Bites are savory appetizers featuring flaky puff pastry filled with creamy brie cheese and topped with tart cranberry sauce. They are baked until golden and bubbly, offering a delightful contrast of crispy, melt-in-your-mouth pastry with juicy, tangy cranberries. Perfect for holiday gatherings or special occasions, these bites are both elegant and easy to make.
    Prep Time 15 minutes
    Cook Time 15 minutes
    Total Time 30 minutes
    Servings: 24
    Course: Main Course
    Cuisine: Holiday
    Calories: 120

    Ingredients
      

    • 1 sheet package puff pastry preferably frozen, thawed
    • 8 ounces brie cheese room temperature for easy slicing
    • 1/2 cup cranberry sauce store-bought or homemade
    • 1 egg egg beaten for egg wash
    • optional honey for drizzling after baking
    • fresh sprig thyme for garnish

    Equipment

    • Mini muffin tin
    • Sharp knife
    • Pastry brush
    • Cooling rack

    Method
     

    1. Preheat your oven to 375°F (190°C) and lightly grease the mini muffin tin to prevent sticking.
    2. Unroll the thawed puff pastry sheet onto a lightly floured surface and cut it into 2-inch squares using a sharp knife.
    3. Press each pastry square gently into the cups of the mini muffin tin, shaping them into small cups with the edges slightly overhanging.
    4. Slice the brie cheese into small pieces and place a piece in the center of each pastry shell.
    5. Top each brie-filled pastry with a teaspoon of cranberry sauce, spreading it gently over the cheese or leaving it as a dollop.
    6. Brush the edges of the pastry with the beaten egg to give a shiny, golden finish when baked.
    7. Bake in the preheated oven for 12-15 minutes, or until the pastry is golden brown and the cheese is bubbling.
    8. Remove the bites from the oven and let them rest in the muffin tin for 5 minutes to set slightly.
    9. Garnish each bite with a small sprig of fresh thyme and optionally drizzle with honey for added sweetness.
    10. Carefully transfer the bites to a serving platter or cooling rack, ready to enjoy warm or at room temperature.

    Notes

    For extra flavor, sprinkle a tiny bit of sugar on the pastry edges before baking. These bites are best enjoyed warm but can be made ahead and reheated briefly in the oven.

    Cooking Tips & Tricks

    • Use cold pastry for easier handling and better rise.
    • Sprinkle a tiny bit of sugar on the pastry for a sweet contrast.
    • Add a pinch of black pepper or a splash of balsamic for depth.
    • Use a fork to gently press the pastry into the muffin tin to avoid tearing.
    • Keep an eye on the oven; pastry can go from perfect to burnt quickly.

    Common Mistakes & How to Fix Them

    • FORGOT TO CHILL THE PASTRY? Chill the assembled bites for 10 minutes before baking.
    • DUMPED TOO MUCH CRANBERRY? Use a smaller spoonful for a neater look and less sogginess.
    • OVER-TORCHED THE EDGES? Cover with foil and lower the oven temp to 170°C (340°F) for remaining minutes.
    • MISSED the golden color? Bake a few minutes longer, watch for a rich amber glow.

    Quick Kitchen Fixes

    • When pastry tears, patch with extra dough and press gently.
    • If cheese isn’t melting, increase oven temp slightly or bake longer.
    • Splash a little water on pastry edges if they look dry before baking.
    • Patch soggy bites by returning to oven for a couple of minutes.
    • Shield burnt edges with foil mid-bake, then continue to cook.

    Make-Ahead and Storage Tips

    • Assemble the bites up to 24 hours ahead; keep refrigerated in an airtight container.
    • Bake just before serving for the best crunch and gooey cheese.
    • Leftovers can be stored in the fridge for 1-2 days, then reheated in a 180°C (350°F) oven for 5-7 minutes.
    • Reheating restores some of the crispness and melts the cheese a bit more.

    10 Practical Q&As about Cranberry Brie Bites

    1. What’s the best way to shape these bites?

    Use a mini muffin tin to get perfectly round, bite-sized pieces that hold together well.

    2. How long should I bake them?

    Bake at 190°C (375°F) for about 12-15 minutes until the pastry is golden and bubbly.

    3. Should I chill the bites before baking?

    Chill the assembled bites for 10 minutes before baking to help them hold their shape.

    4. What kind of brie works best?

    Use a good-quality brie for a creamy melt; a softer, milder flavor complements the tart cranberries.

    5. Can I customize the flavor?

    Add a sprinkle of fresh thyme or a drizzle of honey right after baking for extra flavor.

    6. When is the best time to serve?

    Serve warm or at room temperature. The cheese is gooey, and the cranberries burst with tart juice.

    7. Can I use frozen cranberries?

    Use frozen cranberries for convenience; thaw briefly and drain excess moisture.

    8. What size should the pastry pieces be?

    Cut the puff pastry into small squares, approximately 2 inches, for perfect bites.

    9. How do I know when they’re done?

    Check for doneness by golden color, bubbling cheese, and a crisp pastry edge.

    10. How do I store and reheat leftovers?

    Store leftovers in airtight containers for up to 2 days; reheat in oven for crispness.

    These bites are quick to pull together, especially if you keep some pastry and cranberries in the freezer. I find they taste best fresh, with the cheese delightfully gooey and the cranberries still bright. They’re a little festive, a little nostalgic, and a lot delicious.

    Whenever I make these, I think about all the gatherings where they’ve appeared, bringing a burst of flavor and a reason to gather around the table. They’re imperfect, charming, and just sweet enough to make you smile. A good reminder that sometimes, the simplest bites are the most memorable.

  • Easy Vegan Potato Soup Recipe

    Sometimes, the best meals come from the simplest ideas. I find myself craving this vegan potato soup when I need something warm, soothing, and honest. It’s like a hug in a bowl, especially on those chilly days when comfort is king.

    What I love most is how easily it comes together, and how every spoonful smells like home—creamy, earthy, with a hint of garlic. It’s not fancy, but it hits all the right notes, making you feel cared for without fuss.

    A cozy, practical approach to vegan comfort food, focusing on the sensory experience of simple ingredients.

    Why this soup matters to me

    • I love how this soup makes my kitchen smell cozy.
    • It’s the kind of dish that feels like a warm hug on a rainy day.
    • I’ve made this so many times, I know it by heart now.
    • Sharing this soup always brings a smile, especially when I add a dash of hot sauce.
    • There’s something satisfying about blending everything into a silky, smooth bowl.

    The quiet inspiration behind this dish

    • A cold day, a tired cook, and a craving for simplicity. I started experimenting with potatoes as a base for vegan comfort food.
    • I wanted something that could be made quickly, with ingredients I always keep on hand.
    • The process of blending those tender potatoes into a silky texture is oddly meditative.

    A little history and fun facts about potato soup

    • Potato soup dates back centuries, with variations across Europe and North America.
    • Vegan versions gained popularity in the 20th century, emphasizing plant-based comfort.
    • Potatoes are a staple because they’re affordable, versatile, and absorb flavors beautifully.
    • Adding garlic and onions boosts depth, making simple ingredients taste richer.
    • This dish is a humble reminder that good food doesn’t need fancy ingredients.

    Breaking down the key ingredients

    • Potatoes: I love starchy Russets for creaminess, but Yukon Golds add a buttery feel. Try sweet potatoes for a sweeter twist.
    • Onion: Adds depth and sweetness when cooked down; swap with shallots for a milder flavor.
    • Garlic: Essential for aroma and flavor, but can be skipped if you prefer milder notes.
    • Vegetable broth: The flavor base, but water with a dash of miso or nutritional yeast works too.
    • Plant-based milk: Use coconut cream for richness or skip for a clearer broth.

    Spotlight on potatoes and garlic

    Potatoes:

    • They break down into a silky base, releasing earthy aroma and a comforting texture.
    • Garlic: When sautéed, it becomes fragrant and slightly nutty, adding warmth to the soup.

    Potatoes:

    • Their natural starch helps thicken the soup without added flour.
    • Smaller diced pieces cook faster, so cut uniformly.

    Ingredient swaps to match your pantry and preferences

    • Dairy-Free: Replace plant milk with coconut cream for extra richness, but it will add a coconut aroma.
    • Gluten-Free: This recipe is naturally gluten-free, no swaps needed.
    • Low-Sodium: Use a no-salt-added broth and add salt gradually to control flavor.
    • Filling: Add cooked lentils or beans for extra protein.
    • Herb Boost: Fresh thyme or rosemary can elevate the flavor, swap for dried if fresh isn’t available.

    Equipment & Tools

    • Large pot: Cook the vegetables and potatoes.
    • Immersion blender: Puree the soup directly in the pot.
    • Knife and cutting board: Prepare the vegetables.
    • Measuring cups and spoons: Ensure accurate ingredient amounts.

    Step-by-step guide to creamy vegan potato soup

    1. Gather your equipment: a large pot, an immersion blender, a knife, and a cutting board.
    2. Peel and dice 4 large potatoes into 2-cm cubes.
    3. In the pot, heat 1 tbsp olive oil over medium. Add 1 diced onion, cook until translucent, about 5 mins.
    4. Add 3 cloves minced garlic, cook for 1 min until fragrant.
    5. Toss in the potatoes, pour in 4 cups vegetable broth, bring to a boil.
    6. Reduce heat to low, cover, simmer for 20 mins until potatoes are tender.
    7. Check for doneness: potatoes should be soft when pierced, broth should be slightly thickened.
    8. Use the immersion blender directly in the pot to blend until smooth. If using a regular blender, blend in batches carefully.
    9. Return to heat, stir in salt, pepper, and a splash of plant milk or coconut cream.
    10. Taste and adjust seasoning. Serve hot, garnished with fresh herbs if desired.

    Let the soup sit for 5 minutes off the heat, then serve hot.

    How to Know It’s Done

    • Potatoes are easily pierced with a fork.
    • Soup has a velvety, smooth texture.
    • A quick taste reveals balanced salt and garlic flavor.

    Creamy Vegan Potato Soup

    This vegan potato soup is a comforting, silky blend of tender potatoes, aromatic garlic, and savory vegetable broth, pureed to a smooth, velvety consistency. It’s warm, hearty, and perfect for chilly days, with a simple yet satisfying flavor profile that feels like a cozy hug in a bowl.
    Prep Time 10 minutes
    Cook Time 30 minutes
    Total Time 40 minutes
    Servings: 4
    Course: Main Course
    Cuisine: Comfort Food
    Calories: 180

    Ingredients
      

    • 4 large potatoes Russets or Yukon Golds
    • 1 medium onion diced
    • 3 cloves garlic minced
    • 4 cups vegetable broth
    • 1 tablespoon olive oil
    • 0.5 cup plant-based milk or coconut cream optional for creaminess
    • to taste salt and pepper

    Equipment

    • Large pot
    • Immersion blender
    • Knife
    • Cutting board
    • Measuring cups and spoons

    Method
     

    1. Peel and dice the potatoes into roughly 2-cm cubes, keeping the pieces uniform for even cooking.
    2. Heat the large pot over medium heat and add the olive oil, allowing it to warm until shimmering and fragrant.
    3. Add the diced onion to the pot and sauté until translucent, about 5 minutes, until it begins to smell sweet and turns a soft, glassy appearance.
    4. Stir in the minced garlic and cook for another minute until it releases a fragrant, nutty aroma.
    5. Add the diced potatoes to the pot, stirring to coat them in the fragrant onion and garlic mixture.
    6. Pour in the vegetable broth, ensuring the potatoes are submerged, then increase the heat to bring everything to a gentle boil.
    7. Reduce the heat to low, cover the pot, and let the mixture simmer for about 20 minutes, or until the potatoes are tender when pierced with a fork.
    8. Remove the lid and use an immersion blender to blend the soup directly in the pot until ultra-smooth and velvety, or carefully transfer to a blender in batches.
    9. Stir in the plant-based milk or coconut cream for added richness, then season with salt and pepper to taste.
    10. Allow the soup to simmer gently for another 2-3 minutes to meld the flavors, then taste and adjust seasoning as needed.
    11. Serve the hot, creamy soup in bowls, garnished with fresh herbs if desired, and enjoy the cozy, comforting textures and aroma.

    Tips and tricks for perfect vegan potato soup

    • Use a sharp knife for even dice, which cooks faster and more uniformly.
    • Don’t rush the simmer—20 mins is enough to tenderize potatoes without breaking down starches.
    • For extra flavor, toast garlic in the oil before adding onions.
    • Keep an eye on the salt—potatoes absorb it, so taste before adjusting.
    • Use an immersion blender for smoothness, but pulse gently to avoid splashing.

    Common pitfalls and how to fix them

    • FORGOT to peel potatoes → Peel before dicing for a smoother texture.
    • DUMPED too much salt → Add more broth or a splash of water, then adjust seasoning.
    • OVER-TORCHED garlic → Reduce heat and stir, add fresh garlic if needed.
    • SOUP is too thick → Thin with a splash of hot water or more broth.

    Quick fixes for common soup hiccups

    • If too bland → Add a splash of soy sauce or nutritional yeast.
    • When too thick → Stir in hot water or broth until it reaches desired consistency.
    • Splash with lemon juice if bland, to brighten flavors.
    • Patch too salty → Dilute with more broth or a little coconut milk.
    • Shield from overcooking garlic → Cook on gentle heat, avoid high heat.

    Make-ahead tips for this cozy soup

    • You can prep the potatoes and onion a day ahead, store in the fridge.
    • Soup keeps well for 3–4 days in an airtight container.
    • Reheat gently on the stove, stirring often, until steaming and hot.
    • The flavor deepens overnight, so it often tastes better the next day.

    10 Practical Q&As about Easy Vegan Potato Soup

    1. Can I use different types of potatoes?

    Use starchy potatoes like Russets for creaminess, but Yukon Golds add a buttery texture.

    2. Do I need to peel the potatoes?

    Yes, peel and dice them evenly; they’ll cook faster and blend smoothly.

    3. Should I peel the potatoes?

    Yes, for a smoother soup, peel before chopping. If you prefer rustic, leave some skin on.

    4. Can I substitute vegetable broth?

    Use vegetable broth for flavor, but water with added nutritional yeast works in a pinch.

    5. How do I make it creamier?

    Add a splash of plant-based milk or coconut cream at the end for extra richness.

    6. How do I season it properly?

    Keep an eye on the salt; potatoes absorb it, so taste before adding more.

    7. How long should I cook the soup?

    Cook on medium heat for about 20 minutes, until potatoes are tender and fragrant.

    8. Can I blend the soup in a regular blender?

    Use an immersion blender for smoothness; a regular blender works, but be careful with hot splashes.

    9. How do I prevent the soup from sticking?

    Stir often to prevent sticking, especially if using a thicker broth.

    10. How long does it keep?

    Leftovers keep well in the fridge for 3-4 days; reheat gently, stirring often.

    This soup isn’t just about filling a bowl; it’s about the quiet pleasure of cooking something straightforward and honest. Sometimes, that’s exactly what we need—something warm, nourishing, and a little bit special in its simplicity.

    It’s perfect for making ahead and sharing with friends or just enjoying on a quiet night. No matter how you serve it, it’s a reminder that good food doesn’t need to be complicated to be meaningful.

  • No-bake Peanut Butter Bars Recipe

    Sometimes, I think about how much I rely on quick fixes—especially in the kitchen. These peanut butter bars are my go-to when I want something satisfying but don’t want to turn on the oven. It’s like a little secret recipe I can whip up in moments, no fuss, no heat. They remind me that sometimes, simplicity is the real luxury.

    Making these bars is almost meditative. The smell of melting butter and peanut butter mingling is pure comfort. It’s a quick ritual that brings a little joy, especially when I’m feeling overwhelmed with other things. Plus, no-bake means cleanup’s a breeze, which I really appreciate.

    The Unlikely Joy of Simple No-Bake Treats in a Time-Pressed World

    Why These Bars Matter to Me

    • I love how these bars come together in minutes, especially when I’m short on time.
    • There’s a certain satisfaction in pressing everything into the pan without turning on the oven.
    • The aroma of melted peanut butter and chocolate makes the kitchen feel cozy.
    • I feel proud of how customizable they are—add a sprinkle of sea salt or a handful of chopped nuts.

    Personal Inspiration Behind These Bars

    • A busy afternoon, a jar of peanut butter, and a sudden craving for something sweet and salty. I threw everything together without a recipe, and it turned out better than I expected. Now, they’re my emergency treat, quick to make and always satisfying.
    • They remind me that sometimes, the best things in life are simple and don’t require fuss. Plus, sharing these with friends always sparks a little joy.
    • Making these bars is a small act of kindness—to myself and others. It’s a way to slow down and enjoy a moment of homemade comfort.

    Quick Facts About Peanut Butter Bars

    • Inspired by childhood treats, these bars are a nostalgic nod to simple comfort foods.
    • Graham crackers, originally from England, became popular in the U.S. as a snack and baking ingredient.
    • Chocolate and peanut butter combined in desserts surged in popularity during the 20th century, especially in America.
    • No-bake recipes gained favor during wartime shortages, making use of pantry staples.

    Ingredient Insights & Tweaks

    • Peanut Butter: I prefer creamy for smoothness, but crunchy adds texture. Try natural or processed.
    • Chocolate Chips: Use semi-sweet for balanced sweetness or dark for depth. Finely chop for smooth melting.
    • Butter: Salted or unsalted works; I like salted for a flavor punch. Adjust salt in the recipe accordingly.
    • Sugar: Regular granulated sugar dissolves easily, but honey or maple syrup can add a different sweetness.
    • Graham Cracker Crumbs: Substitute with crushed digestive biscuits or pretzels for a salty crunch.

    Spotlight on Peanut Butter and Chocolate

    Peanut Butter:

    • Rich, oozing, with a hint of roasted nuttiness. It melts into the base, creating a creamy, sticky texture.
    • It can sometimes be oily; stir well to distribute evenly.
    • Look for natural varieties for a more intense peanut flavor.

    Chocolate Chips:

    • Smooth, shiny, and melts into a luscious coating. The scent is sweet and inviting.
    • Finely chop for a smoother, glossy finish. Larger chunks may leave streaks.
    • Use high-quality chocolate for a more vibrant, shiny top layer.

    Substitution Notes for Dietary Needs

    • Dairy-Free: Swap butter for coconut oil for a tropical, slightly sweet note.
    • Sugar-Free: Use a natural sweetener like honey or maple syrup to keep it keto-friendly.
    • Gluten-Free: Ensure crackers or biscuits are certified gluten-free.
    • Vegan: Use plant-based butter and dairy-free chocolate chips.
    • Nut-Free: Substitute peanut butter with seed butter, like sunflower or tahini, for nut allergies.

    Equipment & Tools

    • 8-inch square pan: Hold the mixture and shape the bars.
    • Microwave or double boiler: Melting chocolate and butter evenly.
    • Spatula: Spreading and pressing the mixture smoothly.
    • Parchment paper: Easing removal and cleanup.

    Step-by-step Guide to No-Bake Peanut Butter Bars

    1. Line an 8-inch square pan with parchment paper, leaving a bit overhang for easy removal.
    2. In a microwave-safe bowl, melt 1/2 cup (115g) butter and 1 cup (250g) peanut butter together, about 30 seconds, stir until smooth.
    3. Add 1/2 cup (100g) sugar and 1 teaspoon vanilla extract to the melted mixture, stir well.
    4. Stir in 2 cups (180g) graham cracker crumbs or crushed biscuits, mix until evenly coated.
    5. Press the mixture evenly into the prepared pan, using the back of a spatula or your fingers.
    6. Chop 1 cup (175g) chocolate chips finely; set aside.
    7. In a microwave or double boiler, melt the chocolate until smooth, about 1-2 minutes.
    8. Pour the melted chocolate over the peanut butter base, spreading evenly.
    9. Refrigerate for at least 2 hours until firm and set.
    10. Use the parchment overhang to lift the entire block out of the pan, then cut into squares.

    Chill in the fridge for at least 2 hours. Slice into squares and serve chilled or at room temperature.

    How to Know It’s Done

    • Chocolate coating is glossy and firm but not hard.
    • Bars are firm when pressed gently and hold shape.
    • Chocolate layer sets with a shiny finish and no streaks.

    No-Bake Peanut Butter Bars

    These no-bake peanut butter bars are a quick, satisfying treat made by melting butter and peanut butter together, then mixing in graham cracker crumbs and chocolate. Once chilled, they develop a firm, chewy texture with a glossy chocolate topping, perfect for a simple homemade dessert without any oven time.
    Prep Time 10 minutes
    Total Time 2 hours
    Servings: 8
    Course: Main Course
    Cuisine: American
    Calories: 250

    Ingredients
      

    • 1/2 cup butter unsalted or salted
    • 1 cup peanut butter creamy preferred
    • 1/2 cup sugar granulated or substitute honey/maple syrup
    • 1 teaspoon vanilla extract
    • 2 cups graham cracker crumbs or crushed digestive biscuits
    • 1 cup chocolate chips semi-sweet or dark

    Equipment

    • 8-inch square pan
    • Microwave or double boiler
    • Spatula
    • Parchment paper

    Method
     

    1. Line the 8-inch square pan with parchment paper, leaving some overhang for easy removal.
    2. In a microwave-safe bowl, melt the butter and peanut butter together for about 30 seconds. Stir until the mixture is smooth, glossy, and fragrant with a nutty aroma.
    3. Add the sugar and vanilla extract to the melted mixture. Stir well until the sugar dissolves and the mixture turns creamy and slightly thickened.
    4. Stir in the graham cracker crumbs until evenly coated; the mixture will become thick and sticky.
    5. Press the peanut butter mixture evenly into the prepared pan, using the back of a spatula or your fingers to create a smooth, compact surface.
    6. Chop the chocolate chips finely to ensure smooth melting and a glossy finish.
    7. In a microwave or double boiler, melt the chocolate chips until smooth and shiny, about 1-2 minutes, stirring frequently.
    8. Pour the melted chocolate over the pressed peanut butter layer, spreading it out evenly with a spatula for a glossy, smooth top.
    9. Refrigerate the bars for at least 2 hours until the chocolate is firm and the bars are set.
    10. Once chilled and firm, use the parchment overhang to lift the bars from the pan. Cut into squares and enjoy your homemade no-bake peanut butter bars!

    Tips & Tricks for Perfect No-Bake Bars

    • Use room temperature ingredients for smoother mixing.
    • Press mixture firmly into the pan to avoid air pockets.
    • Melt chocolate slowly, stirring often, to prevent burning.
    • Chill the bars in the fridge until just firm for clean cuts.
    • Add a pinch of sea salt on top for a flavor boost.

    Common Mistakes and How to Fix Them

    • FORGOT TO CHILL: Bars won’t set properly. Fix: Chill longer or leave in freezer for 15 minutes.
    • DUMPED TOO MUCH CHOCOLATE: The coating is thick and streaky. Fix: Warm slightly or add a teaspoon of coconut oil.
    • OVER-TORCHED CHOCOLATE: It’s bitter and hardened. Fix: Re-melt with a splash of cream or coconut oil.
    • CRACKED TOP: Chocolate cracks when cutting. Fix: Slightly warm the knife or chill the bars again.

    Quick Fixes for Common Issues

    • When chocolate is streaky, warm it slightly and stir vigorously.
    • Splash a tiny bit of coconut oil if chocolate won’t melt smoothly.
    • Patch cracks by re-melting a small amount of chocolate and applying with a brush.
    • Shield the chocolate with a paper towel if it starts to crackle during melting.
    • When in doubt, refrigerate longer for a firmer set.

    Make-Ahead and Storage Tips

    • Prepare the base and store in the fridge for up to 24 hours before adding the chocolate layer.
    • Bars can be wrapped individually and frozen for up to 3 months.
    • For best flavor, consume within a week if stored in the fridge.
    • Reheat slightly in the microwave for a softer texture, about 10 seconds, until warm and shiny.

    10 Practical Q&As About No-Bake Peanut Butter Bars

    1. Can I use crunchy peanut butter?

    Use creamy peanut butter for a smooth texture. Crunchy peanut butter can work, but it adds more texture.

    2. Do I need to melt the butter and peanut butter?

    Yes, melting the butter and peanut butter together creates a rich, gooey base that holds everything together.

    3. How long should I chill the bars?

    Chill the mixture for at least 2 hours in the fridge to set properly before slicing.

    4. Is parchment paper necessary?

    Line the pan with parchment paper to prevent sticking and make removal easier.

    5. Can I substitute chocolate chips?

    Use good quality chocolate for melting; it makes a noticeable difference in flavor and shine.

    6. How should I store leftovers?

    Store bars in an airtight container in the fridge for up to a week or freeze for longer storage.

    7. It’s too stiff to spread—what do I do?

    If the mixture is too thick to spread, warm it slightly or add a tiny splash of milk to loosen.

    8. How do I get an even layer?

    Use a spatula to press the mixture evenly into the pan, avoiding air pockets.

    9. Why is my chocolate not melting smoothly?

    Chop the chocolate finely for quicker melting and smoother coating.

    10. Can I make the bars softer?

    For a softer center, add a little more butter or peanut butter to the mixture.

    Once set, these bars are perfect for sharing or keeping in the fridge for when that sweet tooth hits. They’re rich, peanutty, with just enough chocolate to satisfy the craving. I like to cut them into uneven squares—makes them feel more homemade, more real.

    In a world that’s constantly rushing, these bars remind me to slow down and enjoy a simple pleasure. They’re not fancy, but they carry a lot of flavor and a lot of memories. Sometimes, that’s all I need to feel a little grounded.