Ripe bananas are often seen as kitchen compost, but they can be the star of a simple, no-fuss snack. I love turning those overripe, patchy bananas into something more useful—these bars are a reminder that waste can be a starting point, not an ending.
There’s a kind of satisfaction in using what’s already on hand. Plus, these bars are perfect for busy mornings or quick bites on the go. They’re honest, a little rustic, and full of flavor that’s just a step beyond plain banana bread.
Baking with bananas that are on their way out feels a bit like giving them a second life. The scent of toasted oats mingling with caramelized banana makes the kitchen smell cozy, and every bite is a little act of mindful frugality.
Focusing on how ripe bananas can be transformed from kitchen scraps into hearty, portable snack bars that reduce waste and satisfy sweet cravings.
The story behind this recipe
- One lazy afternoon, I found a bunch of bananas turning brown faster than I could eat them. Instead of tossing them, I mashed them up and started experimenting with a bar recipe—something that could use up those ripe fruits and satisfy a sweet craving without fuss.
- I remember the first batch turning out denser than I wanted, but the smell of toasted oats and caramelized banana in the oven made me realize I was onto something. Since then, these bars have become my go-to for using up overripe bananas, especially when I need a quick, wholesome snack.
- There’s a quiet pride in turning kitchen scraps into something nourishing. These bars remind me that a little improvisation can lead to a simple, satisfying treat—no fancy ingredients, just honest effort and a touch of nostalgia.
Key Ingredient Insights
- Bananas: Ripe and soft, they bring natural sweetness and moisture. If yours are a bit too mushy, mash well to avoid clumps.
- Oats: Old-fashioned rolled oats add chew and heartiness. Toast them lightly in the oven before mixing for a nutty flavor and better texture.
- Honey: I use it to balance the banana’s sweetness, but maple syrup works just as well if you prefer a different kind of caramel note.
- Nut Butter: Peanut or almond butter helps bind the bars and adds richness. Skip it for a nut-free version—just add a tad more oats or a splash of milk.
- Add-ins: Chocolate chips, nuts, or dried fruit are optional but really boost flavor. Use what you love, but don’t overdo it to keep bars firm.
- Baking Powder: Just a pinch helps lift the bars slightly. If you want denser bars, skip it; for a little fluff, add it in.
- Vanilla Extract: A splash brightens everything up with a hint of warmth. If you’re out, a touch of cinnamon can offer a cozy twist.
Spotlight on key ingredients
Bananas:
- Ripe and soft, they bring natural sweetness and moisture. If yours are a bit too mushy, mash well to avoid clumps.
- Oats: Old-fashioned rolled oats add chew and heartiness. Toast them lightly in the oven before mixing for a nutty flavor and better texture.
Oats:
- Honey: I use it to balance the banana’s sweetness, but maple syrup works just as well if you prefer a different kind of caramel note.
- Nut Butter: Peanut or almond butter helps bind the bars and adds richness. Skip it for a nut-free version—just add a tad more oats or a splash of milk.
Notes for ingredient swaps
- Dairy-Free: Use coconut yogurt or almond milk instead of dairy yogurt for a creamier, nutty flavor.
- Sweetener: Maple syrup can replace honey, adding a slightly richer, smoky sweetness—just watch the liquid balance.
- Nut Butter: Sunflower seed butter works well for nut allergies, but expect a more neutral, less rich taste.
- Oats: Gluten-free oats can be swapped in if you need a gluten-free version; they’ll give a slightly different chew.
- Add-ins: Dried cranberries or chopped dried apricots add tartness or sweetness—use what you have on hand.
- Bananas: Frozen bananas thawed slightly work just as well, adding a cooler, more intense banana flavor.
- Flavor Boost: A dash of cinnamon or nutmeg can deepen warmth if you want a more spiced note.
Equipment & Tools
- Baking pan: Holds the mixture during baking and shapes the bars.
- Mixing bowls: Combine ingredients smoothly and evenly.
- Spatula: Spread and press the mixture into the pan.
- Parchment paper: Prevents sticking and makes removal easier.
- Oven: Bake the bars evenly at controlled temperature.
Step-by-step guide to Banana Oat Bars
- Gather your equipment: a 20x20cm (8×8 inch) baking pan, mixing bowls, spatula, and parchment paper for easy removal.
- Preheat your oven to 175°C (350°F). Line the baking pan with parchment paper, leaving overhang for easy lifting.
- In a large bowl, mash 3 ripe bananas until smooth. Look for a fragrant, sweet aroma and no big lumps.
- Add 1 cup rolled oats, 1/4 cup honey, 2 tbsp nut butter, and a pinch of baking powder. Mix until well combined; it should be thick and sticky.
- Fold in optional add-ins like chocolate chips or nuts if using. Keep in mind they should be evenly distributed without making the mixture too loose.
- Spoon the mixture into your prepared pan. Use the back of a spatula to press it evenly into the corners, about 1.5 inches thick.
- Bake in the oven for about 20-25 minutes. The top should turn a light golden brown, and the edges will smell toasted.
- Check for doneness: the top is firm and slightly cracked, and the edges start to pull away from the pan. If not, bake for a few more minutes.
- Remove from oven and let cool in the pan for 10 minutes. The bars will firm up as they cool, making them easier to cut.
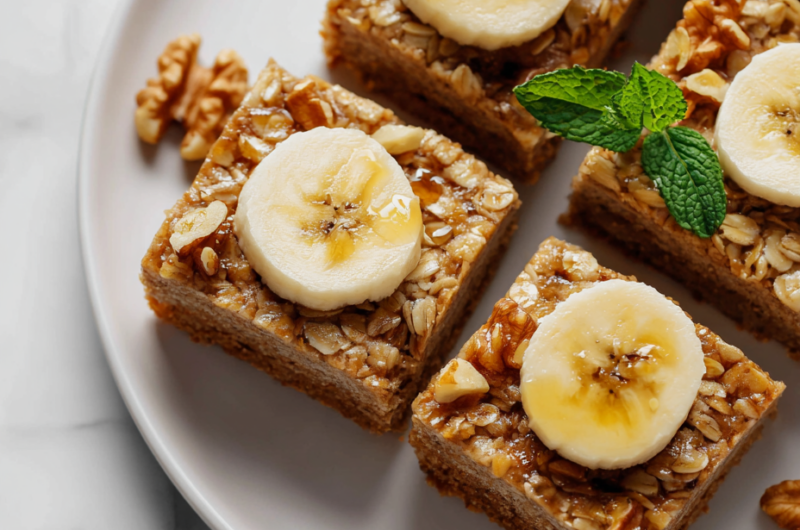
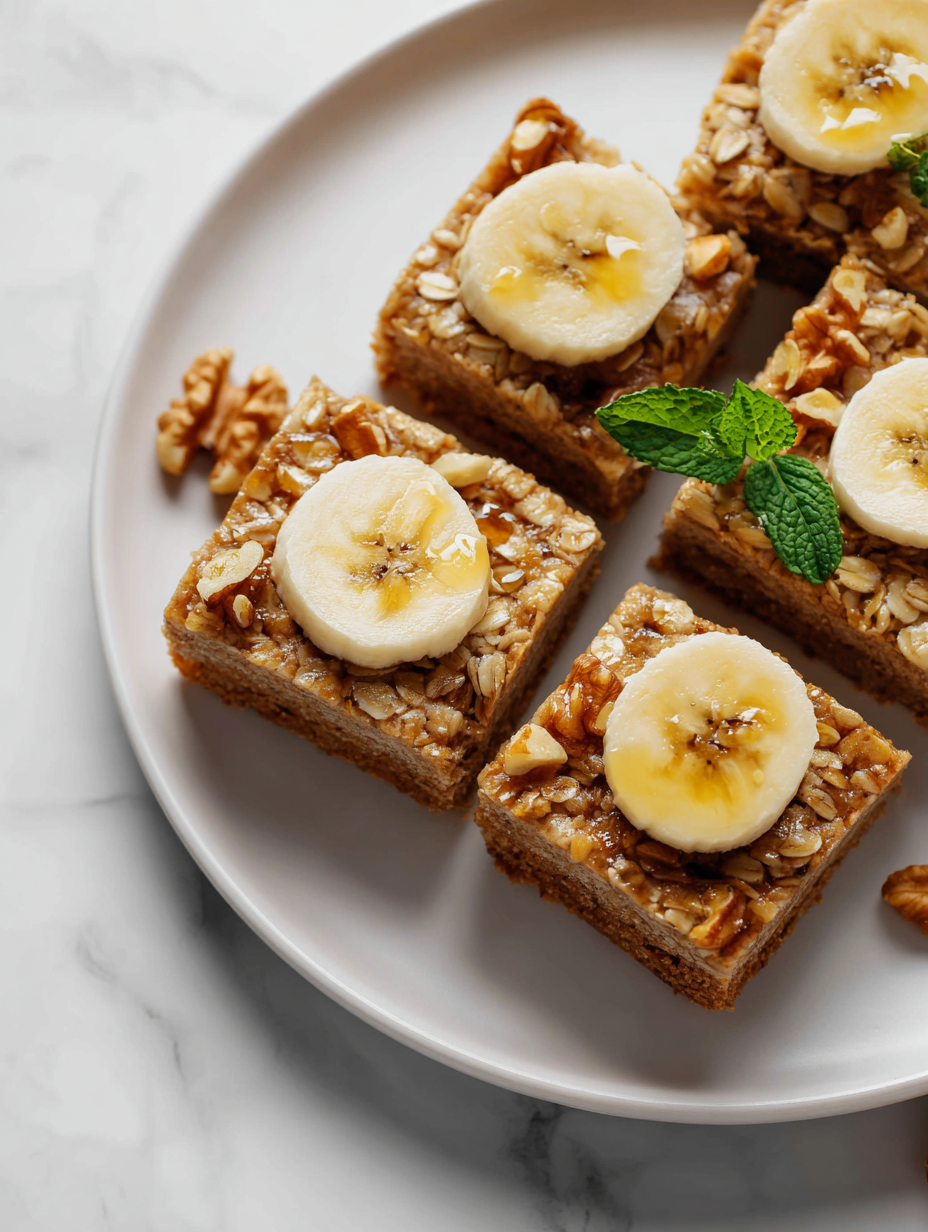
- Lift the entire block out using the parchment overhang. Slice into squares or rectangles, about 1 inch thick.
- Finish by letting the bars cool completely on a wire rack. They’ll be chewy but hold their shape well.
- Serve as a snack or breakfast, with a hint of natural sweetness and a chewy, oat-filled texture.
Let the bars cool in the pan for 10 minutes, then lift using parchment and slice into squares. Cool completely on a wire rack before serving for best texture.
How to Know It’s Done
- The top is golden and slightly cracked, indicating proper doneness.
- Edges are beginning to pull away from the pan, a sign they are baked through.
- When pressed lightly, the bars feel firm but not hard, with a slight bounce.
Banana Oat Bars
Ingredients
Equipment
Method
- Preheat your oven to 175°C (350°F). Line a baking pan with parchment paper, leaving overhang for easy removal.
- Peel and mash the ripe bananas in a large bowl until smooth, with no large lumps remaining. The mixture should smell sweet and fragrant.
- Add the honey, nut butter, and vanilla extract to the mashed bananas. Stir everything together until the mixture is well combined and slightly sticky.
- Stir in the toasted rolled oats and baking powder, mixing until the dry ingredients are evenly incorporated. The batter will be thick and sticky.
- If desired, fold in chocolate chips, nuts, or dried fruit for extra flavor and texture.
- Spoon the mixture into the prepared pan. Use the back of a spatula to press it evenly into the corners, about 1.5 inches thick. Press firmly to ensure the mixture is compact.
- Bake in the preheated oven for 20-25 minutes, until the top turns a light golden brown and starts to crack slightly.
- Remove the pan from the oven and let the bars cool in the pan for about 10 minutes. They will firm up as they cool.
- Using the parchment overhang, lift the entire block out of the pan and place on a wire rack. Slice into squares or rectangles, about 1 inch thick.
- Let the bars cool completely before serving. They should be chewy with a rustic appearance, featuring a lightly cracked top and a golden hue.
Pro tips for perfect banana oat bars
- Bolded Mini-Head: Use a gentle hand when mixing wet and dry ingredients to keep the oats from becoming mushy.
- Bolded Mini-Head: Toast the oats lightly before mixing to enhance their nutty aroma and improve texture.
- Bolded Mini-Head: Press the mixture firmly into the pan with the back of a spatula for even baking and a chewy bite.
- Bolded Mini-Head: Keep an eye on the edges during baking—if they brown too fast, cover loosely with foil to prevent over-torching.
- Bolded Mini-Head: Let the bars cool completely before slicing; this helps them hold shape and enhances texture.
- Bolded Mini-Head: For softer bars, slightly under-bake and allow resting time; for firmer, extend baking by a few minutes.
- Bolded Mini-Head: Use ripe bananas that are heavily speckled for maximum sweetness and moisture—less need for added sugar.
Common mistakes and how to fix them
- FORGOT to check oven temperature → Use an oven thermometer for accuracy.
- DUMPED in all ingredients at once → Mix gradually to ensure even distribution.
- OVER-TORCHED the edges → Cover with foil if edges brown too fast.
- UNDER-baked in the center → Extend baking time by 5 minutes and check for firmness.
Quick fixes and pantry swaps
- When bananas are too mushy, add a handful of oats to absorb excess moisture.
- Splash a little lemon juice on sliced bananas to prevent browning during quick fixes.
- Patch over cracks by pressing mixture firmly into the pan to keep bars even.
- DUMPED in too much honey? Add a few extra oats to balance sweetness and texture.
- When bars are underbaked, shield edges with foil and extend baking time for even doneness.
Prep, store, and reheat tips
- Pre-mash the ripe bananas and store in an airtight container in the fridge for up to 2 days; they’ll stay moist and fragrant, ready to mix when you bake.
- You can toast the oats ahead and keep them in a sealed jar; the nutty aroma will intensify, making your bars extra flavorful.
- Bake the bars a day in advance; once cooled, wrap tightly in foil or store in an airtight container for up to 3 days, keeping the texture chewy and the flavor fresh.
- Reheat slices briefly in the microwave—about 10-15 seconds—until just warm and fragrant, with oats softening slightly, perfect for a quick breakfast or snack.
Top questions about Banana Oat Bars
1. Can I use less ripe bananas?
Ripe bananas give the bars natural sweetness and moisture. Use bananas that are heavily speckled for best flavor and soft texture.
2. Can I substitute the bananas with another fruit?
Yes, but less ripe bananas are less sweet and moist. You might want to add a little honey or maple syrup for extra flavor.
3. Can I use frozen bananas?
Frozen bananas work great—thaw them slightly before mashing to avoid icy chunks. They add a strong banana flavor and extra creaminess.
4. Can I use quick oats?
Using quick oats instead of rolled oats will give a finer texture, but the bars may be a bit softer and less chewy.
5. Can I add other ingredients?
Yes, you can add nuts, chocolate chips, or dried fruits. Just don’t overdo it, or the bars might fall apart.
6. How do I know when they are done?
Bake until the top is golden and slightly cracked, edges pull away from the pan, and a toothpick comes out clean in the center.
7. How should I store the bars?
Store bars in an airtight container at room temperature for 2 days, or in the fridge for up to a week. Freeze for longer storage.
8. How do I reheat leftovers?
Reheat in the microwave for about 10-15 seconds until warm and fragrant. They soften and become more chewy, perfect for a quick snack.
9. Any tips for preparing the baking pan?
To prevent sticking, line your baking pan with parchment paper. Press the mixture firmly into the pan for even baking.
10. What if my bars are too dense?
If the bars turn out too dense, add a pinch more baking powder or bake a few extra minutes to lighten the texture.
These banana oat bars are a quiet nod to kitchen improvisation, turning overripe bananas into something genuinely satisfying. There’s a simple pleasure in slicing into a chewy, oat-filled bar that’s full of warmth and honest flavor. They remind me that good snacks don’t have to be complicated, just a little mindful of what’s already in the kitchen.
Whether you’re grabbing a quick breakfast or a last-minute treat, these bars hold a bit of everyday magic. No fuss, just a straightforward way to make the most of kitchen scraps and enjoy a wholesome bite. Sometimes, the simplest things are the most worth sharing.

Hi, I’m Noah Bennett, the creator behind Breathing In Flavors. For me, cooking begins with a breath. Before the first bite, before the plating, before the garnish, there is that quiet moment when steam rises and you inhale. That is where flavor truly begins. Breathing In Flavors is my space to slow down, appreciate ingredients, and cook with awareness. I am so glad you’re here.
 The creator behind Breathing In Flavors.
For me, cooking begins with a breath. Before the first bite, before the plating, before the garnish, there is that quiet moment when steam rises and you inhale. That is where flavor truly begins.
Breathing In Flavors is my space to slow down, appreciate ingredients, and cook with awareness. I am so glad you’re here.
The creator behind Breathing In Flavors.
For me, cooking begins with a breath. Before the first bite, before the plating, before the garnish, there is that quiet moment when steam rises and you inhale. That is where flavor truly begins.
Breathing In Flavors is my space to slow down, appreciate ingredients, and cook with awareness. I am so glad you’re here.


