This chocolate brownie cookies recipe is my go-to when I want to surprise someone or just treat myself without going full dessert. It’s a little bit of a science experiment—kind of like merging two worlds into one decadent bite. I love how the fudgy center of a brownie meets the satisfying crunch of a cookie, making each mouthful feel like a tiny celebration.
What drew me in initially was the odd charm of blending textures that usually seem worlds apart. It’s messy, imperfect, and totally honest—just like baking in my kitchen. Every batch feels a little different, and that’s part of the fun. Plus, the smell of melting chocolate and toasty edges wafting through the house? Pure comfort.
This recipe explores the surprising harmony of combining the dense, fudgy texture of brownies with the crispiness of cookies, creating a hybrid treat that satisfies both chocolate cravings and cookie crunch in every bite.
The story behind this recipe
- This recipe started as a happy accident one rainy afternoon. I had leftover brownie batter and a batch of cookies that needed using up. Instead of making either, I mashed them together and couldn’t believe how well they worked. That first bite was a revelation—crunchy edges, fudgy center, all in one cookie.
- Since then, I’ve been chasing that perfect balance, tweaking ingredients and oven times. It’s become a kind of baking obsession—trying to get that crackly top, that gooey middle, all without overdoing it. Every batch reminds me that sometimes, the best ideas come from just winging it in the kitchen.
- heading
Key Ingredients Breakdown
- Unsweetened cocoa powder: I love the deep, earthy aroma it adds, but if you prefer a milder flavor, try Dutch-process cocoa for a smoother, less bitter punch.
- Dark chocolate chunks: They melt into pockets of gooey richness. For a less intense experience, swap in milk chocolate for a sweeter, creamier bite.
- Brown sugar: It brings a caramel note I crave, but if you want a lighter cookie, replace half with coconut sugar for a subtle tropical sweetness.
- Butter: I use salted butter for flavor, but if you want to control the saltiness, opt for unsalted and add a pinch of sea salt on top before baking.
- Eggs: They give structure and moisture; if you’re out, a flaxseed or chia seed egg works, but the texture will be slightly denser.
- All-purpose flour: It’s the backbone for the right cookie chew, but for a richer taste, try adding a spoon of cocoa or a handful of chopped nuts.
- Vanilla extract: Just a splash enhances the chocolate’s depth. If you’re feeling adventurous, a hint of espresso powder amplifies the chocolate notes without overpowering.
Spotlight on key ingredients
Dark chocolate chunks:
- They melt into pockets of gooey richness and create a luscious, velvety texture. Look for high-quality, slightly oily chunks that melt smoothly—skip the overly dry or waxy ones.
- Unsweetened cocoa powder: Its deep, earthy aroma is what makes the cookies intensely chocolatey. When heated, it releases a rich scent that signals good things ahead. Dutch-process cocoa offers a smoother, milder flavor, perfect if you want less bitterness.
Butter:
- Brown sugar: Its caramel undertone adds a chewy, slightly sticky texture and a warm, comforting sweetness. When baked, it caramelizes slightly on the edges, intensifying the chocolate flavor. For a different twist, try coconut sugar for a subtler, tropical note.
- It provides richness and helps create that tender, slightly crisp edge. I prefer salted butter for flavor, but unsalted works just as well—just add a pinch of salt on top before baking for balance. It melts quickly, giving the cookies that glossy, fudgy appearance.
Ingredient Swap Tips
- Dairy-Free: Use coconut oil or dairy-free margarine instead of butter. The cookies will be slightly less rich but still delicious.
- Sugar Variations: Swap brown sugar for coconut sugar for a caramel-like flavor with a hint of tropical sweetness.
- Chocolate Types: Replace dark chocolate chunks with milk chocolate or vegan chocolate chips for different sweetness levels and creaminess.
- Flour Options: Use gluten-free all-purpose flour blend if you need a gluten-free version; expect a slightly different texture.
- Cocoa Powder: Dutch-process cocoa provides a smoother, less bitter flavor, but natural cocoa will give a more robust chocolate punch.
- Add-ins: Mix in nuts, dried fruit, or crushed pretzels for extra crunch and flavor contrast.
- Egg Substitutes: Use a flaxseed or chia seed egg (1 tablespoon seeds + 3 tablespoons water) for a vegan-friendly version—note the texture will be a bit denser.
Equipment & Tools
- Oven: To bake the cookies evenly at the correct temperature.
- Baking sheet: To hold the cookies during baking and ensure even heat transfer.
- Parchment paper or silicone mat: To prevent sticking and make cleanup easier.
- Mixing bowls: To combine ingredients comfortably and thoroughly.
- Spatula: To fold ingredients gently and scrape bowls clean.
- Cookie scoop or tablespoon: To portion out cookies uniformly for even baking.
- Wire rack: To cool cookies evenly without becoming soggy.
Step-by-step guide to baking
- Preheat your oven to 180°C (350°F). Line a baking sheet with parchment paper or a silicone mat. Gather your mixing bowls, spatula, and a cookie scoop or tablespoon for portioning.
- Melt 125g (1/2 cup) of unsalted butter in a small saucepan over low heat. Once melted, remove from heat and stir in 100g (1/2 cup) of dark chocolate chunks until smooth and glossy. Let cool slightly—just a few minutes.
- In a large bowl, whisk together 1 cup of brown sugar, 2 large eggs, and 1 teaspoon of vanilla extract until well combined. Add the cooled chocolate-butter mixture and stir until integrated.
- Sift together 1 cup of all-purpose flour, 1/2 cup of unsweetened cocoa powder, and 1/2 teaspoon of baking powder. Gradually fold dry ingredients into the wet mixture just until no streaks remain. Don’t overmix, or the cookies may turn dense.
- Gently fold in an additional 1/2 cup of chocolate chunks. The batter should be thick and fudgy but scoopable. If it’s too stiff, add a splash of milk or cream.
- Using a cookie scoop or tablespoon, portion dough onto the prepared baking sheet, spacing them about 2 inches apart. Slightly flatten each mound with the back of a spoon or your fingers for even baking.
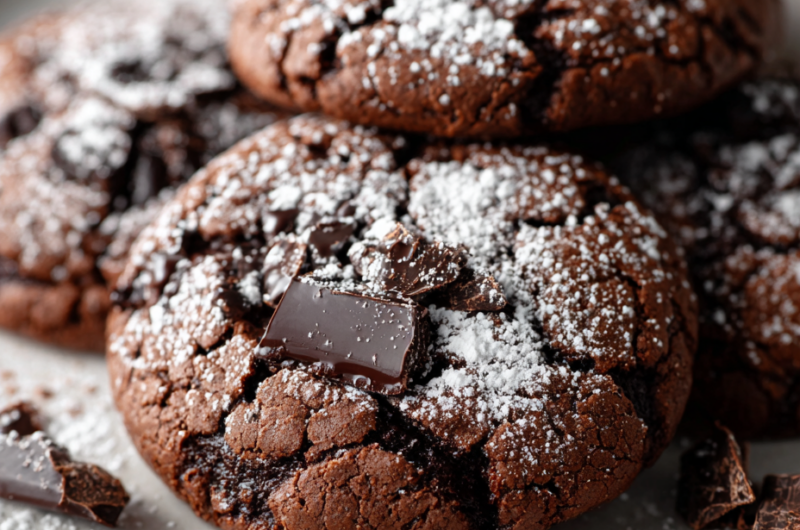
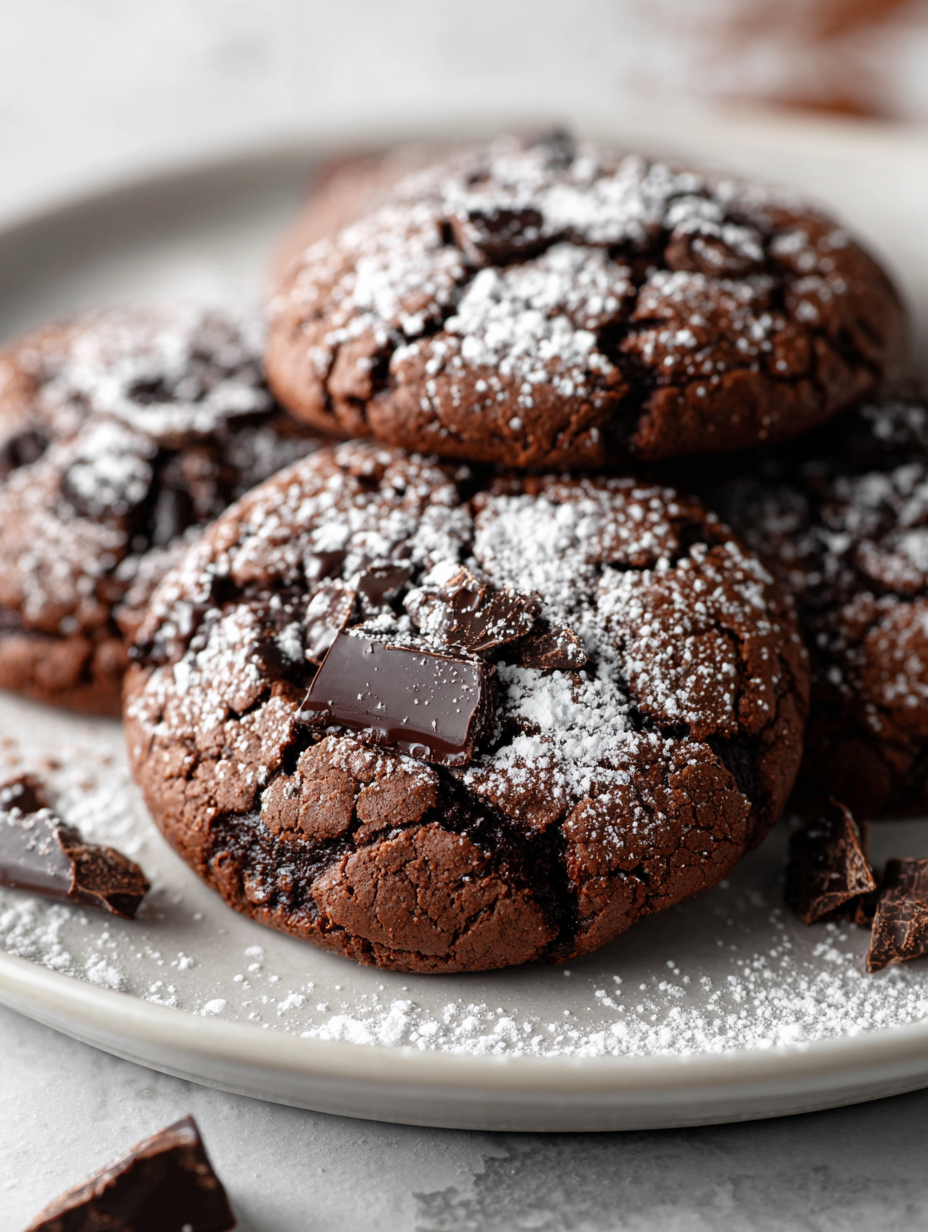
- Bake for 12-15 minutes. The edges should look set and slightly crispy, while the centers remain fudgy and shiny. They may crack on top, which is perfect. If the tops are too shiny or wet, give them a few more minutes.
- Remove the cookies from the oven and let rest on the baking sheet for 5 minutes. Then, transfer them to a wire rack to cool completely. They firm up as they cool but stay wonderfully chewy inside.
- Finish by dusting with a pinch of sea salt or a drizzle of melted chocolate if desired. Serve warm or at room temperature for that perfect balance of crisp and gooey.
Let the cookies cool on the wire rack for at least 10 minutes. Finish with a light sprinkle of sea salt or a drizzle of melted chocolate if desired. Serve warm or at room temperature, stored in an airtight container for up to 3 days.
How to Know It’s Done
- Edges are golden and slightly crisp, centers look glossy and fudgy.
- A toothpick inserted into the center comes out with moist crumbs, not wet batter.
- Cookies crack slightly on top, with a faint aroma of roasted chocolate and butter.
Chocolate Brownie Cookies
Ingredients
Equipment
Method
- Preheat your oven to 180°C (350°F). Line a baking sheet with parchment paper or a silicone mat to prevent sticking. Gather all your tools and ingredients for easy access.
- Melt the butter in a small saucepan over low heat, listening for a gentle bubbling sound. Once melted, remove from heat and stir in the dark chocolate chunks until smooth and shiny. Let this mixture cool slightly; it should feel warm but not hot.
- In a large mixing bowl, whisk together the brown sugar, eggs, and vanilla extract until the mixture is smooth, slightly thickened, and fragrant—this takes about a minute. The eggs should be fully incorporated and the sugar starting to dissolve.
- Pour the slightly cooled chocolate-butter mixture into the egg mixture, stirring gently until combined and glossy. The batter should look rich and smooth with a velvety texture.
- Sift together the flour, cocoa powder, and baking powder into a separate bowl. Gradually fold these dry ingredients into the wet mixture using a spatula, doing so gently to keep the batter thick and fudgy. Stop mixing as soon as there are no streaks of flour remaining.
- Gently fold in an additional handful of dark chocolate chunks to ensure gooey pockets of chocolate throughout the cookies. The batter should be thick, almost like brownie dough, and scoopable but stiff.
- Using a cookie scoop or tablespoon, portion out the dough onto the prepared baking sheet, spacing each about 2 inches apart. Slightly flatten each mound with the back of a spoon for even baking and a prettier top.
- Bake in the preheated oven for 12-15 minutes. The edges should be golden and slightly crisp, while the centers remain shiny and fudgy. The cookies may crack on top—this natural fissure is perfect and indicates they are baked just right.
- Remove the baking sheet from the oven and let the cookies rest for about 5 minutes. Then, transfer them carefully to a wire rack to cool completely. As they cool, they will set into a perfect balance of crispy edges and chewy centers.
- Finish by sprinkling a tiny pinch of sea salt on top of the warm cookies for extra flavor contrast, if you like. Serve these cookies warm or at room temperature for maximum fudgy goodness and crunchy edges.
Pro tips for perfect cookies
- Bolded Tip: Chill the dough briefly before scooping to prevent spreading too much during baking.
- Bolded Tip: Use a light hand when folding in chocolate chunks to keep the batter from becoming too dense.
- Bolded Tip: For a shinier top, brush the cookies with a little beaten egg before baking.
- Bolded Tip: Rotate the baking sheet halfway through baking to ensure even coloring and texture.
- Bolded Tip: Slightly underbake — cookies will firm up as they cool, keeping that fudgy interior intact.
- Bolded Tip: Add a pinch of sea salt on top of warm cookies to enhance the chocolate flavor and balance sweetness.
Common mistakes and how to fix them
- FORGOT to preheat oven → Always preheat for even baking.
- DUMPED in all flour at once → Mix dry ingredients gradually to prevent lumps.
- OVER-TORCHED cookies → Remove when edges are golden, centers look shiny.
- UNDER-baked cookies → Bake 1-2 minutes longer if centers are too soft.
Quick fixes and pantry swaps
- When cookies spread too much, chill the dough for 30 minutes before baking.
- Splash a little milk into the batter if it feels too stiff and crumbly.
- Patch cracks with a tiny dab of melted chocolate for a smooth top.
- Dumped in too much flour? Lighten batter with a splash of water or milk.
- Shield burnt edges by lowering oven temperature 5°C (10°F) and baking slightly longer.
Prep, store, and reheat tips
- Prepare the dough ahead: Mix and fold ingredients up to 24 hours in advance; keep covered in the fridge for easier scooping.
- Store baked cookies in an airtight container at room temperature for up to 3 days, retaining their fudgy and crispy contrast.
- Freeze unbaked dough balls for up to 1 month; thaw at room temperature for 15-20 minutes before baking for fresh cookies anytime.
- Reheat cookies briefly in a 150°C (300°F) oven for 3-5 minutes, until warm and fragrant—watch for the chocolate to soften and the edges to crackle.
Top questions about chocolate brownie cookies
1. Can I use milk chocolate instead of dark?
Use high-quality dark chocolate chunks for the richest, gooey pockets. Cheaper chocolate might not melt as smoothly, resulting in less flavor and texture.
2. How do I know when the cookies are done?
Bake until edges are golden and centers look shiny but set. If they crack on top and smell chocolaty, they’re ready.
3. Can I prepare the dough ahead?
Chill the dough for 30 minutes before baking to prevent spreading and improve texture. This also helps develop richer flavor.
4. My cookies are flat, what went wrong?
If cookies spread too much, refrigerate the dough for 15 minutes before baking. It firms up the fat, helping them hold shape.
5. How do I keep the chocolate evenly distributed?
Use a light hand when folding in chocolate chunks. Overmixing can make the cookies dense and tough, not fudgy and crisp.
6. How should I store these cookies?
Store baked cookies in an airtight container at room temperature for up to 3 days. Reheat briefly in the oven for that just-baked warmth.
7. Can I freeze the dough?
Freeze unbaked dough balls for up to a month. Thaw at room temperature for 15 minutes before baking for fresh cookies anytime.
8. Which cocoa powder should I use?
Use Dutch-process cocoa powder for a smoother, less bitter chocolate flavor. Natural cocoa provides a more robust, intense chocolate punch.
9. How can I make the flavor pop more?
For extra crunch, sprinkle a pinch of sea salt on top of warm cookies. It enhances the chocolate and balances sweetness.
10. What if my cookies are too soft after baking?
If cookies are underbaked, give them a couple more minutes. They should be firm around the edges but still fudgy inside.
These cookies aren’t just a treat—they’re a little reminder that baking is a messy, unpredictable adventure. The contrast of crispy edges and fudgy centers makes every bite feel like a small victory, especially when the house fills with that rich, chocolatey aroma. They’re perfect for sharing, or not, when you need a quick, honest moment of comfort.
In the end, it’s about the simple joy of combining ingredients that speak to your mood—whether it’s nostalgic, chaotic, or just craving something truly satisfying. No matter how they turn out, these cookies always bring a bit of that warm, imperfect magic to the table.

Hi, I’m Noah Bennett, the creator behind Breathing In Flavors. For me, cooking begins with a breath. Before the first bite, before the plating, before the garnish, there is that quiet moment when steam rises and you inhale. That is where flavor truly begins. Breathing In Flavors is my space to slow down, appreciate ingredients, and cook with awareness. I am so glad you’re here.
 The creator behind Breathing In Flavors.
For me, cooking begins with a breath. Before the first bite, before the plating, before the garnish, there is that quiet moment when steam rises and you inhale. That is where flavor truly begins.
Breathing In Flavors is my space to slow down, appreciate ingredients, and cook with awareness. I am so glad you’re here.
The creator behind Breathing In Flavors.
For me, cooking begins with a breath. Before the first bite, before the plating, before the garnish, there is that quiet moment when steam rises and you inhale. That is where flavor truly begins.
Breathing In Flavors is my space to slow down, appreciate ingredients, and cook with awareness. I am so glad you’re here.


