There’s something about homemade chocolate fudge bars that wraps you in a warm, nostalgic hug. Maybe it’s the melt-in-your-mouth texture or the rich, bittersweet cocoa aroma that fills the kitchen as they bake. But I like to think it’s also the tiny rebel in me, sneaking a pinch of sea salt or a dash of chili into the mix to make every bite a little more grown-up, a little more surprising.
This recipe isn’t just about satisfying a sweet tooth; it’s about reclaiming that childhood joy while adding layers of complexity. It’s simple enough for a weekend project, yet flexible enough to customize with ingredients you already have. When I make these, I always feel like I’m sharing a secret—something special in every crumb, a story in every square.
Focusing on the nostalgic comfort of homemade chocolate fudge bars, but with a twist—incorporating unexpected ingredients like sea salt or chili for a complex, grown-up flavor profile.
The story behind this recipe
- This recipe came from a messy weekend in my childhood kitchen, where my grandma would let me scrape the spoon clean after making fudge. I remember the sticky sweetness, the faint salty crack of sea salt she sprinkled on top, and how the kitchen filled with a rich cocoa aroma that made everything feel cozy and special. Over the years, I’ve tweaked that memory into a recipe that balances deep chocolate flavor with just a hint of salt and a chewy, fudgy texture that’s hard to resist.
- Every time I make these bars, I think of those lazy afternoons, the smell of melting chocolate, and the simple joy of creating something sweet with just a handful of ingredients. They’re not fancy, but they carry a piece of my family’s kitchen—and my heart—in every bite.
- story_type
Ingredient breakdown: key components
- Unsweetened cocoa powder: I love the intense, slightly bitter aroma it releases when heated; you might prefer Dutch-processed for a smoother, less tangy flavor.
- Butter: Using salted butter adds a subtle depth, but if you want pure chocolate flavor, go for unsalted and add a pinch of sea salt later.
- Sweetened condensed milk: It gives the fudge its chewy, gooey texture—skip or reduce if you prefer less sweetness or a firmer bar.
- Chocolate chips: I prefer semi-sweet because they melt into a luscious, velvety filling; swap for dark or milk chocolate based on your mood.
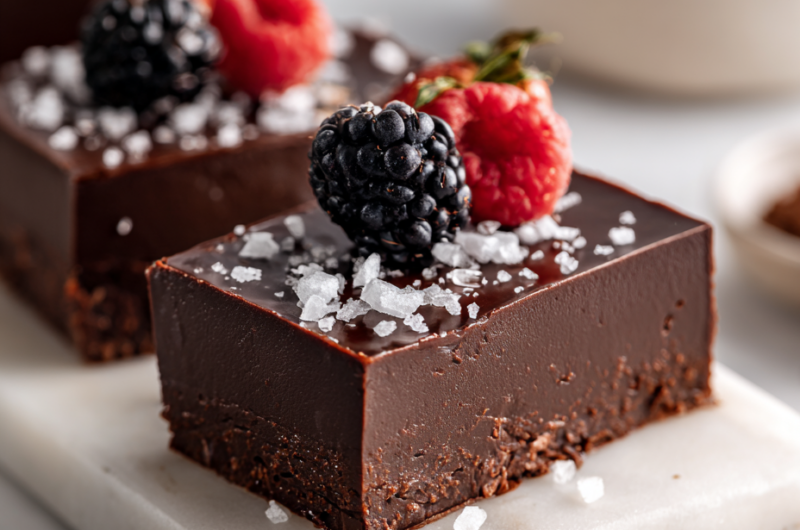
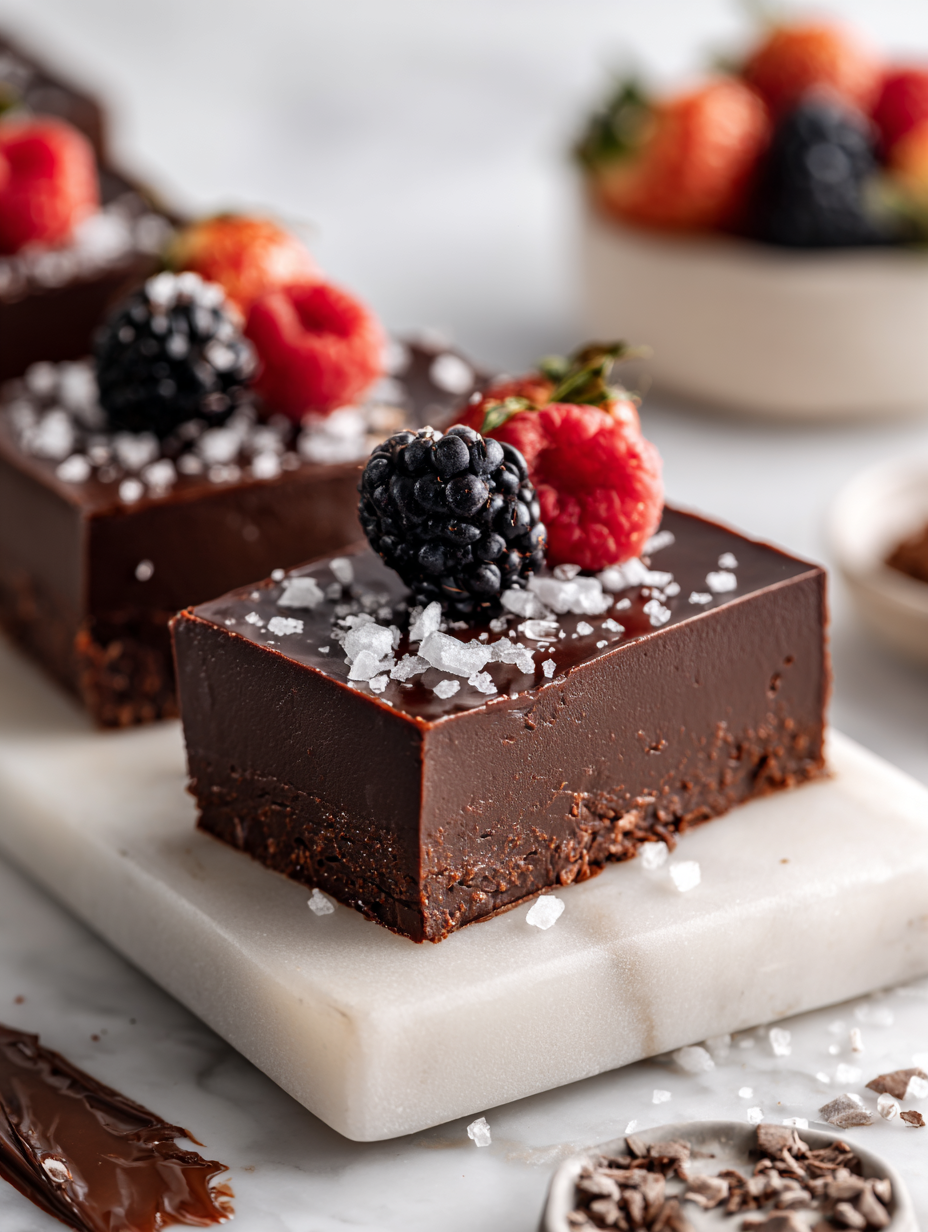
- Sea salt: A pinch on top just before setting elevates the richness—don’t skip this for that perfect salty-sweet contrast, especially if your chocolate is on the bittersweet side.
- Vanilla extract: It brightens the whole thing with a warm, cozy note—consider almond extract for a different twist, but use sparingly.
- Chili powder or sea salt (optional): If you like a kick, a tiny pinch of chili adds surprising depth; start small—you can always add more!
Spotlight on key ingredients
Cocoa Powder & Chocolate Chips:
- Unsweetened cocoa powder: I love the intense, slightly bitter aroma it releases when heated; you might prefer Dutch-processed for a smoother, less tangy flavor.
- Chocolate chips: I prefer semi-sweet because they melt into a luscious, velvety filling; swap for dark or milk chocolate based on your mood.
Sweetened Condensed Milk & Butter:
- Sweetened condensed milk: It gives the fudge its chewy, gooey texture—skip or reduce if you prefer less sweetness or a firmer bar.
- Butter: Using salted butter adds a subtle depth, but if you want pure chocolate flavor, go for unsalted and add a pinch of sea salt later.
Notes for ingredient swaps
- Dairy-Free: Swap regular butter for coconut oil or vegan margarine. It might alter the richness slightly but keeps it plant-based.
- Sweetener: Use honey or maple syrup instead of sweetened condensed milk for a different flavor profile, though the texture might be a tad less chewy.
- Chocolate: Dark chocolate or milk chocolate chips can replace semi-sweet. Expect a slightly different intensity and sweetness.
- Nuts: Add chopped pecans or walnuts for crunch—omit or swap with dried fruit if allergies are a concern.
- Salt: Sea salt flakes on top elevate the chocolate flavor—skip if you prefer it plain or are reducing sodium.
- Flavor Boost: A splash of espresso or coffee can intensify the chocolate notes—use sparingly to avoid overpowering.
- Vegan: Use vegan chocolate and coconut condensed milk to make this recipe fully plant-based without losing that fudgy richness.
Equipment & Tools
- 20×20 cm (8×8 inch) square pan: To hold and shape the fudge while baking and cooling.
- Parchment paper: To prevent sticking and make removal easier.
- Heatproof bowl: To melt the chocolate and butter gently over simmering water.
- Saucepan: To create a bain-marie for gentle melting.
- Spatula: To stir and spread the mixture evenly.
- Sharp knife: To cut the cooled fudge into squares.
Step-by-step guide to fudge bars
- Equip your 20×20 cm (8×8 inch) square pan with parchment paper, leaving overhang for easy removal.
- In a heatproof bowl, combine 200g (7 oz) semi-sweet chocolate chips, 150g (2/3 cup) unsalted butter, and 1/4 cup (60 ml) sweetened condensed milk.
- Set the bowl over a simmering pot of water (bain-marie) at about 60°C (140°F). Stir gently until smooth and glossy, about 3-5 minutes.
- Remove from heat. Immediately fold in 1 teaspoon vanilla extract and a pinch of sea salt if desired. Mix well.
- Pour the warm mixture into the prepared pan, spreading evenly with a spatula. Tap gently to remove air bubbles.
- Bake in a preheated oven at 160°C (320°F) for 10 minutes. The top will look set but slightly shiny.
- Once baked, let the fudge cool at room temperature for 15-20 minutes until the edges start to pull away.
- Transfer to the fridge, uncovered, for 2 hours or until firm. For best texture, avoid covering too soon to prevent condensation.
- After chilling, lift the fudge out of the pan using the parchment overhang. Cut into small squares with a sharp knife.
- Serve immediately or store in an airtight container in the fridge for up to a week. For longer storage, freeze wrapped squares for up to a month.
Let the fudge cool completely at room temperature, then chill uncovered in the fridge for at least 2 hours. Once firm, lift out using the parchment overhang and cut into squares. Serve immediately or store in an airtight container. For cleaner cuts, wipe the knife between slices.
How to Know It’s Done
- Color: The melted chocolate should be glossy and smooth before pouring.
- Texture: The cooled fudge should be firm but chewy when bitten into.
- Appearance: The edges should be clean and sharp when cut, with no cracks or crumbling.
Homemade Chocolate Fudge Bars with a Surprise Twist
Ingredients
Equipment
Method
- Line your square pan with parchment paper, leaving some overhang on the sides for easy lifting later.
- Combine the chocolate chips and butter in a heatproof bowl.
- Set the bowl over a saucepan of simmering water, ensuring the bottom doesn’t touch the water, and gently melt, stirring occasionally, until smooth and glossy.
- Remove the bowl from heat and stir in the sweetened condensed milk and vanilla extract until fully combined and silky.
- Pour the warm, thick mixture into your prepared pan and spread evenly with a spatula, smoothing the surface gently.
- Bake in a preheated oven at 160°C (320°F) for about 10 minutes until the top looks set and slightly shiny.
- Remove from the oven and let cool at room temperature for about 15-20 minutes; the fudge will start to pull away from the edges and develop a glossy surface.
- Transfer the pan to the fridge, uncovered, and chill for at least 2 hours until firm and sliceable.
- Once cooled and firm, lift the fudge out of the pan using the parchment overhang and cut into small squares with a sharp knife.
- Sprinkle a tiny pinch of sea salt or chili powder on top of each square for an added flavor contrast, if desired.
- Serve immediately or store in an airtight container in the refrigerator for up to a week. Enjoy the rich, chewy, and slightly salty bites!
Tips & tricks for perfect fudge
- Use low heat: Melt chocolate and butter gently over a bain-marie to prevent scorching and achieve a glossy finish.
- Add vanilla last: Stir in vanilla extract off the heat to preserve its warm aroma and flavor integrity.
- Tap the pan: Gently tap the filled pan on the counter to settle the mixture and eliminate air bubbles before baking.
- Chill uncovered: Refrigerate the fudge uncovered for at least 2 hours to prevent condensation from forming on the surface.
- Wipe your knife: Clean the knife between cuts for sharp, clean edges and a more professional look.
- Avoid overbaking: Keep an eye on the fudge’s shine; it’s done when it’s slightly shiny and set around the edges, not crackly.
- Adjust for altitude: If you’re high up, add a minute or two to the baking time to ensure proper setting.
Common mistakes and how to fix them
- FORGOT to preheat the oven → Always preheat to 160°C (320°F) before baking.
- DUMPED in all ingredients at once → Combine ingredients step-by-step for smooth melting.
- OVER-TORCHED the chocolate → Remove from heat as soon as glossy and smooth to prevent bitterness.
- FAILED to chill fully → Chill at least 2 hours for firm, clean cuts and proper texture.
Quick fixes and pantry swaps
- If melted chocolate thickens, splash in a tiny bit of hot water and stir until smooth.
- When fudge cracks or is crumbly, patch with a quick re-melt and re-cool in the fridge.
- Splash a few drops of milk if the fudge is too stiff to spread smoothly.
- Shield overbaked edges with foil to prevent burning and preserve fudgy texture.
- Dumped in ingredients too fast? Open your window, stir gently, and add a pinch of patience for glossy melt.
Prep, store, and reheat tips
- Prepare the fudge mixture up to a day in advance; store it covered in the fridge to preserve the rich cocoa aroma.
- The baked fudge bars can be kept in an airtight container at room temperature for up to 3 days, maintaining their chewy texture.
- For longer storage, wrap the cut squares tightly and refrigerate for up to a week, where flavors deepen and intensify.
- Reheat slices gently in the microwave for 10-15 seconds until slightly softened, with a warm, melt-in-your-mouth feel and a faint, inviting aroma.
Top questions about fudge bars
1. Can I substitute dark chocolate for semi-sweet?
Yes, you can use milk chocolate chips for a sweeter, milder flavor, but it will be less intense and fudgy.
2. Is there a dairy-free option?
Using coconut oil instead of butter makes it dairy-free, but expect a slightly softer, less rich texture.
3. How long should I chill the fudge?
Chilling for at least 2 hours firms up the fudge, making it easier to cut cleanly and prevents melting.
4. Should I add salt or toppings?
A pinch of sea salt on top enhances the chocolate’s richness and adds a pleasant contrast to sweetness.
5. How do I melt the chocolate properly?
Warm the mixture gently over low heat, just until smooth and glossy, to avoid scorching or bitterness.
6. How do I know when it’s done?
To prevent cracks, don’t overbake or overheat the mixture; remove from the oven once it looks shiny and set.
7. How long will the fudge last?
Store leftovers in an airtight container in the fridge for up to a week; bring to room temp before serving.
8. How do I cut perfect squares?
Cut with a sharp knife, wiping between slices for clean, sharp edges without crumbling.
9. Can I enhance the flavor with other ingredients?
Add a splash of espresso or coffee for a deeper chocolate flavor, but keep it subtle so it doesn’t overpower.
10. Can I reheat the fudge?
Reheat a slice in the microwave for 10-15 seconds until slightly warm and melty, releasing a rich cocoa aroma.
These fudge bars are more than just a treat; they carry a nostalgic punch that’s perfect for cozy afternoons or unexpected guests. The rich chocolate aroma, combined with that hint of sea salt or chili, makes every bite feel like a small rebellion against plain desserts.
Whenever I cut into a batch, I’m reminded of childhood afternoons and the simple joy of creating something sweet with a few honest ingredients. They’re messy, a little imperfect, but always deeply satisfying—exactly how a good homemade dessert should be.

Hi, I’m Noah Bennett, the creator behind Breathing In Flavors. For me, cooking begins with a breath. Before the first bite, before the plating, before the garnish, there is that quiet moment when steam rises and you inhale. That is where flavor truly begins. Breathing In Flavors is my space to slow down, appreciate ingredients, and cook with awareness. I am so glad you’re here.
 The creator behind Breathing In Flavors.
For me, cooking begins with a breath. Before the first bite, before the plating, before the garnish, there is that quiet moment when steam rises and you inhale. That is where flavor truly begins.
Breathing In Flavors is my space to slow down, appreciate ingredients, and cook with awareness. I am so glad you’re here.
The creator behind Breathing In Flavors.
For me, cooking begins with a breath. Before the first bite, before the plating, before the garnish, there is that quiet moment when steam rises and you inhale. That is where flavor truly begins.
Breathing In Flavors is my space to slow down, appreciate ingredients, and cook with awareness. I am so glad you’re here.


