There’s something about the smell of cinnamon and oats that instantly takes me back to childhood mornings. These bars are like a portable hug, packed with warm spices and hearty grains that stick with you through busy days. Making them at home means I can tweak the sweetness and spice just how I like it, without any preservatives or extras.
This recipe got started when I was craving a snack that was both satisfying and nostalgic. I wanted something I could grab on my way out the door, not fuss over or buy pre-packaged. The best part? It’s simple enough to throw together on a weekend and keeps well in the fridge for those hectic mornings.
Focusing on a nostalgic, childhood comfort food with a twist—making a portable, grab-and-go treat that combines the warmth of cinnamon with the hearty texture of oats, perfect for busy mornings or quick snacks.
The story behind this recipe
- This recipe was inspired by a lazy Sunday afternoon when I realized I had a jar of leftover oats and a mound of cinnamon that was about to lose its punch. I wanted something quick, warm, and honestly, a little nostalgic—like the breakfast bars I’d pinch from my mom’s baking stash as a kid. It’s funny how the simplest ingredients can conjure up childhood mornings in a single bite.
- I remember the first batch I made was a bit rough around the edges—crumbly and too sweet, but I loved how the cinnamon’s aroma filled the kitchen and made everything feel cozy. Since then, I’ve tweaked and adjusted, aiming for that perfect balance of chewiness and spice, with a hint of honey to tie it all together. These bars remind me that sometimes, comfort comes in a portable, slightly imperfect package.
- heading: “The story behind this recipe”
Key ingredients and tips
- Old-fashioned rolled oats: I love the chewiness they add, but if you want a softer bar, try quick oats—just watch the moisture level when baking.
- Cinnamon: I use a generous teaspoon for that warm, cozy aroma that fills the kitchen. Feel free to dial it up if you love a strong spice punch.
- Honey: It brings a sticky sweetness that binds everything together—swap with maple syrup for a different depth, but expect a slightly different texture.
- Butter: I find it gives the bars a rich, tender crumb. For a dairy-free version, coconut oil works but will add a subtle tropical note.
- Brown sugar: I prefer the molasses richness it provides, but coconut sugar can be a one-to-one swap if you want a milder flavor and a darker hue.
- Vanilla extract: Just a splash enhances all the spices and oats—skip it if you’re in a hurry, but it really rounds out the flavor.
- Salt: A pinch balances the sweetness and enhances the cinnamon’s warmth—don’t skip it, even if you’re tempted to reduce sugar.
Spotlight on key ingredients
Old-fashioned rolled oats:
- I love the chewiness they add, but if you want a softer bar, try quick oats—just watch the moisture level when baking.
- Cinnamon: I use a generous teaspoon for that warm, cozy aroma that fills the kitchen. Feel free to dial it up if you love a strong spice punch.
- Honey: It brings a sticky sweetness that binds everything together—swap with maple syrup for a different depth, but expect a slightly different texture.
Cinnamon:
- I use a generous teaspoon for that warm, cozy aroma that fills the kitchen. Feel free to dial it up if you love a strong spice punch.
- Honey: It brings a sticky sweetness that binds everything together—swap with maple syrup for a different depth, but expect a slightly different texture.
Notes for ingredient swaps
- Dairy-Free: Swap butter for coconut oil or vegan margarine. Expect a slightly more delicate texture and a subtle tropical aroma.
- Sweetener: Use maple syrup instead of honey for a richer, caramel-like flavor, but reduce the liquid slightly to compensate.
- Oats: Quick oats can be used in place of rolled oats for a softer, less chewy bar; cut back on the baking time a touch.
- Brown Sugar: Coconut sugar offers a milder, molasses undertone and darker color, but may slightly alter the moisture content.
- Spice Variations: Add a pinch of nutmeg or ground ginger for extra warmth. Skip or reduce cinnamon if preferred.
- Add-ins: Incorporate chopped nuts, dried fruits, or chocolate chips—tweak the baking time if adding moist extras to prevent sogginess.
- Vanilla Extract: Use vanilla bean paste for a richer flavor or omit if you prefer a more straightforward cinnamon oat taste.
Equipment & Tools
- Baking pan: Holds the mixture for baking and shaping the bars.
- Parchment paper: Prevents sticking and makes removal easy.
- Mixing bowls: Combine dry and wet ingredients separately.
- Spatula: Mix and press mixture into the pan evenly.
- Small saucepan: Melt butter and warm honey for binding.
- Knife: Cutting the cooled bars into squares.
Step-by-step guide to cinnamon oat bars
- Equipment ready: Line a 9×9 inch (23×23 cm) baking pan with parchment paper, leaving overhang for easy removal. Preheat oven to 180°C (350°F).
- In a large bowl, combine 2 cups (160g) rolled oats, 1/2 teaspoon salt, and 1 teaspoon cinnamon. Mix well until evenly distributed.
- In a small saucepan over medium heat, melt 1/2 cup (115g) unsalted butter. Once melted, stir in 1/3 cup (113g) honey and 1 teaspoon vanilla extract. Warm until combined, about 2 minutes; do not boil.
- Pour the warm honey-butter mixture over the oats mixture. Stir with a spatula until the oats are evenly coated and sticky.
- Transfer the mixture to the prepared pan. Using the back of a spatula or your fingers, press firmly into an even layer, ensuring no air pockets. Bake for 15 minutes, until the edges are golden.
- Remove from oven and let cool in the pan for about 10 minutes. The mixture will firm up as it cools, but still be slightly soft in the center.
- While still warm, cut into bars or squares with a sharp knife. Let cool completely on a wire rack before removing from the pan.
- Finish: Carefully lift the bars out of the pan using the parchment overhang. Serve at room temperature or store in an airtight container.
Let the bars cool completely before slicing. Store in an airtight container at room temperature for up to 3 days, or refrigerate for a week. Reheat briefly in the microwave if desired, until warm and fragrant.
How to Know It’s Done
- Golden edges and fragrant cinnamon aroma when baking.
- Bars hold together when pressed gently—no crumbling.
- Oats look toasted and slightly shiny from the honey-butter coating.
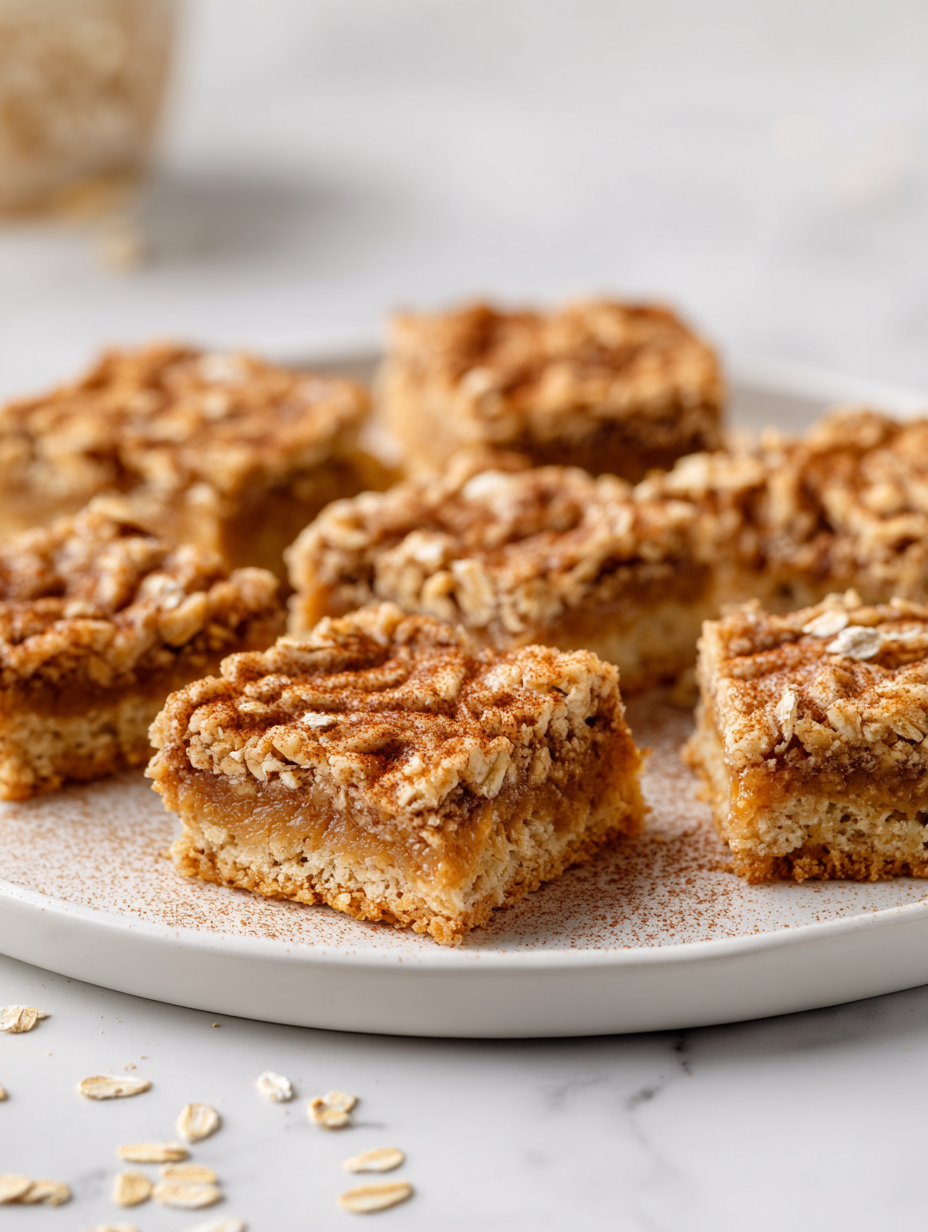
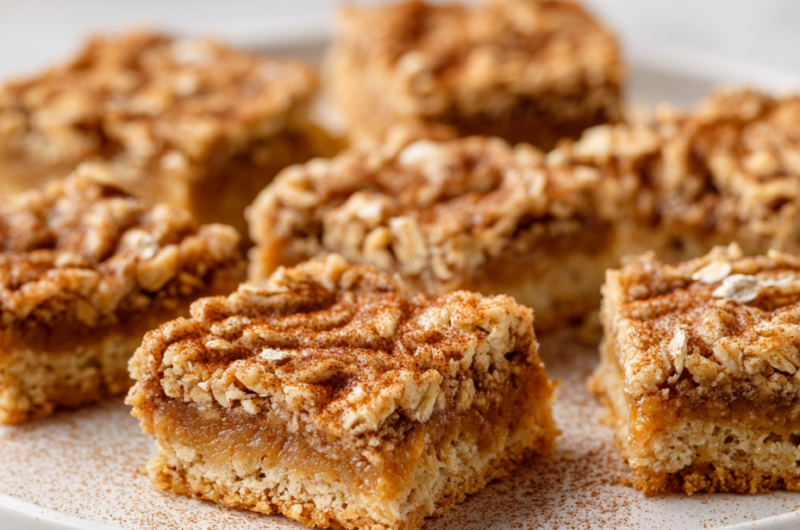
Cinnamon Oat Bars
Ingredients
Equipment
Method
- Line a 9x9 inch baking pan with parchment paper, leaving overhang on the sides for easy removal. Preheat your oven to 180°C (350°F).
- In a large mixing bowl, combine the rolled oats, salt, and cinnamon. Stir well until evenly distributed, and the mixture looks uniform with specks of cinnamon throughout.
- In a small saucepan over medium heat, melt the butter until it’s bubbling softly and smells rich and toasty. Stir in the honey and vanilla, warming for about 2 minutes until the mixture is smooth and fragrant.
- Pour the warm honey-butter mixture over the oats mixture. Use a spatula to stir and fold until all the oats are coated and sticky, with a glossy appearance and a pleasant aroma of cinnamon and honey filling your kitchen.
- Transfer the oat mixture into the prepared pan. Press down firmly with the back of a spatula or your fingers to create an even, compact layer. This helps the bars hold together nicely after baking.
- Bake in the preheated oven for about 15 minutes, until the edges turn golden brown and you can smell toasty oats. The mixture may bubble slightly at the edges, signaling that it’s ready.
- Remove the pan from the oven and allow it to cool in the pan for about 10 minutes. The bars will firm up as they cool, but should still be slightly soft in the center.
- Using the parchment overhang, lift the bars out of the pan and place them on a wire rack. Let them cool completely before slicing into squares or rectangles, revealing their chewy, golden interior.
- Once cooled, cut into 12 even bars with a sharp knife. Serve at room temperature for best flavor and texture. Store leftovers in an airtight container at room temperature or refrigerate for up to a week.
Pro tips for perfect cinnamon oat bars
- Use fresh cinnamon for a more fragrant, punchy aroma that really wakes up the oats.
- When melting butter and honey, do it slowly over medium heat until just bubbling—no boiling, to keep it smooth.
- Press the mixture firmly into the pan—use the bottom of a glass to get an even, compact layer for tidy bars.
- Bake until edges are golden and smell toasty—don’t pull them too early or they’ll be softer than intended.
- Cool the bars completely before slicing—warm bars are crumbly, but fully cooled they hold shape better.
- If the bars seem too soft after baking, pop them in the fridge for 15 minutes before cutting for cleaner edges.
- For extra flavor, sprinkle a little sea salt on top before baking—adds a subtle contrast to the sweet cinnamon.
Common mistakes and how to fix them
- FORGOT to adjust oven temperature → Ensure accurate temp to avoid over- or under-baking.
- DUMPED sugar too early → Mix sugar thoroughly into wet ingredients for even sweetness.
- OVER-TORCHED oats → Keep an eye on edges to prevent burning, use lower heat if necessary.
- SKIPPED resting time → Let bars cool completely; cutting too early causes crumbling.
Quick fixes and pantry swaps
- When mixture is too dry, splash a teaspoon of hot water to loosen it up.
- If bars are crumbling, patch with a thin layer of honey and press firmly.
- Damped oats? Shield with a little extra butter to keep texture moist.
- When edges burn quickly, cover with foil halfway through baking.
- Splash a little milk if bars are too chewy after refrigeration.
Prep, store, and reheat tips
- Prepping the dry mixture the night before makes assembly quicker—just mix oats, spices, and salt in a jar.
- Store baked bars in an airtight container at room temperature for up to 3 days; they stay chewy and fragrant.
- For longer storage, refrigerate up to a week—bars firm up and become slightly denser, but still tasty.
- Reheat a bar in the microwave for about 10 seconds until warm and the cinnamon aroma shimmers through.
- If the bars feel a little soft after refrigeration, let them sit at room temperature for 5 minutes before serving.
Common questions about cinnamon oat bars
1. Can I substitute quick oats for rolled oats?
Yes, you can use quick oats for a softer texture, but reduce the baking time slightly to prevent over-drying.
2. Can I use maple syrup instead of honey?
Absolutely, swapping honey for maple syrup works well. Expect a slightly different sticky texture and a hint of maple flavor.
3. How long do these bars keep?
Refrigerate the bars in an airtight container for up to a week. Reheat briefly in the microwave until warm and fragrant.
4. Can I make these dairy-free?
Yes, dairy-free butter substitutes like coconut oil work, but may make the bars a tad more delicate and add a subtle tropical scent.
5. How do I know when they are done?
Bake until edges are golden and smell toasty—usually around 15 minutes. The bars should feel firm but not hard when pressed.
6. Can I add extras like nuts or dried fruits?
Yes, adding chopped nuts or dried fruits is fine. Just reduce baking time slightly to avoid sogginess.
7. How should I store these bars?
Use fresh cinnamon for a more aromatic punch. Store in an airtight container to preserve flavor and texture.
8. What if my mixture is too dry and crumbly?
If mixture is too dry, add a splash of hot water to loosen it before pressing into the pan.
9. My bars are too soft—what should I do?
If bars are too soft after baking, chill in the fridge for 15 minutes before slicing for cleaner edges.
10. What if the edges burn too quickly?
When the edges start to burn, loosely cover with foil and continue baking until golden brown.
These cinnamon oat bars are more than just a snack; they’re a slice of childhood tucked into a portable form. The warm aroma of cinnamon and the hearty chew of oats make them perfect for a quick breakfast or a comforting treat on a busy afternoon. Every bite reminds me of simpler mornings and the joy of homemade comfort food.
Sharing them with friends or family feels like passing on a little piece of that nostalgia. No matter how hectic life gets, these bars offer a moment of warmth and familiarity, right when you need it most. Sometimes, that’s all it takes to turn a regular day around.

Hi, I’m Noah Bennett, the creator behind Breathing In Flavors. For me, cooking begins with a breath. Before the first bite, before the plating, before the garnish, there is that quiet moment when steam rises and you inhale. That is where flavor truly begins. Breathing In Flavors is my space to slow down, appreciate ingredients, and cook with awareness. I am so glad you’re here.
 The creator behind Breathing In Flavors.
For me, cooking begins with a breath. Before the first bite, before the plating, before the garnish, there is that quiet moment when steam rises and you inhale. That is where flavor truly begins.
Breathing In Flavors is my space to slow down, appreciate ingredients, and cook with awareness. I am so glad you’re here.
The creator behind Breathing In Flavors.
For me, cooking begins with a breath. Before the first bite, before the plating, before the garnish, there is that quiet moment when steam rises and you inhale. That is where flavor truly begins.
Breathing In Flavors is my space to slow down, appreciate ingredients, and cook with awareness. I am so glad you’re here.


