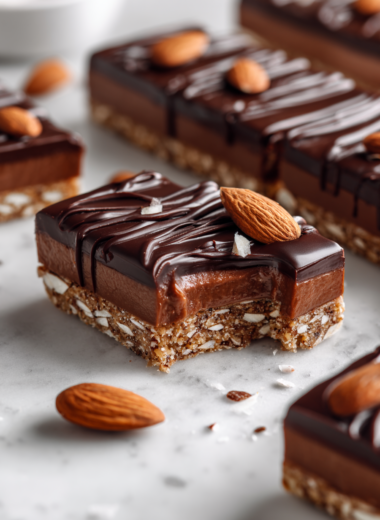
Sometimes, I get a craving for something sweet but don’t want to fuss with layered cakes or complicated desserts. These peanut butter chocolate chip chewy bars are my go-to — honest, simple, and just the right amount of sticky, nutty, and chocolatey. I love how they come together quickly, especially when I need a quick fix after a long day.
What really makes these bars special is how forgiving they are, even if I forget a step or tweak the ingredients slightly. It’s a no-fuss recipe that’s perfect for busy days or when I want to use up that jar of peanut butter lurking in the back of the cupboard.
From a cook’s notes perspective, focusing on the imperfect, real-time tips for making chewy bars that stay just right.
Why this recipe matters to me
- I love how forgiving this recipe is, even if I forget to soften the butter.
- The smell of peanut butter and melting chocolate baking together is pure comfort.
- I’ve made these with chunky peanut butter, and the texture gets even more interesting.
- Sometimes I add a handful of chopped nuts for extra crunch, and it’s a hit.
- These bars remind me of childhood after-school snacks, simple and satisfying.
Personal story behind the bars
- This recipe was born from my need for a quick, reliable sweet fix that didn’t require a trip to the store or complicated steps.
- It’s a mashup of childhood memories and my love for baking fast, comforting treats.
- Every batch feels like a small victory, especially when I want something homemade but don’t have hours to spare.
- It’s become a staple in my kitchen, especially during busy weeks or when friends drop by unexpectedly.
Background and fun facts
- Inspired by childhood snacks, these bars mimic the classic peanut butter and chocolate combo we all loved.
- The chewy texture comes from a simple mix of ingredients that don’t require melting or tempering.
- Adding a pinch of sea salt before baking enhances the chocolate and peanut butter flavors.
- Using mini chocolate chips ensures even distribution and a delicate melt-in-your-mouth sensation.
Ingredient insights and tweaks
- Peanut Butter: I prefer creamy for smooth texture, but chunky adds crunch—try both.
- Chocolate Chips: Semi-sweet are classic, but dark or milk chocolate also works, depending on your mood.
- Brown Sugar: Adds moisture and depth; substitute with coconut sugar for a slightly different flavor.
- Eggs: Bind everything together; flax eggs can be a vegan swap, but expect slightly different texture.
- Flour: All-purpose is reliable, but whole wheat adds nuttiness and fiber—consider a blend.
Key ingredients spotlight
Chocolate Chips: Tiny bursts of melty, bittersweet chocolate that soften but don’t fully melt, creating pockets of gooey goodness.:
- Peanut Butter: Creamy, rich, and oozing with nutty aroma. It melts slightly during baking, creating a luscious base.
- It’s the flavor foundation, so quality matters—natural peanut butter delivers a deeper, roasted taste.
Eggs: They give structure and moisture, turning the dough into a cohesive, pliable batter.:
- Brown Sugar: Its molasses notes lend a caramel aroma that intensifies as the bars bake, making each bite more complex.
- The moisture in brown sugar helps keep the bars chewy and tender.
Smart ingredient swaps for different diets and preferences
- Dairy-Free: Swap butter for coconut oil or vegan margarine for a similar richness.
- Vegan: Use flaxseed meal mixed with water instead of eggs, but expect slightly less binding.
- Sugar-Free: Substitute with erythritol or coconut sugar, though flavor and texture may differ.
- Gluten-Free: Replace all-purpose flour with a blend of almond flour and gluten-free baking mix.
- Extra Chocolate: Use chopped dark chocolate or cacao nibs for a different texture and flavor.
Equipment & Tools
- Mixing bowls: To combine ingredients and mix dough.
- Rubber spatula: To fold ingredients and spread batter evenly.
- 9×13 inch baking dish: To bake the bars in an even layer.
- Parchment paper: To prevent sticking and for easy removal.
- Wire cooling rack: To cool the bars evenly and prevent sogginess.
Step-by-step guide to chewy bars
- Preheat your oven to 180°C (350°F). Grease a 9×13 inch baking dish or line it with parchment paper.
- In a large bowl, cream together 1 cup of peanut butter, 1/2 cup of softened butter, and 1 cup of brown sugar. Mix until smooth and fluffy, about 2-3 minutes.
- Add 2 large eggs and 1 teaspoon of vanilla extract. Mix well until combined.
- In a separate bowl, whisk together 2 cups of all-purpose flour, 1 teaspoon baking powder, and a pinch of salt.
- Gradually add the dry ingredients to the wet, mixing just until incorporated. Do not overmix, or the bars may turn dense.
- Stir in 1 cup of chocolate chips until evenly distributed.
- Pour the batter into the prepared baking dish. Smooth the top with a spatula, pressing gently to level.
- Bake for 20-25 minutes. The edges should be golden, and the center slightly jiggly but set.
- Remove from oven and let cool completely in the pan on a wire rack, about 30 minutes. This helps them firm up and makes slicing easier.
- Once cooled, cut into squares or rectangles. Store in an airtight container at room temperature for up to 4 days or freeze for longer storage.
Allow the bars to cool completely in the pan before slicing. This helps them set and makes cutting cleaner. Slice with a sharp knife, wiping between cuts if needed.
How to Know It’s Done
- Edges are golden brown, center is set but slightly soft for maximum chew.
- A toothpick inserted in the center comes out with moist crumbs, not wet batter.
- Bars are firm enough to hold their shape when sliced, not crumbly.
Peanut Butter Chocolate Chip Chewy Bars
Ingredients
Equipment
Method
- Preheat your oven to 180°C (350°F) and line a 9×13 inch baking dish with parchment paper, leaving some overhang for easy removal.
- In a large mixing bowl, combine the peanut butter, softened butter, and brown sugar. Use a rubber spatula to mix until the mixture is smooth, creamy, and slightly fluffy, about 2-3 minutes. The mixture should be uniformly blended and fragrant.1 cup peanut butter
- Add the eggs one at a time, mixing well after each addition, then stir in the vanilla extract. The batter will become glossy and slightly thickened. This creates moisture and richness in the bars.1 cup peanut butter
- In a separate bowl, whisk together the flour, baking powder, and salt to evenly distribute the leavening and flavoring agents.1 cup peanut butter
- Gradually add the dry ingredients to the wet mixture, folding gently with the spatula until just combined. Be careful not to overmix; this keeps the bars tender. The dough will be thick and slightly sticky.
- Stir in the chocolate chips until evenly distributed throughout the batter. Use your spatula to fold them in gently.1 cup peanut butter
- Pour the batter into the prepared baking dish. Use the spatula to spread it evenly, pressing gently to ensure a flat, compact surface. This helps the bars bake uniformly.
- Bake for 20-25 minutes, until the edges are golden brown and the center is set but still slightly soft to the touch. The smell of baked chocolate and peanut butter will fill your kitchen.
- Remove the dish from the oven and let it cool completely on a wire rack for about 30 minutes. Cooling helps the bars firm up, making them easier to cut and preventing crumbles.
- Once cooled, lift the bars out of the dish using the parchment overhang. Slice into squares or rectangles with a sharp knife, wiping between cuts for clean edges. Serve and enjoy your chewy, nutty, chocolatey bars!
Notes
Pro tips for perfect chewy bars
- Use room temperature ingredients for a smoother batter.
- Mix just until combined to keep the bars tender.
- Press batter firmly into the pan for even baking.
- Add a sprinkle of sea salt on top before baking for flavor.
- For extra chew, stir in a tablespoon of honey or maple syrup.
Common mistakes and how to fix them
- FORGOT TO GREASE THE PAN? Use parchment paper for easy removal.
- DUMPED TOO MUCH FLOUR? Add a splash of milk or a bit more peanut butter to loosen the batter.
- OVER-TOASTED CHOCOLATE? Reduce bake time by 2 minutes or cover loosely with foil.
- CRACKED BARS? Chill fully before slicing, and wipe your knife between cuts for clean edges.
Fast fixes for common issues
- When bars crack while slicing, chill them an extra 10 minutes.
- Splash a little warm water on the knife to help cut through sticky batter.
- Patch cracks with a smear of peanut butter or melted chocolate.
- Shield edges with a piece of parchment if they brown too quickly.
- When in doubt, extend baking time by 2 minutes and check again.
Make-ahead and storage tips
- Prepare the batter ahead of time and keep refrigerated for up to 24 hours before baking.
- Bars can be stored in an airtight container at room temperature for 3-4 days, or frozen for up to a month.
- Refrigerating the bars slightly firms them up, making slicing easier and cleaner.
- Reheat by warming in a 150°C (300°F) oven for 5 minutes, until just soft and fragrant.
10 Practical Q&As about Peanut Butter Chocolate Chip Chewy Bars
1. What size baking dish should I use?
Use a sturdy baking dish, like 9×13 inches, for even thickness and easier cutting.
2. How do I know when to stop mixing?
Mix until the ingredients are just combined; over-mixing can make the bars dense.
3. How do I tell if the bars are baked enough?
Bake until the edges are golden and the center is set, about 20-25 minutes at 180°C (350°F).
4. Can I cut them while they’re still warm?
Let the bars cool completely in the pan before slicing; this helps them set and prevents crumbling.
5. How long do these bars last?
Store in an airtight container at room temperature for 3-4 days, or freeze for longer storage.
6. Can I use chunky peanut butter?
Using natural peanut butter makes the flavor richer, but it may require a slightly longer mixing time.
7. Should I salt the top before baking?
Add a pinch of sea salt on top before baking for a sweet-salty contrast.
8. How can I make these bars chewier?
To make them extra chewy, add a tablespoon of honey or a bit more brown sugar.
9. Why should I chill the bars before slicing?
Chill the bars in the fridge before slicing for clean cuts and a firmer texture.
10. Can I use chopped chocolate instead of chips?
Use mini chocolate chips for even distribution and a more delicate chocolate flavor.
Once cooled, these bars are best enjoyed with a glass of cold milk or just on their own, feeling the chewy bite and chocolate melt on your tongue. They’re a reminder that sometimes, simple ingredients combined well can create something truly satisfying.
Whether you’re packing them in a lunchbox or grabbing a quick snack, these chewy bars are a little bit of comfort that’s easy to whip up. No matter the season, they bring a bit of homemade joy that can brighten any day.