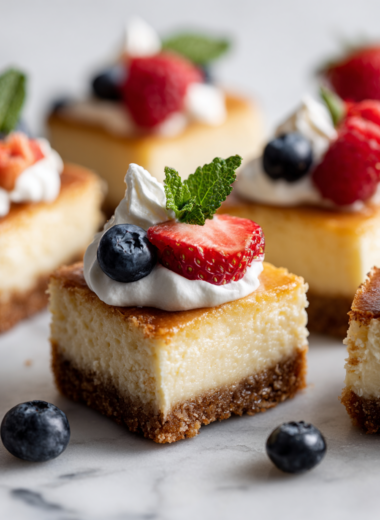
Blog

  • Crispy Baked Tofu Nuggets Recipe

    I’ve always loved the idea of crispy snacks, but frying feels heavy and messy. Baking offers a way to get that satisfying crunch without the oil splatters and guilt.

    These nuggets are about capturing that texture—crisp outside, tender inside—and doing it with ingredients I usually have around. It’s a small win, a quick fix for snack cravings.

    Sometimes I think about how much I crave that crackly bite, especially on busy days when I don’t want to fuss in the kitchen. Baking gives me that, and I don’t have to worry about oil or extra calories.

    From the perspective of a home cook who loves texture and crunch, but wants to keep it simple and healthy.

    Why I Keep Coming Back to This Recipe

    • I love how crispy these get—there’s a satisfying crack every time.
    • It’s a relief to have a crunchy snack that’s actually healthy.
    • I get nostalgic thinking about childhood snacks, but this feels fresher and more grown-up.
    • There’s pride in making something crispy without the greasy mess.

    My Journey to Crispy, Healthy Tofu Nuggets

    • I wanted a snack that’s satisfying in texture but doesn’t leave me feeling sluggish afterward.
    • Inspired by Asian fried tofu, I experimented with baking to keep that crunch but cut the oil.
    • The first batch was a mess—either too soft or burnt—until I learned to flip and watch the color.
    • Now, I keep it simple, and the house smells amazing of toasted breadcrumbs and baked goodness.

    A Little Tofu History and Tech

    • Tofu’s origins trace back to ancient China, where it’s been a staple for over 2,000 years.
    • The use of panko breadcrumbs originates from Japan, designed to create lighter, crispier coatings.
    • Baking instead of frying is a modern twist that aligns with current health-conscious trends.
    • This method is inspired by traditional Asian techniques of drying and crisping tofu for texture.

    Key Ingredients and How They Behave

    • Firm tofu: I prefer it pressed well—less water means better crisp. Swap with tempeh for a nuttier bite.
    • Breadcrumbs: Panko gives the crunch, but regular breadcrumbs work in a pinch—just less airy.
    • Soy sauce: Adds savory depth, but coconut aminos keep it vegan and subtly sweet.
    • Cornstarch: Helps crisp up the coating—arrowroot works similarly, just slightly less crispy.
    • Oil spray: Light mist helps with browning; skip if you want a completely oil-free version.

    Spotlight on Tofu and Breadcrumbs

    Tofu:

    • It’s the backbone—firmer, pressed well, it crisps up beautifully and holds shape.
    • Watch for a subtle soy or nutty aroma as it bakes, signaling readiness.

    Panko Breadcrumbs:

    • Breadcrumbs: Panko is airy and light, perfect for that crackly exterior.
    • Look for golden, crispy crumbs that shimmer slightly when baked.

    Smart Swaps for Different Diets

    • Dairy-Free: Use gluten-free panko or crushed rice crackers for a similar crunch.
    • Gluten-Free: Opt for certified gluten-free panko or crushed cornflakes.
    • Vegan: Swap soy sauce for coconut aminos or liquid smoke for smoky flavor.
    • Low-Sodium: Use reduced-salt soy or alternative seasoning to control salt.
    • Extra Flavour: Add garlic powder or smoked paprika to the breadcrumb mix for extra punch.

    Equipment & Tools

    • Wire rack: Allows air circulation for even crisping.
    • Baking sheet: Catches drips and provides a stable base.
    • Towel or paper towels: Press out excess water from tofu.
    • Mixing bowls: Combine coating ingredients.
    • Tongs: Handle tofu pieces gently.

    How to Make Crispy Baked Tofu Nuggets

    1. Press the tofu: Wrap in a towel, weigh down for 15 minutes.
    2. Cut into bite-sized cubes, about 1.5 cm (0.6 inch).
    3. Mix breadcrumb coating: panko, cornstarch, seasonings.
    4. Dip each tofu piece in a little soy or almond milk, then coat thoroughly.
    5. Arrange on a wire rack over a baking sheet, spray lightly with oil.
    6. Bake at 200°C (400°F) for 25-30 minutes, flipping halfway.
    7. Check for golden color and crispness; it should sound crackly when tapped.
    8. Rest for 5 minutes before serving to let the crust set.

    Let the nuggets rest for 5 minutes on a wire rack before serving to ensure the crust is set and crispy.

    How to Know It’s Done

    • Golden brown exterior with a slight shimmer from oil spray.
    • Crackling sound when tapped or bitten into.
    • Firm texture that holds shape but is tender inside.

    Baked Crispy Tofu Nuggets

    These baked tofu nuggets deliver a satisfyingly crunchy exterior with a tender inside, achieved through a simple breadcrumb coating and baking method. Main ingredients include firm tofu pressed for moisture, panko breadcrumbs for crunch, and seasonings to enhance flavor, resulting in a light, crispy snack that’s healthier than fried alternatives.
    Prep Time 15 minutes
    Cook Time 30 minutes
    Total Time 45 minutes
    Servings: 4
    Course: Main Course
    Cuisine: Asian-inspired
    Calories: 150

    Ingredients
      

    • 14 oz firm tofu pressed to remove excess water
    • 1 cup panko breadcrumbs airy and light for crunch
    • 2 tbsp cornstarch helps crisp the coating
    • 3 tbsp soy sauce or coconut aminos for vegan option
    • 1/4 cup almond milk for dipping
    • 1 tbsp olive oil spray light spray for browning
    • 1/2 tsp garlic powder optional for added flavor
    • 1/2 tsp smoked paprika optional for smoky flavor

    Equipment

    • Wire rack
    • Baking sheet
    • Towel or paper towels
    • Mixing bowls
    • Tongs

    Method
     

    1. Wrap the tofu block in a clean towel and press gently, then place a weight on top and let it sit for about 15 minutes to remove excess moisture. This step ensures the nuggets get crispy.
    2. Once pressed, cut the tofu into bite-sized cubes, roughly 1.5 cm (0.6 inch) each, to ensure even baking and a satisfying bite.
    3. In a mixing bowl, combine the panko breadcrumbs, cornstarch, garlic powder, smoked paprika, and a pinch of salt if desired. Mix well to evenly distribute the seasonings.
    4. Pour the soy sauce into a shallow dish and the almond milk into another. Dip each tofu cube first into the almond milk, allowing excess to drip off, then coat thoroughly in the seasoned panko mixture, pressing lightly to adhere.
    5. Arrange the coated tofu nuggets on a wire rack set over a baking sheet, ensuring they are spaced evenly to allow air circulation for maximum crispness.
    6. Lightly spray the nuggets with olive oil spray to promote browning and crunching during baking.
    7. Bake in a preheated oven at 200°C (400°F) for 25 to 30 minutes, flipping the nuggets halfway through, until they are golden brown and crispy.
    8. Once baked, remove the nuggets from the oven and let them rest on the wire rack for about 5 minutes. This cooling time helps set the crust and enhances crunchiness.
    9. Serve the nuggets warm with your favorite dipping sauce, or enjoy them on their own for a crunchy, healthy snack.

    Notes

    Pressing the tofu well is key to achieving maximum crispness. Using a wire rack ensures even air flow during baking, resulting in an irresistibly crunchy exterior. Feel free to add extra seasonings like garlic powder or chili flakes for more flavor.

    Tips to Perfect Your Crispy Baked Tofu Nuggets

    • THE COATING: Use panko for crunch, or crushed cornflakes for extra texture.
    • PREP THE BREADING: Mix seasonings into breadcrumbs for even flavor.
    • USE A WIRE RACK: Ensures air flows around, crisp up all sides.
    • FLIP HALFWAY: Flip nuggets at 15 minutes for even baking.
    • SPRAY LIGHTLY: A quick spritz of oil enhances browning without greasiness.
    • DON’T OVERCROW: Space out nuggets on the rack to avoid steaming.

    Common Pitfalls and How to Fix Them

    • FORGOT TO PRESS TOFU: Press longer or use a tofu press for best crunch.
    • DUMPED TOO MUCH OIL: Light spray is enough; excess oil makes the coating soggy.
    • OVER-TORCHED: Reduce oven temp or check early; dark edges mean it’s done.
    • NOT CRISPY ENOUGH: Bake longer or increase oven temp slightly, watching closely.

    Fast Fixes for Common Baking Woes

    • When too soft, bake longer or increase heat gradually.
    • If sticking occurs, line the rack with parchment or foil.
    • Splash with a bit of soy or vinegar if flavor is dull.
    • Patch soggy spots with more breadcrumb and bake a few minutes longer.
    • Shield burnt edges with foil and continue baking for even doneness.

    Prepping and Storing for Freshness

    • Press and cut the tofu a day ahead; store in an airtight container in the fridge.
    • Coat the tofu with breadcrumbs up to 2 hours before baking; keep covered in the fridge.
    • The flavor intensifies slightly as it sits, but crispness might diminish.
    • Reheat in oven at 180°C (350°F) for 10 minutes, until crackly and hot.

    10 Practical Q&As about Crispy Baked Tofu Nuggets

    1. How do I get the tofu crispy without frying?

    Use a firm tofu and press out excess water for the best crispiness. Wrap in a towel and weigh down for 15 minutes.

    2. What’s the key to a crunchy crust?

    Coat the tofu in a seasoned breadcrumb mixture, then bake at 200°C (400°F) for 25-30 minutes until golden.

    3. Should I use a baking sheet or a rack?

    Bake on a wire rack set over a baking sheet to allow air circulation and even crisping.

    4. Can I skip the cornstarch?

    Use cornstarch or arrowroot to help the coating stick and crisp up. It’s like magic—light and crunchy.

    5. What goes well with these nuggets?

    Serve with a tangy dipping sauce like sriracha mayo or sweet chili. It adds a bright contrast.

    6. How do I prevent sticking?

    Make sure to flip the nuggets halfway through baking for even crispness. Use tongs for gentle handling.

    7. Can I use regular breadcrumbs?

    Use panko breadcrumbs for extra crunch, or crushed cornflakes for an extra layer of texture.

    8. How do I know when they’re done?

    Baking time may vary with oven calibration. Look for a deep golden color and a firm texture.

    9. Should I cool them immediately?

    Let the nuggets rest for 5 minutes after baking to set the crust and prevent breakage.

    10. How do I reheat without losing crunch?

    Reheat in the oven at 180°C (350°F) for 10 minutes for best crispness.

    These nuggets are not just a snack, they’re a reminder that good, satisfying crunch can come from simple, honest ingredients.

    Once you get the hang of baking them just right, you’ll find yourself reaching for this recipe again and again, especially when craving something crispy and homemade.

  • instant pot chicken soup recipe

    instant pot chicken soup recipe

    Having a reliable chicken soup recipe that’s quick and customizable is a must in my kitchen. The Instant Pot makes it almost effortless, turning simple ingredients into a nourishing bowl in under 30 minutes. I love adding fresh herbs and lemon to keep it lively, especially on colder days when you need warmth and a little zing.

    Why This Soup Will Keep Calling You Back

    It’s quick enough for weeknights but has enough flavor to impress. The bright lemon notes cut through the richness, making each sip refreshing. Plus, it’s endlessly customizable—add noodles, greens, or hot sauce. It’s that rare dish that feels homey but also keeps your palate interested.

    Breaking Down the Ingredients

    • Chicken breasts:: Lean, tender, quick to cook, and shredding easily. Swap with thighs for more flavor.
    • Carrots:: Sweet, crunchy, and add color. Use parsnips for a different sweet note.
    • Celery:: Crunchy and aromatic; brings freshness. Leeks can be a milder alternative.
    • Garlic:: Pungent and fragrant, boosts flavor. Shallots work well if garlic isn’t available.
    • Lemon juice:: Brightens everything up, adds a zesty punch. Lime juice can substitute for a different citrus vibe.
    • Fresh herbs:: Parsley and thyme add freshness and earthiness. Basil is a nice summer alternative.
    • Chicken broth:: The savory base; go for low-sodium for control. Vegetable broth suits vegetarians.

    Tools and Equipment for Instant Pot Chicken Soup

    • Instant Pot or similar electric pressure cooker: Main cooking vessel for fast, hands-off pressure cooking.
    • Sharp chef’s knife: Chopping vegetables and shredding chicken.
    • Cutting board: Providing a stable surface for prep.
    • Measuring spoons and cups: Ensuring accurate seasoning and liquids.
    • Ladle: Serving the soup.

    How to Make This Soup Your New Comfort Go-To

    Step 1: Start by prepping your ingredients: chop carrots, celery, and onion, mince garlic, and set aside.

    Step 2: Turn the Instant Pot to sauté mode, add a splash of oil, and cook onions until translucent, about 3 minutes.

    Step 3: Add carrots, celery, garlic, and a bay leaf; sauté until fragrant, about 2 minutes.

    Step 4: Pour in chicken broth, then add boneless chicken breasts, ensuring they’re submerged.

    Step 5: Lock the lid, set to high pressure for 10 minutes, then let it naturally release for 10 minutes.

    Step 6: Open the lid carefully, remove chicken, shred it with two forks, and return to the pot.

    Step 7: Stir in lemon juice, chopped herbs, salt, and pepper to taste.

    Step 8: Turn to sauté mode again, simmer for 2 minutes to meld flavors.

    Step 9: Taste and adjust seasoning. Serve hot with crusty bread.

    Cooking Checkpoints and Tips to Keep in Mind

    • Ensure chicken is fully submerged in broth before pressure cooking.
    • The vegetables should be tender but not mushy, check after 10 minutes.
    • Lemon juice should be added at the end to keep the brightness intact.
    • Taste and adjust salt and acid before serving to balance flavors.

    Common Mistakes and How to Fix Them

    • Quick releasing pressure while chicken is still undercooked.? Use the natural release for 10 minutes to avoid tough chicken.
    • Adding lemon too early, which dulls flavor.? Add lemon juice at the end to prevent bitterness.
    • Overcooking vegetables in the pressure cooker.? Ensure vegetables are tender but not mushy.
    • Serving with bland broth.? Taste and adjust seasoning after cooking.

    Instant Pot Lemon Chicken Soup

    This quick and customizable chicken soup is made effortlessly in the Instant Pot, combining tender shredded chicken, vibrant lemon juice, and fresh herbs for a nourishing bowl with a bright, refreshing flavor. The soup has a clear, comforting broth with tender vegetables, perfect for colder days or when you need a lively, satisfying meal.
    Prep Time 10 minutes
    Cook Time 20 minutes
    Total Time 30 minutes
    Servings: 4
    Course: Main Course
    Cuisine: Comfort Food
    Calories: 250

    Ingredients
      

    • 2 large chicken breasts boneless, skinless
    • 2 medium carrots peeled and diced
    • 2 stalks celery chopped
    • 3 cloves garlic minced
    • 4 cups chicken broth low-sodium preferred
    • 1 each bay leaf
    • 2 tablespoons lemon juice freshly squeezed
    • 1/4 cup fresh herbs parsley and thyme, chopped
    • to taste salt and pepper

    Equipment

    • Instant Pot or similar electric pressure cooker
    • Sharp chef’s knife
    • Cutting board
    • Measuring spoons and cups
    • Ladle

    Method
     

    1. Chop carrots, celery, and mince garlic, setting everything aside for easy access during cooking.
    2. Turn the Instant Pot to sauté mode, add a splash of oil, and cook the onions until translucent, about 3 minutes, filling your kitchen with a fragrant aroma.
    3. Add the chopped carrots, celery, garlic, and bay leaf, sautéing for another 2 minutes until fragrant and slightly softened.
    4. Pour in the chicken broth and place the chicken breasts into the pot, ensuring they are fully submerged in the liquid.
    5. Secure the lid, set the pressure to high, and cook for 10 minutes, allowing the flavors to meld beautifully.
    6. Once cooking is complete, let the pressure release naturally for 10 minutes before carefully opening the lid.
    7. Remove the chicken breasts and shred them with two forks, then return the shredded meat to the soup.
    8. Stir in the lemon juice and chopped fresh herbs, then season with salt and pepper to taste, brightening the broth with citrusy zing.
    9. Switch the Instant Pot to sauté mode again and simmer the soup for 2 minutes to meld all the flavors together.
    10. Taste the broth and adjust seasoning with additional salt, pepper, or lemon juice if desired.
    11. Serve the hot soup in bowls, garnished with extra herbs if you like, alongside crusty bread for a hearty, satisfying meal.
    This soup is a one-pot wonder that’s bright, hearty, and almost too easy. The lemon and herbs give it a fresh lift, perfect for chilly evenings or when you need a bit of brightness. Feel free to mix in your favorite greens or a dash of hot sauce for extra personality. Once it’s on the table, you’ll find yourself reaching for seconds without a second thought.

  • easy chicken soup recipe

    easy chicken soup recipe

    Chicken soup is often a simple, everyday dish, but I’ve found that a few bold ingredients can turn it into something memorable. Using fresh ginger and lemongrass adds a zing that awakens the senses and makes the familiar feel new. It’s a quick way to turn a humble bowl into a bright, healing potion.

    Why I Keep Coming Back to This Soup

    The balance of zing and comfort keeps me reaching for this recipe. It’s a quick fix for dull days, but also a celebration of bright, lively flavors that wake up the palate. Plus, it’s endlessly adaptable—add noodles, swap herbs, or toss in leftover veggies. It’s a bowl I never tire of making or eating.

    What’s in This Soup? A Breakdown

    • Chicken thighs or breasts: Juicy, tender meat that absorbs flavors well; I prefer thighs for richness, but breasts work too.
    • Fresh ginger: Sharp, spicy, and invigorating; peel and slice thin for quick infusion.
    • Lemongrass stalks: Bright, lemony aroma that’s both exotic and grounding; bruise before adding.
    • Chicken broth: The flavorful base, homemade if possible, but good quality store-bought works.
    • Lime juice and cilantro: Finish with a pop of citrus and fresh herbaceous notes; they make the flavors sing.
    • Onions and garlic: The aromatic foundation that builds depth; sauté until golden.
    • Salt and pepper: Basic seasonings that tie everything together.

    Tools of the Trade for a Flavorful Broth

    • Large stockpot: To simmer everything evenly and develop flavors.
    • Knife and chopping board: For prepping garlic, ginger, and herbs.
    • Ladle: To serve the hot broth and shredded chicken.
    • Tongs: To handle hot chicken pieces safely.
    • Measuring cups and spoons: For precise broth and seasoning measurements.

    Step-by-Step for a Cozy, Fragrant Chicken Soup

    Step 1: Start by gathering all your ingredients and tools. Make sure the chicken is nicely thawed.

    Step 2: In a large pot, heat a tablespoon of oil over medium heat. Add diced onions and stir until translucent, about 5 minutes.

    Step 3: Add chopped garlic, ginger, and a stalk of lemongrass (bruised to release flavor). Sauté until fragrant, about 2 minutes.

    Step 4: Pour in 8 cups of chicken broth, then add chicken pieces. Bring to a gentle boil, then lower to simmer.

    Step 5: Skim off any foam that rises to the surface. Let simmer until chicken is tender, about 30 minutes.

    Step 6: Remove the chicken, shred it, and return it to the broth. Adjust seasoning with salt and pepper.

    Step 7: Add a splash of lime juice and chopped cilantro at the end for brightness.

    Cooking Cues to Watch For

    • Onions should be soft and slightly golden.
    • Broth should be clear and fragrant, not murky or greasy.
    • Chicken is perfectly cooked when it shreds easily and is no longer pink.
    • Lemongrass should be tender and fragrant, not tough or bitter.

    Common Pitfalls and How to Avoid Them

    • Boiling too vigorously.? Use gentle heat when simmering to prevent cloudy broth.
    • Leaving foam to sink and cloud the broth.? Skim foam regularly for a clearer soup.
    • Adding citrus too early, which dulls the brightness.? Add lime and herbs at the end for fresh flavor.
    • Serving undercooked or unevenly shredded chicken.? Ensure chicken is fully cooked and shredded before returning to broth.

    Bright Lemongrass Chicken Soup

    This vibrant chicken soup combines tender chicken thighs with aromatic ginger, fresh lemongrass, and flavorful broth to create a comforting yet lively dish. The soup is finished with bright lime juice and cilantro, resulting in a clear, fragrant bowl with tender chicken pieces and a zingy, herbal finish.
    Prep Time 15 minutes
    Cook Time 40 minutes
    Total Time 55 minutes
    Servings: 4
    Course: Main Course
    Cuisine: Asian
    Calories: 250

    Ingredients
      

    • 4 pieces chicken thighs preferably bone-in, skinless
    • 1 inch fresh ginger peeled and sliced thin
    • 2 stalks lemongrass bruised to release flavor
    • 8 cups chicken broth preferably homemade or good quality store-bought
    • 1 lime lime juice freshly squeezed
    • 1/4 cup cilantro chopped
    • 1 medium onion diced
    • 3 cloves garlic minced
    • 1 teaspoon salt
    • 1/2 teaspoon black pepper

    Equipment

    • Large stockpot
    • Knife and chopping board
    • Ladle
    • Tongs
    • Measuring cups and spoons

    Method
     

    1. Gather all your ingredients and prep your tools, ensuring the chicken is thawed and ready to cook.
    2. Heat a large stockpot over medium heat and add a splash of oil. Once hot, add diced onions and cook, stirring occasionally, until they turn translucent and fragrant, about 5 minutes.
    3. Add minced garlic, sliced ginger, and bruised lemongrass stalks to the pot. Sauté for about 2 minutes until the mixture is aromatic and begins to sizzle.
    4. Pour in the chicken broth and add the chicken thighs to the pot. Bring the mixture to a gentle boil, then reduce the heat to low and let it simmer, uncovered, for 30 minutes, skimming off foam as it rises.
    5. Remove the chicken thighs from the broth, place them on a cutting board, and shred the meat with two forks. Return the shredded chicken to the pot and stir to combine.
    6. Season the soup with salt and pepper, tasting for balance. Add a splash of lime juice for brightness and stir well.
    7. Just before serving, stir in chopped cilantro and give the soup a final taste test to adjust seasoning if needed.
    8. Ladle the hot, fragrant soup into bowls and enjoy immediately, savoring the bright, comforting flavors and tender chicken pieces.

    Notes

    For a richer flavor, you can add noodles or leftover vegetables. Be sure to remove the lemongrass stalks before serving, as they are tough and inedible. Fresh herbs and citrus at the end really elevate the dish’s brightness.
    This soup is all about layering flavors—bright, warming, and a little unexpected. I love how the lemongrass and ginger lift the usual chicken soup into something fresh and lively. It’s perfect for a quick, comforting meal that feels special, even on busy days. Feel free to add noodles or veggies to make it even heartier.

  • dinner recipes with chicken breast

    dinner recipes with chicken breast

    Chicken breast often gets a bad rap for being dry, but when cooked right, it’s a blank canvas for flavor. I love roasting it with lemon and herbs because it’s simple but feels special. The oven’s gentle heat keeps the meat juicy while infusing it with citrusy brightness. This isn’t a fuss-free dinner, but it’s one where every step rewards you with a tender, fragrant plate.

    Why I Keep Coming Back to This Recipe

    It’s reliable and adaptable, perfect for nights when I want something impressive without fuss. The lemon and herbs keep it feeling fresh, even after reheating. Plus, the simple technique makes me confident every time, whether I’m cooking for myself or guests.

    Inside the Ingredients of Flavor

    • Chicken breasts: Lean, tender, cooks quickly, perfect for roasting or pan-searing.
    • Lemon slices: Bright, zesty, and slightly caramelized, they add freshness and a smoky sweetness.
    • Fresh herbs (thyme, rosemary): Aromatic, earthy, they infuse the chicken with herbal depth.
    • Olive oil: Rich and fruity, it helps crisp the skin and carries flavors.
    • Salt and pepper: Basic seasoning, essential for bringing out all the flavors.
    • Garlic (optional): Adds a fragrant punch if you want a more savory profile.
    • White wine or broth (optional): De-glazing the pan adds richness and moisture.

    Tools of the Trade for this Chicken

    • Heavy ovenproof skillet: For searing and roasting in the same pan, no transfer needed.
    • Sharp knife: To slice lemons and herbs finely.
    • Meat thermometer: To ensure chicken reaches the perfect internal temp.
    • Tongs: For flipping and handling hot ingredients safely.

    Step-by-Step: Mastering the Roasted Lemon Herb Chicken Breast

    Step 1: Preheat your oven to 200°C (392°F).

    Step 2: Pat the chicken breasts dry with paper towels to ensure browning.

    Step 3: Rub the chicken with olive oil, salt, pepper, and chopped fresh herbs like thyme and rosemary.

    Step 4: Slice a lemon thinly and set aside.

    Step 5: Heat a heavy ovenproof skillet over medium-high heat for about 2 minutes.

    Step 6: Sear the chicken breasts, skin-side down if they have skin, until golden brown, about 4 minutes.

    Step 7: Flip the chicken, add lemon slices to the pan, and cook for another 2 minutes.

    Step 8: Transfer the skillet to the oven and roast for 15-20 minutes, until the internal temp hits 75°C (165°F).

    Step 9: Remove from oven, let rest for 5 minutes, then serve with lemon slices and herbs.

    Cooking Checkpoints & Tips

    • Chicken should be golden and firm but not dry.
    • Lemon slices should be slightly caramelized and fragrant.
    • The internal temperature must reach 75°C (165°F) for safety.
    • Juices should run clear when pierced with a skewer.

    Common Mistakes & How to Fix Them

    • Chicken is pale and undercooked.? Increase oven temperature to 220°C (428°F) if chicken isn’t browning.
    • Juicy chicken turns dry when sliced too soon.? Let the chicken rest longer if juices run out when cut.
    • Pan looks empty and dry after searing.? Add a splash of broth or wine if pan is too dry during roasting.
    • Chicken is rubbery or overdone.? Use a meat thermometer to avoid overcooking.

    Roasted Lemon Herb Chicken Breast

    This dish features chicken breasts roasted with lemon slices and fresh herbs, resulting in tender, juicy meat with a fragrant, slightly caramelized exterior. The gentle oven heat infuses the chicken with citrus and herbal flavors, creating a bright and satisfying main course. The final appearance boasts golden-brown skin, aromatic herbs, and lemon slices that are slightly caramelized.
    Prep Time 10 minutes
    Cook Time 25 minutes
    Total Time 35 minutes
    Servings: 4
    Course: Main Course
    Cuisine: Mediterranean
    Calories: 320

    Ingredients
      

    • 4 pieces chicken breasts skin-on preferred for crispiness
    • 2 tablespoons olive oil
    • 1 teaspoon salt
    • 1/2 teaspoon black pepper
    • 2 cloves garlic minced, optional
    • 2 sprigs fresh thyme
    • 2 sprigs fresh rosemary
    • 1 lemon thinly sliced
    • 1/4 cup white wine or broth optional, for deglazing

    Equipment

    • Heavy ovenproof skillet
    • Sharp knife
    • Meat thermometer
    • Tongs

    Method
     

    1. Preheat your oven to 200°C (392°F). Set an ovenproof skillet on the stove over medium heat and let it warm up for about 2 minutes.
    2. Pat the chicken breasts dry with paper towels. This helps achieve a nice, crispy exterior.
    3. Rub the chicken with olive oil, then season generously with salt and pepper. Press chopped herbs like thyme and rosemary onto the meat for added flavor.
    4. Thinly slice the lemon into rounds and set aside. These will be added during searing for caramelization and flavor.
    5. Place the chicken breasts skin-side down in the hot skillet. Sear for about 4 minutes until the skin is golden and crispy, listening for a gentle sizzle and watching for browning.
    6. Flip the chicken using tongs and quickly add lemon slices around the meat. Cook for another 2 minutes, allowing the lemon to become fragrant and slightly caramelized.
    7. Transfer the skillet to the preheated oven and roast for 15-20 minutes. Use a meat thermometer to check that the internal temperature reaches 75°C (165°F).
    8. Once cooked, remove the skillet from the oven, transfer the chicken to a plate, and let it rest for 5 minutes to retain juices.
    9. If desired, deglaze the skillet with white wine or broth, scraping up the browned bits to create a flavorful sauce.
    10. Slice the rested chicken and serve topped with the caramelized lemon slices and fresh herbs, with a drizzle of the pan sauce if made.

    Notes

    Ensure the chicken reaches the proper internal temperature for safety. Resting the meat helps keep it juicy. Feel free to customize herbs or add garlic for extra flavor.
    This dish is about balancing the bright acidity of lemon with the savory depth of herbs. It’s straightforward but feels fancy enough for a quick weeknight or a small dinner party. The key is to let the chicken rest — that’s when all the juices settle and you get that tender bite. Feel free to tweak the herbs or add a splash of white wine in the pan for extra complexity.

  • quick chicken breast recipes

    quick chicken breast recipes

    Most quick chicken recipes rely on marinades or sauces, but I’ve found that the real trick is in the prep and pan heat. Thin, even slices cook fast but need attention so they don’t dry out. This method is about searing with a simple spice rub that’s forgiving and delivers a caramelized flavor.

    Why I Keep Coming Back to This Recipe

    It’s fast, forgiving, and endlessly adaptable. I love how a simple spice rub can turn plain chicken into something flavorful in minutes. Plus, it’s reliable on busy nights when I don’t want to fuss but still crave good, honest food.

    The Building Blocks of Quick Chicken

    • Chicken breasts: My go-to for quick, lean protein—tender when sliced thin.: Use fresh, skinless, boneless breasts for best results. Slightly pounding them helps with even cooking.
    • Salt and pepper: Basic, but essential—brings out the chicken’s natural flavor.: Don’t skimp; they’re the foundation for flavor.
    • Smoked paprika: Adds a subtle smoky depth.: Look for smoked, not sweet paprika, for that earthy aroma.
    • Olive oil: For searing—hot enough to sizzle but not burn.: Choose a good-quality extra virgin for flavor.
    • Lemon: Brightens everything.: A squeeze after cooking lifts the dish—use fresh lemon for zing.
    • Garlic powder: Quick flavor, no fuss.: Use sparingly to avoid overpowering the delicate chicken.
    • Herbs (optional): Fresh thyme or parsley for freshness.: Add at the end for a pop of color and aroma.

    Tools of the Trade for Fast Chicken

    • Sharp Chef’s Knife: For slicing chicken thinly for quick cooking.
    • Cutting Board: Provides a stable surface for slicing.
    • Skillet (preferably cast iron): Ensures even heat and great crust.
    • Tongs: For flipping chicken without piercing.
    • Instant-Read Thermometer: Checks doneness precisely.

    Steps to Sear and Perfect Your Chicken Breast Quickly

    Step 1: Start with a sharp knife and a sturdy cutting board. Slice the chicken breasts horizontally to create thinner cutlets. This helps them cook quickly and evenly.

    Step 2: Pat the chicken dry with paper towels. Moisture on the surface can cause steaming, not searing.

    Step 3: Season generously with salt, pepper, and a splash of smoked paprika for depth.

    Step 4: Heat a tablespoon of oil in a skillet over medium-high heat—about 190°C (375°F). When shimmering, add the chicken.

    Step 5: Cook the chicken for about 3-4 minutes per side. Look for a golden-brown crust that’s not burnt.

    Step 6: Check for doneness by slicing into the thickest part—juices should run clear, and the meat should be firm but juicy.

    Step 7: Remove the chicken from the pan. Let it rest for 5 minutes before slicing. Resting allows juices to redistribute.

    Step 8: Serve with a squeeze of lemon or your favorite quick sauce. Keep the pan juices for a flavorful dip.

    Cooking Checkpoints and Tips for Juicy, Crispy Chicken

    • The chicken should have a deep golden crust, not pale or burned.
    • Juices run clear when pierced with a knife—no pink or red.
    • The internal temperature hits 74°C (165°F) for safe, juicy meat.

    Common Mistakes and How to Fix Them

    • Cooking by eye can lead to dry or underdone chicken.? Use a thermometer to avoid overcooking or undercooking.
    • Cutting immediately causes juices to escape.? Let the chicken rest 5 minutes.
    • Burning the outside while the inside remains raw.? Keep the heat steady at medium-high.
    • Relying solely on pre-seasoned chicken can be bland.? Adjust seasoning to taste before serving.

    Quick Pan-Seared Chicken Breasts

    This recipe features thinly sliced chicken breasts seasoned with a simple spice rub, seared in a hot skillet to develop a golden crust. The method emphasizes careful prep and precise heat to achieve juicy, tender meat with a flavorful caramelized exterior. Finished with a squeeze of lemon, it’s perfect for a fast, satisfying meal.
    Prep Time 10 minutes
    Cook Time 10 minutes
    Total Time 20 minutes
    Servings: 4
    Course: Main Course
    Cuisine: American
    Calories: 250

    Ingredients
      

    • 4 pieces boneless, skinless chicken breasts preferably fresh
    • 1 teaspoon salt to taste
    • 1/2 teaspoon black pepper freshly ground
    • 1 teaspoon smoked paprika for depth of flavor
    • 1 tablespoon olive oil extra virgin preferred
    • 1 lemon lemon for squeezing after cooking

    Equipment

    • Sharp chef’s knife
    • Cutting board
    • Skillet (preferably cast iron)
    • Tongs
    • Instant-read thermometer

    Method
     

    1. Use a sharp knife and cutting board to slice each chicken breast horizontally into thin cutlets, about 1/2 inch thick. This helps them cook quickly and evenly, perfect for searing.
    2. Pat the sliced chicken dry with paper towels to remove excess moisture, ensuring a good sear and preventing steaming.
    3. Combine salt, black pepper, and smoked paprika in a small bowl, then generously season both sides of each chicken cutlet, pressing the spices in lightly.
    4. Heat olive oil in a cast iron skillet over medium-high heat until shimmering and just starting to smoke, about 2 minutes.
    5. Carefully place the seasoned chicken slices into the hot skillet, laying them flat without crowding the pan. You should hear a sizzle.
    6. Cook the chicken for about 3-4 minutes without moving it, until the edges turn golden brown and the underside develops a caramelized crust.
    7. Flip each piece using tongs and cook for another 3-4 minutes, checking for a deep golden crust and firm texture.
    8. Check doneness with an instant-read thermometer; the internal temperature should reach 74°C (165°F). The juices should run clear when pierced.
    9. Remove the chicken from the skillet and let it rest on a plate for 5 minutes, allowing the juices to redistribute and keeping the meat tender.
    10. Squeeze fresh lemon over the rested chicken to brighten the flavors, and serve immediately with your favorite sides.
    These chicken breasts are all about speed and flavor. They hold up well to quick marinades or simple spice rubs, making them perfect for weeknights when time is tight but you still want something satisfying. Feel free to tweak the seasonings or serve them atop a salad or pasta. Once you get the hang of the timing, this recipe becomes a reliable go-to.

  • stuffed chicken breast recipes

    stuffed chicken breast recipes

    Stuffed chicken breasts are a surprisingly forgiving way to elevate a simple dinner. I love how a few ingredients, layered with care, can turn poultry into something special. This recipe’s twist is stuffing with a smoky, cheesy blend that melts into every fiber. It’s comfort food with a little edge, perfect for cold nights or when you need a quick, satisfying meal.

    Why I Keep Coming Back to This Recipe

    Because it’s fast, forgiving, and endlessly customizable. The smoky cheese blend paired with tender chicken is addictive. Every time I make it, I get a little excited about trying new fillings or toppings. It’s a go-to comfort with a twist, perfect for both casual dinners and small gatherings.

    Ingredient Breakdown & Tips

    • Chicken breasts: Use thick, even breasts; they cook uniformly and hold the stuffing well.
    • Cheese (mozzarella or provolone): Oozy, melts beautifully, adding that irresistible stretch and flavor.
    • Spinach or herbs: Fresh herbs brighten the stuffing, add a pop of green and fresh aroma.
    • Smoked paprika: Adds a smoky depth, complementing the richness of the cheese.
    • Olive oil: For crisping the exterior and adding flavor—use good quality.
    • Garlic: A touch of minced garlic in the stuffing gives a subtle, aromatic punch.
    • Lemon zest (optional): Brightens the dish with a hint of citrus—just a touch on the filling.

    Tools & Equipment You’ll Need

    • Sharp paring knife: To carve a clean pocket in the chicken.
    • Baking sheet with parchment paper: Prevents sticking and makes cleanup easier.
    • Meat thermometer: To check the chicken’s internal temperature.
    • Mixing bowl: To prepare the stuffing mixture.
    • Basting brush: To apply oil or butter for crisping.

    The Art of Stuffing & Cooking Chicken Breasts

    Step 1: Preheat your oven to 200°C (390°F).

    Step 2: Lay the chicken breasts flat on a cutting board.

    Step 3: Slice a pocket into each chicken breast, careful not to cut all the way through.

    Step 4: Season the inside and outside with salt, pepper, and a hint of smoked paprika.

    Cooking Checkpoints & Tips for Success

    • Chicken should reach an internal temperature of 75°C (165°F).
    • The filling should be hot and slightly bubbly before removing from oven.
    • The chicken’s juices run clear when pierced.
    • The exterior should be golden and crispy, not burnt.

    Common Mistakes & How to Fix Them

    • Pocket tears open during stuffing.? Use a sharp knife to avoid tearing the chicken.
    • Overstuffed chicken collapses or doesn’t cook evenly.? Don’t overfill the pocket, or the stuffing spills out.
    • Chicken remains undercooked or unevenly cooked.? Ensure oven is preheated for even cooking.
    • Juices run out and dry the meat.? Rest the chicken for 5 minutes before slicing.

    Stuffed Chicken Breasts with Smoky Cheese and Herbs

    This dish features tender chicken breasts carefully carved to create a pocket, then filled with a smoky, cheesy blend accented with fresh herbs and garlic. Baked until golden and crispy on the outside with gooey, melted cheese inside, it offers a satisfying combination of crispness and juiciness. The preparation highlights simple techniques that turn basic ingredients into a comforting yet elevated main course.
    Prep Time 15 minutes
    Cook Time 25 minutes
    Total Time 40 minutes
    Servings: 4
    Course: Main Course
    Cuisine: American
    Calories: 380

    Ingredients
      

    • 4 pieces chicken breasts preferably thick and even
    • 1 cup cheese (mozzarella or provolone) shredded
    • 1 cup fresh spinach or herbs chopped
    • 1 teaspoon smoked paprika for smoky depth
    • 2 tablespoons olive oil for brushing
    • 2 cloves garlic minced
    • 1 teaspoon lemon zest optional, for brightness
    • to taste salt and pepper

    Equipment

    • Sharp paring knife
    • Baking sheet with parchment paper
    • Meat thermometer
    • Mixing bowl
    • Basting brush

    Method
     

    1. Preheat your oven to 200°C (390°F) and line a baking sheet with parchment paper.
    2. Lay each chicken breast flat on a cutting board and gently slice a horizontal pocket into the thick side, being careful not to cut all the way through.
    3. In a mixing bowl, combine shredded cheese, chopped herbs or spinach, minced garlic, smoked paprika, lemon zest (if using), and a pinch of salt and pepper, then mix well.
    4. Stuff each chicken pocket generously with the cheese mixture, pressing lightly to pack it in without tearing the meat.
    5. Brush the exterior of each stuffed chicken breast with olive oil using a basting brush, ensuring all sides are coated for crisping.
    6. Place the stuffed chicken breasts on the prepared baking sheet and bake in the preheated oven until golden brown and cooked through, about 25 minutes, or until the internal temperature reaches 75°C (165°F).
    7. Once cooked, remove the chicken from the oven and let it rest for 5 minutes, allowing the juices to settle.
    8. Slice into the chicken to reveal the melted, cheesy stuffing inside, and serve hot with your favorite sides.

    Notes

    For extra flavor, sprinkle additional smoked paprika or fresh herbs before serving. Adjust stuffing quantities to your preference for more cheesiness or herbs.
    This dish is more than just a protein fix; it’s a canvas for your flavor fantasies. The crispy edges, the oozy center, the burst of herbs—each bite is a small celebration. Feel free to swap in your favorite cheeses or herbs to make it uniquely yours. Once you master the technique, it’s a quick win on busy nights or when you want to impress without fuss.

  • juicy chicken breast recipes

    juicy chicken breast recipes

    Chicken breasts are deceptively tricky—so much potential for dryness if you’re not careful. I’ve found that a little technique goes a long way, especially when it comes to searing and resting. This approach brings out a smoky, tender bite that feels like a little indulgence on a weeknight.

    There’s a quiet satisfaction in mastering the juicy chicken method—no fuss, just good ingredients and a mindful touch. It’s a recipe that’s forgiving once you get the rhythm down, and the payoff is a moist, flavorful piece every time.

    Why I Keep Coming Back to This Technique

    It’s simple but effective, rewarding patience with juicy, flavorful results every time. The process builds confidence and reminds me that good cooking is about understanding heat and timing. Plus, it’s flexible—seasonings and herbs are easily tweaked to suit my mood or what’s in the fridge.

    Breaking Down the Ingredients for Juicy Chicken

    • Chicken breasts: Choose thick, even pieces for uniform cooking and moisture retention.
    • Salt: Enhances flavor and helps with browning—don’t skimp.
    • Pepper: Adds a sharp contrast to the savory sear.
    • Smoked paprika: Gives a deep, smoky aroma and color—skip if you prefer mild.
    • Oil (vegetable or canola): High smoke point, helps get that crispy crust.
    • Lemon (optional): Brightens the flavor—squeeze over right before serving.
    • Herbs (thyme, rosemary): Optional, but adds an aromatic touch to the finish.

    Tools of the Trade for Juicy Chicken

    • Heavy skillet (cast iron preferred): Provides even heat and a good sear.
    • Meat thermometer: Ensures perfect doneness without guesswork.
    • Tongs: Handles the chicken safely and helps flip without piercing.
    • Paper towels: Patting chicken dry for optimal sear.
    • Aluminum foil: Resting the chicken to retain juices.

    Step-by-Step for Perfectly Juicy Chicken Breast

    Step 1: Start by selecting thick, even chicken breasts—no thin, uneven pieces that dry out too fast.

    Step 2: Pat the chicken dry with paper towels; moisture is the enemy of good searing and juicy results.

    Step 3: Season generously with salt, pepper, and a pinch of smoked paprika for depth and a smoky aroma.

    Step 4: Heat a heavy skillet—cast iron works best—over medium-high heat until it’s just about to smoke.

    Step 5: Add a splash of oil; it should shimmer immediately. Place chicken breasts skin side down if they have skin.

    Step 6: Sear without moving for about 5-6 minutes or until the underside is golden and crispy.

    Step 7: Flip the breasts; cook for another 5-7 minutes, adjusting heat to keep the outside from burning.

    Step 8: Check doneness by using a meat thermometer—aim for 65°C (149°F) in the thickest part.

    Step 9: Let the chicken rest for at least 5 minutes to allow juices to redistribute. Cover loosely with foil.

    Step 10: Slice against the grain and serve—juicy, tender, with a slight smoky crust.

    Cooking Checkpoints & Tips to Keep in Mind

    • Ensure the pan is hot enough before adding chicken; it prevents sticking and promotes even searing.
    • Look for a deep golden crust before flipping; it’s a sign of proper caramelization.
    • Use a meat thermometer to avoid overcooking—juicy chicken starts at 65°C (149°F).
    • Rest the chicken at least 5 minutes; slicing too early releases all the juices.

    Common Mistakes & How to Fix Them

    • Overcooking or cooking on too high heat.? If chicken is dry, lower the heat slightly and cook for less time.
    • Pan too hot or not enough oil.? Add a splash of broth or water to the pan if chicken sticks or burns.
    • Not resting the meat after cooking.? Rest the chicken longer if juices run clear too quickly.
    • Cooking in too thick a piece without checking temperature.? If chicken is underdone, return it to the pan for a minute or two.

    Juicy Pan-Seared Chicken Breasts

    This recipe features thick, evenly cut chicken breasts seared to develop a flavorful, golden crust while remaining tender and moist inside. Using a simple seasoning blend and precise heat control, the method emphasizes searing and resting to achieve a smoky, juicy bite with minimal fuss. The final result is a visually appealing, succulent chicken with a crispy exterior and a perfectly cooked interior.
    Prep Time 10 minutes
    Cook Time 15 minutes
    Total Time 25 minutes
    Servings: 4
    Course: Main Course
    Cuisine: American
    Calories: 250

    Ingredients
      

    • 4 pieces chicken breasts preferably thick and even in size
    • 1 teaspoon salt for seasoning generously
    • ½ teaspoon pepper adds contrast to the sear
    • ½ teaspoon smoked paprika optional, for smoky flavor and color
    • 2 tablespoons oil (vegetable or canola) high smoke point for searing
    • 1 lemon lemon optional, for brightening flavor
    • fresh thyme or rosemary optional, for aromatic finish

    Equipment

    • Heavy skillet (cast iron preferred)
    • Meat thermometer
    • Tongs
    • Paper towels
    • Aluminum foil

    Method
     

    1. Pat the chicken breasts dry thoroughly with paper towels to remove excess moisture, which helps achieve a crisp sear.
    2. Generously season each piece with salt, pepper, and smoked paprika, rubbing the spices into the meat for even coverage.
    3. Heat the skillet over medium-high heat until it’s just about to shimmer and feels hot to the touch, with a faint smoke in the air.
    4. Add the oil to the hot pan, swirling to coat the surface evenly. When it shimmers and starts to smoke lightly, you’re ready to add the chicken.
    5. Place the chicken breasts into the skillet, skin-side down if they have skin, and press gently to ensure contact with the pan. Let cook undisturbed for about 5-6 minutes until the underside is deep golden and crispy, with sizzling sounds and a fragrant aroma filling the air.
    6. Flip the chicken breasts carefully using tongs, and cook for an additional 5-7 minutes, adjusting heat if necessary to prevent burning but still maintaining a steady sizzle.
    7. Check for doneness by inserting a meat thermometer into the thickest part of the chicken — it should register around 65°C (149°F). If needed, cook a minute or two longer to reach this temperature.
    8. Remove the skillet from heat and transfer the chicken to a plate. Cover loosely with foil and let rest for at least 5 minutes, allowing juices to redistribute and ensuring each bite remains moist.
    9. Squeeze fresh lemon juice over the rested chicken, and sprinkle with herbs if using, to add a bright, aromatic finish.
    10. Slice the chicken against the grain into thick slices, revealing a juicy, tender interior with a beautifully caramelized crust.
    11. Serve these succulent slices on a plate, enjoying the crispy exterior and moist, flavorful interior—perfect for a weeknight dinner or a quick, satisfying meal.

    Notes

    For extra flavor, add fresh herbs during the resting period or squeeze lemon just before serving. Always rest the chicken to keep juices locked in for maximum moistness.
    This recipe is all about understanding the importance of heat control and patience. The crispy exterior combined with that moist, tender center is a balance that takes practice but pays off every time. Feel free to tweak the seasonings or add a splash of lemon to brighten it up—your kitchen, your rules. Enjoy the process, and savor every bite, knowing you’ve cracked the code on juicy chicken.

  • air fryer chicken breast recipes

    air fryer chicken breast recipes

    Cooking chicken breast in an air fryer feels like cheating—until you taste it. It’s a game of timing and heat, turning a potentially dry cut into something juicy and tender. Plus, it’s fast, no mess, just crispy goodness in a pinch.
    What I love about this approach is how forgiving it is. A little seasoning, a hot air blast, and you’re done. It’s perfect for busy weeknights or when you crave something straightforward but satisfying.

    Why I keep coming back to this recipe

    It’s reliable, quick, and endlessly customizable. I like the control—the crispy crust, the juicy interior. Sometimes, I just need a straightforward win when dinner feels like a chore, and this always delivers.

    Breaking down the ingredients, honestly

    • Chicken breasts: Lean, tender, and versatile—perfect for quick cooking and absorbing flavors.
    • Olive oil: Helps crisp the skin and carry seasonings—use sparingly to avoid greasiness.
    • Salt and pepper: Basic but essential—enough to enhance, not overpower.
    • Smoked paprika: Adds a smoky depth—try chipotle for a spicy kick.
    • Seasonings of your choice: Garlic powder, thyme, or cumin—customize to your mood.
    • Lemon zest or juice: Brightens flavors—use at the end for a fresh contrast.

    Tools of the trade for perfect air fryer chicken

    • Air fryer: To cook evenly with hot air for crispy, juicy chicken.
    • Meat thermometer: To check internal temperature and avoid overcooking.
    • Tongs: To flip the chicken without piercing the meat.
    • Paper towels: To dry the chicken for better seasoning adherence.

    Step-by-step for juicy, crispy air fryer chicken breast

    Step 1: Start by patting your chicken breasts dry with paper towels. This helps the seasoning stick and the skin crisp up.

    Step 2: Preheat your air fryer to 200°C (390°F) for about 3 minutes. Hot air is key for that golden exterior.

    Step 3: Rub the chicken breasts with olive oil, then season generously with salt, pepper, and a pinch of smoked paprika for depth.

    Step 4: Place the breasts in the air fryer basket, skin-side down if skin-on, making sure they’re not crowded. Cook for 10 minutes.

    Step 5: Flip the chicken, then cook for another 8-10 minutes, or until the internal temp hits 75°C (165°F).

    Step 6: Let rest for 5 minutes before slicing. Resting keeps the juices locked in.

    Step 7: Check for doneness by pressing lightly—if it feels firm but has a little jiggle, it’s ready.

    Cooking checkpoints and tips to get it just right

    • Look for a golden crust that’s crisp but not burnt.
    • Use a meat thermometer to ensure internal temp reaches 75°C (165°F).
    • The chicken should feel firm but with a slight jiggle when gently pressed.

    Common mistakes and how to fix them

    • Not drying, leading to less crisp skin.? Pat the chicken dry thoroughly before seasoning.
    • Dry chicken, resulting in uneven browning.? Use enough oil for a thin coating.
    • Soggy or unevenly cooked sides.? Flip the chicken halfway.
    • Undercooked chicken, risk of foodborne illness.? Ensure the internal temp reaches 75°C (165°F).

    Air Fryer Chicken Breast

    This recipe features chicken breasts cooked in an air fryer to achieve a crispy exterior and juicy interior. The key steps involve seasoning, preheating, and flipping the chicken to ensure even cooking and a golden crust. The final dish is tender, flavorful, and beautifully browned, perfect for a quick, satisfying meal.
    Prep Time 5 minutes
    Cook Time 20 minutes
    Total Time 25 minutes
    Servings: 2
    Course: Main Course
    Cuisine: American
    Calories: 250

    Ingredients
      

    • 2 pieces chicken breasts boneless, skinless
    • 1 tablespoon olive oil helps crisp the exterior
    • 1 teaspoon salt to enhance flavor
    • 1/2 teaspoon black pepper freshly ground if possible
    • 1/2 teaspoon smoked paprika for smoky depth
    • 1 teaspoon garlic powder optional for extra flavor
    • Zest of 1 lemon lemon zest brightens the flavor

    Equipment

    • Air fryer
    • Meat thermometer
    • Tongs
    • Paper towels

    Method
     

    1. Pat the chicken breasts dry with paper towels until the surface feels smooth and no moisture remains. This step helps the seasoning adhere and the skin crisp up nicely.
    2. Preheat your air fryer to 200°C (390°F) for about 3 minutes—this ensures a hot environment for crispy results.
    3. In a small bowl, mix the olive oil with salt, pepper, smoked paprika, garlic powder, and lemon zest to create a flavorful seasoning blend.
    4. Rub the seasoning mixture evenly over both sides of each chicken breast, coating thoroughly for maximum flavor.
    5. Place the seasoned chicken breasts in the air fryer basket, making sure they are not crowded and have space around them for hot air circulation.
    6. Cook the chicken for 10 minutes, then carefully flip each breast using tongs, ensuring the crispy side stays up.
    7. Continue cooking for another 8-10 minutes, or until the internal temperature reaches 75°C (165°F). Use a meat thermometer to check for doneness.
    8. Once cooked, remove the chicken breasts from the air fryer and let them rest for 5 minutes on a cutting board. This helps lock in the juices.
    9. Slice the chicken breasts against the grain, revealing juicy, tender meat with a crispy exterior.
    10. Serve immediately, perhaps with a squeeze of fresh lemon for added brightness and flavor.

    Notes

    For extra crispness, spray the chicken lightly with cooking spray before cooking. Adjust seasoning to taste, adding herbs or spices as desired.
    This simple method turns out chicken that’s tender on the inside with a satisfying crispy crust. No need for complicated marinades or lengthy oven waits. It’s about understanding your air fryer’s quirks and letting it do the work. Now, go ahead, tweak the seasonings to suit your mood, and enjoy a quick, satisfying meal.

  • grilled chicken breast recipes

    grilled chicken breast recipes

    I’ve always loved the idea of a chicken breast that’s more than just a bland protein. It’s a chance to play with fire and flavor, to get a little smoky, a little charred, and still keep that tender bite. This approach—grilling over high heat—lets you see the beauty in its simplicity, turning a common ingredient into something memorable.

    Why I Keep Coming Back to This Method

    It’s quick, reliable, and delivers a satisfying bite every time. The smoky flavor and crispy edges remind me of summer nights and backyard cookouts, even in winter. Plus, it’s forgiving enough to tweak with herbs or spices, making it a flexible go-to.

    Breaking Down the Chicken and Seasonings

    • Chicken breast: Lean, tender, and fast-cooking—perfect for quick grilling but needs careful handling.
    • Smoked paprika: Adds a smoky depth that mimics outdoor char; use mild if you prefer less heat.
    • Garlic powder: Gives a savory punch; fresh garlic can be a good substitute but burns faster.
    • Lemon: Brightens everything with zesty acid; skip if you’re not into citrus.
    • Salt and pepper: Fundamental for flavor; don’t skimp on seasoning.
    • Cumin: A hint of earthiness that complements smoky spices; optional but adds depth.
    • Olive oil: Helps seasonings stick and prevents sticking; use a good-quality extra virgin.

    Tools of the Trade for a Perfect Grill

    • Grill or grill pan: Provides the high, direct heat needed for searing and charring.
    • Tongs: Helps flip the chicken without piercing the meat, keeping it juicy.
    • Instant-read thermometer: Ensures you hit the safe internal temperature without guesswork.
    • Basting brush: Optional—adds extra flavor or oil to prevent sticking.

    Grilling a Chicken Breast with Edge and Heart

    Step 1: Start with a good-quality chicken breast, preferably organic or free-range for better flavor.

    Step 2: Pat the chicken dry with paper towels; moisture is the enemy of that perfect sear.

    Step 3: Marinate or season generously—think smoked paprika, garlic powder, a pinch of cumin, and a squeeze of lemon.

    Step 4: Preheat your grill to medium-high, about 200°C (390°F).

    Step 5: Place the chicken on the grill, skin-side down if applicable. Cook for 6–7 minutes, then flip.

    Step 6: Continue grilling for another 6–7 minutes, until the juices run clear and the internal temperature reaches 74°C (165°F).

    Step 7: Remove from heat, tent with foil, and let rest for 5 minutes.

    Step 8: Slice against the grain, admire the smoky char, and serve with a squeeze of fresh lemon.

    Cooking Checkpoints to Nail That Perfect Chicken

    • The chicken should have a rich, golden-brown crust with visible grill marks.
    • The internal temperature must hit 74°C (165°F) — no guessing.
    • Juices should run clear when you pierce the thickest part.
    • The meat should feel firm but spring back when pressed.

    Common Mistakes and How to Fix Them

    • Burnt exterior without cooked interior.? IF THE CHICKEN IS OVER-TORCHED, lower the heat and cook more slowly.
    • Pink juices and soft texture inside.? IF THE CHICKEN IS UNDERCOOKED, increase heat slightly or cook longer.
    • Sticking and tearing.? IF THE chicken sticks to the grill, oil the grates or brush the meat before cooking.
    • Overcooking leading to dryness.? IF THE chicken is dry, don’t cook it beyond 74°C (165°F).

    Smoky Grilled Chicken Breast

    This grilled chicken breast is seasoned with smoky paprika, garlic, and lemon, then cooked over high heat to develop a charred exterior and tender interior. The process creates a juicy, flavorful dish with crispy edges and a hint of smokiness, perfect for summer nights or backyard-inspired meals.
    Prep Time 10 minutes
    Cook Time 14 minutes
    Total Time 24 minutes
    Servings: 4
    Course: Main Course
    Cuisine: Grilling
    Calories: 250

    Ingredients
      

    • 4 pieces chicken breasts preferably organic or free-range
    • 1 tablespoon smoked paprika mild or hot, based on preference
    • 1 teaspoon garlic powder fresh garlic can be used but may burn faster
    • 1 teaspoon cumin optional, adds earthiness
    • 1 lemon lemon for juice and zest
    • 1 teaspoon salt
    • ½ teaspoon black pepper
    • 2 tablespoons olive oil extra virgin preferred

    Equipment

    • Grill or grill pan
    • Tongs
    • Instant-read thermometer
    • Basting brush (optional)

    Method
     

    1. Pat the chicken breasts dry with paper towels to remove excess moisture, which helps achieve a good sear.
    2. In a small bowl, combine smoked paprika, garlic powder, cumin (if using), salt, and black pepper to create a flavorful spice blend.
    3. Zest the lemon directly over the spice mixture, then cut and squeeze out the juice into the bowl. Mix well to combine.
    4. Rub the spice mixture all over the chicken breasts, ensuring even coating on all sides.
    5. Preheat your grill or grill pan to medium-high heat, aiming for about 200°C (390°F). You should see the surface starting to shimmer and slightly smoky.
    6. Brush the grill grates lightly with olive oil or oil the chicken to prevent sticking. Place the chicken breasts on the hot grill, skin-side down if applicable.
    7. Cook for about 6–7 minutes, then flip the chicken using tongs. You should see a deep, golden-brown sear with grill marks forming.
    8. Continue grilling for another 6–7 minutes, until the internal temperature reaches 74°C (165°F) and juices run clear when pierced.
    9. Remove the chicken from the grill and tent loosely with foil. Let it rest for 5 minutes to allow juices to redistribute.
    10. Slice the chicken against the grain, revealing a juicy, smoky interior with crispy, charred edges.
    11. Squeeze fresh lemon over the slices before serving to brighten the flavors and add a zesty finish.
    This recipe is about embracing the imperfect, the smoky, the slightly charred bits that remind you it’s alive. No fancy marinades, just straightforward seasoning and honest heat. It’s simple but deeply satisfying, especially when the grill’s flames crackle and the chicken’s juices shimmer with flavor. Feel free to tweak the spices, add herbs, or serve it over a warm salad — it’s your canvas.

  • baked chicken breast recipes

    baked chicken breast recipes

    Baking chicken breasts can be a delicate balance between dry and underdone. I’ve learned that scoring the meat helps it cook evenly and stay juicy. Plus, it’s a great way to infuse flavor directly into the meat, not just on the surface.

    Why I Keep Coming Back to This Simple Roast

    It’s quick, forgiving, and endlessly adaptable. The scoring technique guarantees juicy bites, and the lemon-garlic combo lifts the flavor beyond basic chicken. It’s a recipe I rely on when I want something satisfying without fuss, especially during busy weeks or when I need a meal that feels fresh and bright.

    Ingredient Breakdown and Substitution Tips

    • Olive oil: A good splash keeps the chicken moist and adds a subtle fruitiness. Swap with avocado oil for higher smoke point.
    • Lemon zest: Brightens the flavor and cuts through richness. Use lime zest for a different citrus vibe.
    • Garlic: Infuses savory notes. Fresh is best, but garlic powder works in a pinch.
    • Fresh herbs: Adds aromatic complexity. Dried can be used but use half the amount.
    • Chicken breasts: The star, tender when cooked right. Bone-in thighs can replace if you prefer juiciness.
    • Salt and pepper: Fundamentals for seasoning. Tweak with smoked paprika for a smoky depth.
    • Herbs and spices: Customize with thyme, rosemary, or chili flakes for variety.

    Tools of the Trade for Perfect Chicken

    • Baking sheet: Provides even heat and space for air circulation.
    • Meat thermometer: Ensures perfect doneness without guesswork.
    • Sharp knife: For scoring and slicing the chicken.
    • Pastry brush: To baste with juices or marinade.

    Step-by-Step for Juicy, Flavorful Baked Chicken Breasts

    Step 1: Preheat your oven to 200°C (390°F).

    Step 2: Pat the chicken breasts dry, then gently score the thick side to help cook evenly.

    Step 3: Mix olive oil, lemon zest, garlic, and herbs in a small bowl.

    Step 4: Rub the marinade all over the chicken, making sure to get into the scores.

    Step 5: Place chicken breasts on a baking sheet lined with parchment paper.

    Step 6: Bake for 20-25 minutes, until the edges are golden and the internal temp hits 75°C (165°F).

    Step 7: Halfway through, baste with the juices from the tray to keep it moist.

    Step 8: Let rest for 5 minutes before slicing so juices stay locked in.

    Cooking Checkpoints & Tips to Nail It

    • The internal temperature reaches 75°C (165°F).
    • The edges are golden and slightly crisp.
    • Juices run clear when pierced with a knife.

    Common Mistakes and How to Fix Them

    • Cooking without checking internal temp.? Add a few extra minutes if chicken isn’t at temp; oven variances matter.
    • Burning the outside before the inside is cooked.? Cover with foil if edges darken too fast; reduce oven temp.
    • Guessing doneness by sight.? Use a meat thermometer for accuracy.
    • Cutting immediately, losing juices.? Let meat rest before slicing.

    Juicy Lemon-Garlic Baked Chicken Breasts

    This dish features chicken breasts that are scored to promote even cooking and maintain juiciness. Coated in a vibrant lemon-garlic herb marinade, they bake to golden perfection with a tender, moist texture and bright flavor. The simple technique ensures flavorful, visually appealing chicken every time.
    Prep Time 10 minutes
    Cook Time 25 minutes
    Total Time 35 minutes
    Servings: 4
    Course: Main Course
    Cuisine: American
    Calories: 210

    Ingredients
      

    • 4 pieces chicken breasts boneless, skinless
    • 2 tablespoons olive oil or avocado oil
    • 1 zest lemon for zesting
    • 3 cloves garlic minced
    • 1 teaspoon dried herbs such as thyme or rosemary, optional
    • to taste salt and pepper

    Equipment

    • Baking sheet
    • Meat thermometer
    • Sharp knife
    • Pastry brush

    Method
     

    1. Preheat your oven to 200°C (390°F) and line a baking sheet with parchment paper.
    2. Pat the chicken breasts dry with paper towels, then gently score the thick side of each with a sharp knife, creating 2-3 shallow cuts. This helps the marinade penetrate and ensures even cooking.
    3. Combine olive oil, lemon zest, minced garlic, dried herbs, salt, and pepper in a small bowl to make a flavorful marinade.
    4. Rub the marinade all over the chicken breasts, making sure to get into the scores and coat evenly. Let sit for 5 minutes to absorb the flavors.
    5. Place the chicken breasts on the prepared baking sheet with the scored side up, spaced apart for even heat circulation.
    6. Bake in the preheated oven for 20-25 minutes, or until the edges turn golden and the internal temperature reaches 75°C (165°F). Use a meat thermometer to check for perfect doneness.
    7. Halfway through baking, baste the chicken with the juices from the tray using a pastry brush to keep it moist and flavorful.
    8. Once cooked, remove the chicken from the oven and let it rest for 5 minutes to allow the juices to redistribute.
    9. Slice the chicken against the grain, revealing a juicy, tender interior with a bright lemon-herb flavor.
    10. Serve immediately, enjoying the moist texture and vibrant citrus aroma.
    This baked chicken breast is a simple way to elevate a weeknight dinner. It’s forgiving, fast, and endlessly adaptable with whatever herbs or citrus you have. Once you get the hang of scoring and basting, it’s hard to go back to plain chicken. Enjoy it solo or toss into salads, wraps, or pasta for a satisfying meal.