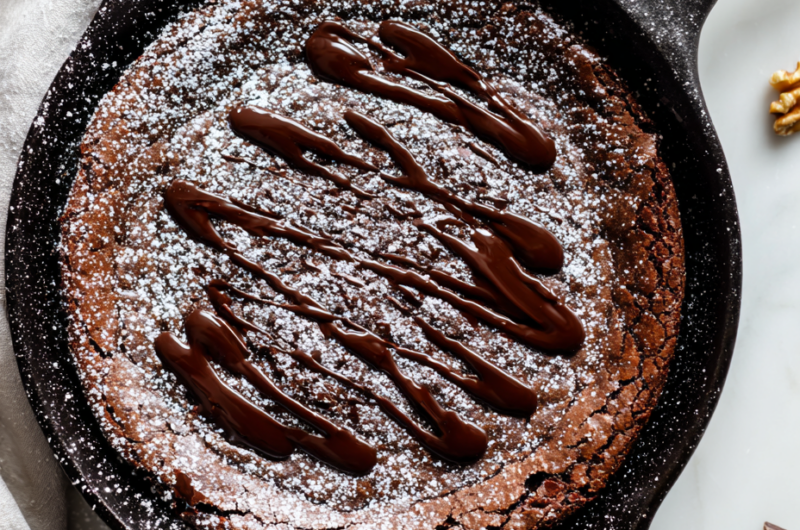
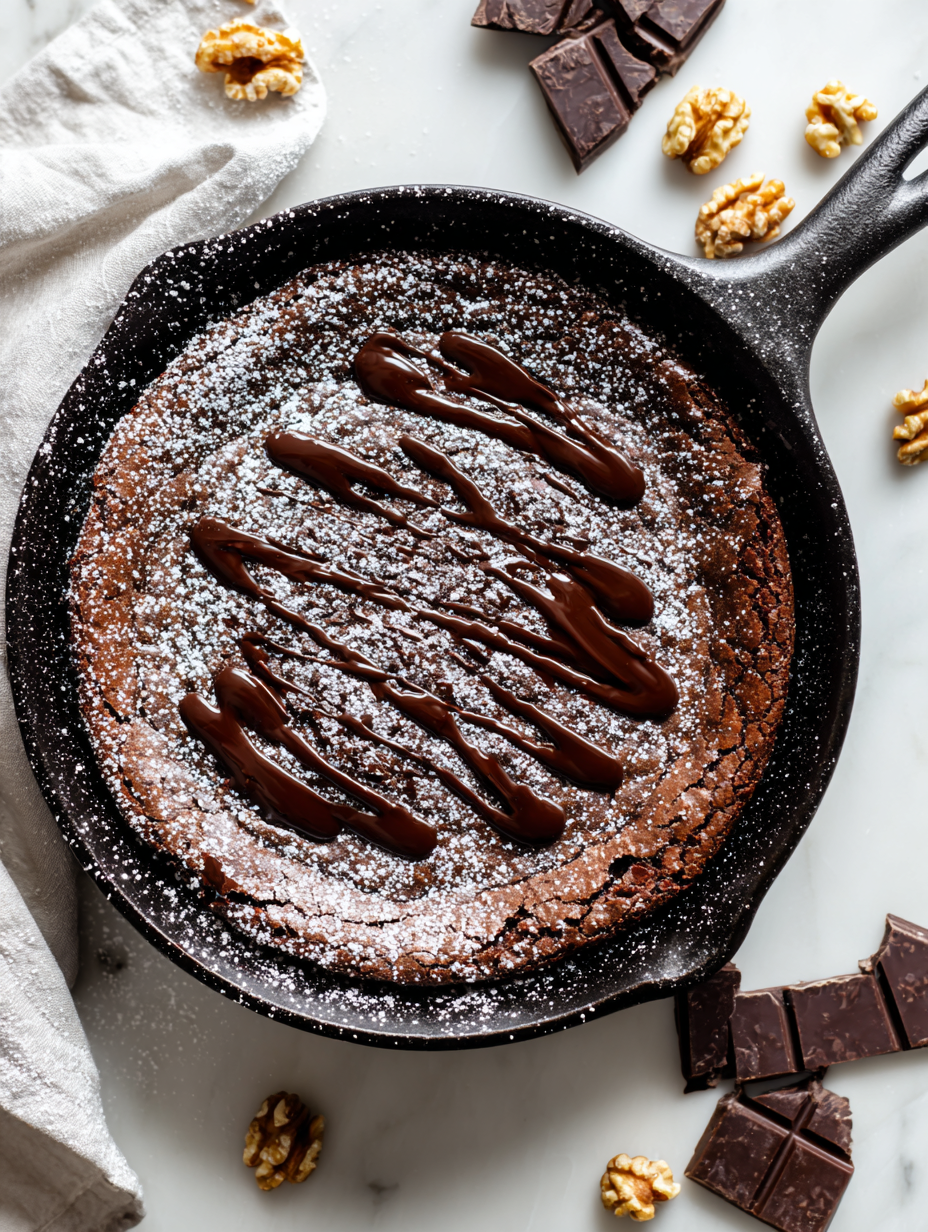
Baking brownies in a cast-iron skillet isn’t just about making dessert; it’s about capturing that rustic, almost old-world charm. The skillet’s heavy sides and seasoned surface create a crackly crust that contrasts beautifully with the fudgy, melt-in-your-mouth center. Every time I do it this way, I feel like I’m reconnecting with the simple joy of honest baking.
There’s something about the way the skillet distributes heat evenly, making every bite just right—crisp on the edges, gooey in the middle. It’s a messy, satisfying process that invites a little chaos and lots of tasting along the way. Plus, serving straight from the skillet makes for a more relaxed, communal dessert moment, where everyone digs in with spoons.
Focusing on how baking brownies in a cast-iron skillet creates a unique crust and fudgy center, blending rustic charm with comfort.
The story behind this recipe
- This recipe is born from late-night baking sessions with my grandmother. We’d melt butter and chocolate together, then stir in sugar and eggs, trying to mimic her favorite bakery’s rich, dense brownies. Those moments, filled with the smell of cocoa and warm chatter, stuck with me and shaped how I bake now.
- Once, I added a pinch of sea salt on top just before baking, and the contrast of sweet and salty was an instant revelation. It’s funny how small tweaks can transform a simple brownie into something memorable. Now, I keep that salty crunch in my back pocket, always chasing that perfect bite.
- heading: The story behind this recipe
Ingredient breakdown
- Unsweetened cocoa powder: I love the deep, slightly bitter aroma it brings; for an extra chocolate punch, opt for Dutch-processed. Skip if you want a milder flavor.
- Quality dark chocolate: Nothing beats that rich, melting decadence. Use a good bar, and chop it finely so it melts evenly—your brownies will thank you.
- Butter: I prefer salted for that slight hint of saltiness that balances the sweetness, but unsalted works fine if you want control over the salt level. Melt it slowly to avoid splatters.
- Granulated sugar: The sugar’s crunch and sweetness define the texture—don’t skimp, but if you like a less sweet brownie, reduce slightly or try coconut sugar for a caramel vibe.
- Eggs: They add structure and moisture. Room temperature eggs blend better and help create that fudgy, cohesive crumb—cold eggs can cause curdling.
- All-purpose flour: I keep it simple here, but a touch of cocoa powder can deepen the chocolate flavor. Be gentle when folding to keep the batter airy.
- Vanilla extract: Just a splash enhances all the flavors—go for good-quality vanilla; the aroma alone can make the brownies smell divine as they bake.
Spotlight on key ingredients
Dark Chocolate:
- Unsweetened cocoa powder: I love the deep, slightly bitter aroma it brings; for an extra chocolate punch, opt for Dutch-processed. Skip if you want a milder flavor.
- Quality dark chocolate: Nothing beats that rich, melting decadence. Use a good bar, and chop it finely so it melts evenly—your brownies will thank you.
Butter and Sugar:
- Butter: I prefer salted for that slight hint of saltiness that balances the sweetness, but unsalted works fine if you want control over the salt level. Melt it slowly to avoid splatters.
- Granulated sugar: The sugar’s crunch and sweetness define the texture—don’t skimp, but if you like a less sweet brownie, reduce slightly or try coconut sugar for a caramel vibe.
Notes for ingredient swaps
- Dairy-Free: Swap butter for coconut oil or vegan butter—your brownies will be slightly subtler in flavor but just as rich.
- Sugar Alternatives: Use coconut sugar or maple syrup instead of granulated sugar—expect a moister crumb and caramel undertones.
- Gluten-Free: Replace all-purpose flour with a good gluten-free blend—texture might be a tad more delicate, but still decadent.
- Vegan: Use flax eggs (1 tbsp flaxseed + 3 tbsp water per egg) and dairy-free chocolate—will be slightly less fudgy but still satisfying.
- Extra Chocolate: Add a handful of mini chocolate chips or chunks—oozy pockets make each bite more indulgent.
- Cocoa Powder: Dutch-processed versus natural—Dutch is smoother and less acidic, perfect for a deep chocolate flavor.
- Salt: Use sea salt flakes on top before baking—adds a subtle crunch and enhances the chocolate’s richness.
Equipment & Tools
- Cast-iron skillet: Bakes the brownies evenly with rustic crust.
- Saucepan: Melts butter and chocolate smoothly.
- Mixing bowls: Combines ingredients thoroughly.
- Whisk and spatula: Blends eggs and folds batter gently.
- Measuring cups and spoons: Ensures accurate ingredient portions.
- Oven thermometer (optional): Checks oven temperature for precision.
Step-by-step guide to brownies
- Preheat your oven to 180°C (350°F). Find a 20cm (8-inch) cast-iron skillet and give it a quick wipe with paper towel if needed—seasoned surface is best, but a little oil won’t hurt if it’s new.
- Melt 150g (about 10 tbsp) unsalted butter in a small saucepan over low heat. As it melts, add 100g (about 3/4 cup) chopped dark chocolate, stir until smooth and glossy, smell that rich cocoa aroma filling the kitchen. Remove from heat and let cool slightly.
- In a mixing bowl, whisk together 2 large eggs, 150g (3/4 cup) sugar, and 1 tsp vanilla extract until well combined. The mixture should look slightly frothy and feel warm to the touch.
- Pour the cooled chocolate-butter mixture into the eggs and whisk briskly. Sift in 50g (1/2 cup) unsweetened cocoa powder and 70g (1/2 cup) all-purpose flour. Fold gently with a spatula until just combined—don’t overmix, keep it airy.
- Pour the batter into the skillet, spreading evenly. Sprinkle a pinch of sea salt on top for that salty crunch. Place in the oven and bake for 20–25 minutes. The edges should be set but the center still jiggles slightly—smell that chocolatey goodness as it bakes.
- Check for doneness by gently shaking the skillet; the center should wobble just a little. Insert a toothpick into the middle—if it comes out with moist crumbs, it’s ready. If cracks form on top, that’s good, that’s crusty perfection.
- Remove from oven and let sit for 10 minutes. Resting allows the center to set further while keeping it fudgy. Serve straight from the skillet, with a dusting of powdered sugar or a scoop of vanilla ice cream if you like.
Let the brownies rest for about 10 minutes before slicing. Serve directly from the skillet for a casual vibe or transfer to a plate, cutting into wedges. A sprinkle of flaky sea salt enhances that salty-sweet contrast.
How to Know It’s Done
- Edges are firm and slightly pull away from skillet.
- Center jiggles gently but isn’t runny.
- Crust on top is crackly and darkly glossy.
Cast-Iron Skillet Brownies
Ingredients
Equipment
Method
- Preheat your oven to 180°C (350°F). Lightly oil your cast-iron skillet to ensure a seasoned surface or prevent sticking.
- Melt the butter slowly over low heat in a saucepan, then add the chopped dark chocolate, stirring until smooth and glossy. Let it cool slightly while you prepare the other ingredients.
- In a mixing bowl, whisk together the eggs, sugar, and vanilla extract until the mixture is light, slightly frothy, and warm to the touch—this helps incorporate air for a tender crumb.
- Pour the slightly cooled chocolate-butter mixture into the egg mixture and whisk briskly to combine, releasing a rich cocoa aroma.
- Sift the cocoa powder and fold it into the batter gently with a spatula, then add the flour and fold just until combined—avoid overmixing to keep the batter airy and fudgy.
- Pour the batter into the prepared skillet, spreading evenly with a spatula. Sprinkle a tiny pinch of sea salt on top for that salty crunch and flavor contrast.
- Bake in the preheated oven for 20–25 minutes, until the edges are firm and slightly pulled away from the skillet, and the top is crackly and shiny. The center should wobble just a little when shaken.
- Remove the skillet from the oven and let the brownies rest for about 10 minutes; this allows the center to set while keeping it fudgy and moist.
- Slice into wedges directly in the skillet or carefully transfer to a cutting board for neater presentation. Serve warm, perhaps with a sprinkle of flaky sea salt or a scoop of vanilla ice cream for extra indulgence.
Pro tips for perfect brownies
- Use high-quality cocoa powder for a richer, more intense chocolate flavor that really stands out.
- Melt butter and chocolate slowly over low heat to avoid scorching, and smell that deep, warm aroma fill your kitchen.
- Gently fold dry ingredients into wet to keep the batter airy—overmixing can make brownies tough.
- Check for doneness by gently jiggling the skillet; edges should be firm but center still slightly wobbly for fudginess.
- Let brownies rest for at least 10 minutes post-baking—this helps set the center and makes slicing cleaner.
- For a crackly top, bake until a shiny crust forms, then briefly broil if you want extra crunch before cooling.
- Add a pinch of flaky sea salt on top before baking to intensify chocolate richness and add a delightful crunch.
Common mistakes and how to fix them
- FORGOT to check oven temperature → use an oven thermometer for accuracy.
- DUMPED batter into pan too quickly → spread evenly with a spatula immediately.
- OVER-TORCHED edges → cover with foil halfway through baking if edges brown too fast.
- FAILED to let brownies rest → rest 10 minutes for better texture and easier slicing.
Quick fixes and pantry swaps
- When batter is too thick, splash in a teaspoon of milk to loosen it.
- If brownies are dry, cover with a damp towel and microwave for 10 seconds.
- Splash a little vanilla or coffee extract to boost chocolate aroma instantly.
- Patch cracks by gently pressing them down with a spatula before baking.
- Shield edges with foil if they darken or burn during baking, preserving the fudgy center.
Prep, store, and reheat tips
- Prep the batter up to a day in advance; keep it covered in the fridge. The flavors deepen overnight, and the batter firms up, making for easier pouring.
- Brownies can be baked and stored at room temperature in an airtight container for up to 3 days. The crust stays crisp, and the center remains fudgy.
- For longer storage, wrap the cooled brownies tightly in plastic wrap or foil, then freeze for up to 3 months. Thaw at room temperature for about 20 minutes before serving.
- Reheat slices in the microwave for 10-15 seconds until just warm. The smell of melted chocolate should waft up, and the texture will be soft and gooey again.
Brownies Recipe FAQs
1. Why do my eggs need to be at room temperature?
Use room temperature eggs to help them incorporate smoothly into the batter, resulting in a more even crumb.
2. How do I know when brownies are done?
Bake until the edges are firm and slightly pull away from the pan, with a center that jiggles just a bit.
3. Can I bake brownies longer if they look undercooked?
If they seem undercooked, give them a few more minutes, but be careful not to overbake, or they’ll dry out.
4. How can I test if my brownies are baked properly?
Use a toothpick inserted in the center; moist crumbs mean it’s perfect, dry means overbaked.
5. Should I let the brownies cool before cutting?
Let the brownies rest for at least 10 minutes; this helps set the center and makes slicing easier.
6. Why add salt to the brownie batter or top?
Adding a pinch of salt on top before baking enhances the chocolate flavor and adds a nice crunch.
7. What kind of chocolate should I use for the best flavor?
Use high-quality dark chocolate for a richer, more decadent flavor that melts beautifully into the batter.
8. Can I make these brownies dairy-free?
Switch to coconut oil or vegan butter for dairy-free versions, which still give a moist, rich brownie.
9. How should I store leftover brownies?
Store baked brownies in an airtight container for up to 3 days at room temperature or freeze for longer.
10. How do I reheat brownies without drying them out?
Reheat slices briefly in the microwave for 10-15 seconds until warm and gooey again, with a fragrant cocoa smell.
Baking these cast-iron brownies is a reminder that simple ingredients, handled with a bit of care, create something truly satisfying. The aroma of melted chocolate and baked crust makes the house feel warm and inviting, even on the busiest days.
Every time I slice into one, I think about how a little patience and attention to detail can turn a humble batter into a moment of comfort that lingers long after the last bite. It’s not just about dessert—it’s about taking the time to enjoy the small, delicious rituals.

Hi, I’m Noah Bennett, the creator behind Breathing In Flavors. For me, cooking begins with a breath. Before the first bite, before the plating, before the garnish, there is that quiet moment when steam rises and you inhale. That is where flavor truly begins. Breathing In Flavors is my space to slow down, appreciate ingredients, and cook with awareness. I am so glad you’re here.
 The creator behind Breathing In Flavors.
For me, cooking begins with a breath. Before the first bite, before the plating, before the garnish, there is that quiet moment when steam rises and you inhale. That is where flavor truly begins.
Breathing In Flavors is my space to slow down, appreciate ingredients, and cook with awareness. I am so glad you’re here.
The creator behind Breathing In Flavors.
For me, cooking begins with a breath. Before the first bite, before the plating, before the garnish, there is that quiet moment when steam rises and you inhale. That is where flavor truly begins.
Breathing In Flavors is my space to slow down, appreciate ingredients, and cook with awareness. I am so glad you’re here.


